


This no-bake Andes Mint Cheesecake comes together with a cool, creamy mint chocolate filling layered over a crunchy Mint Oreo crust and topped with chocolate chip sweetness. It's an easy homemade dessert finished with a silky ganache and whipped cream that feels rich and fudge-like without ever turning on the oven. You'll get simple tips to help you make the best Mint Chocolate Cheesecake for Christmas cheesecake ideas, holiday desserts, or anytime treats that looks beautiful. Pin this recipe now so you always have a festive no-bake option ready when you need something special without extra effort.
Why this is the best no-bake Andes mint cheesecake recipe
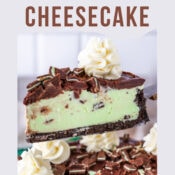
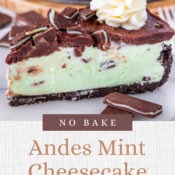
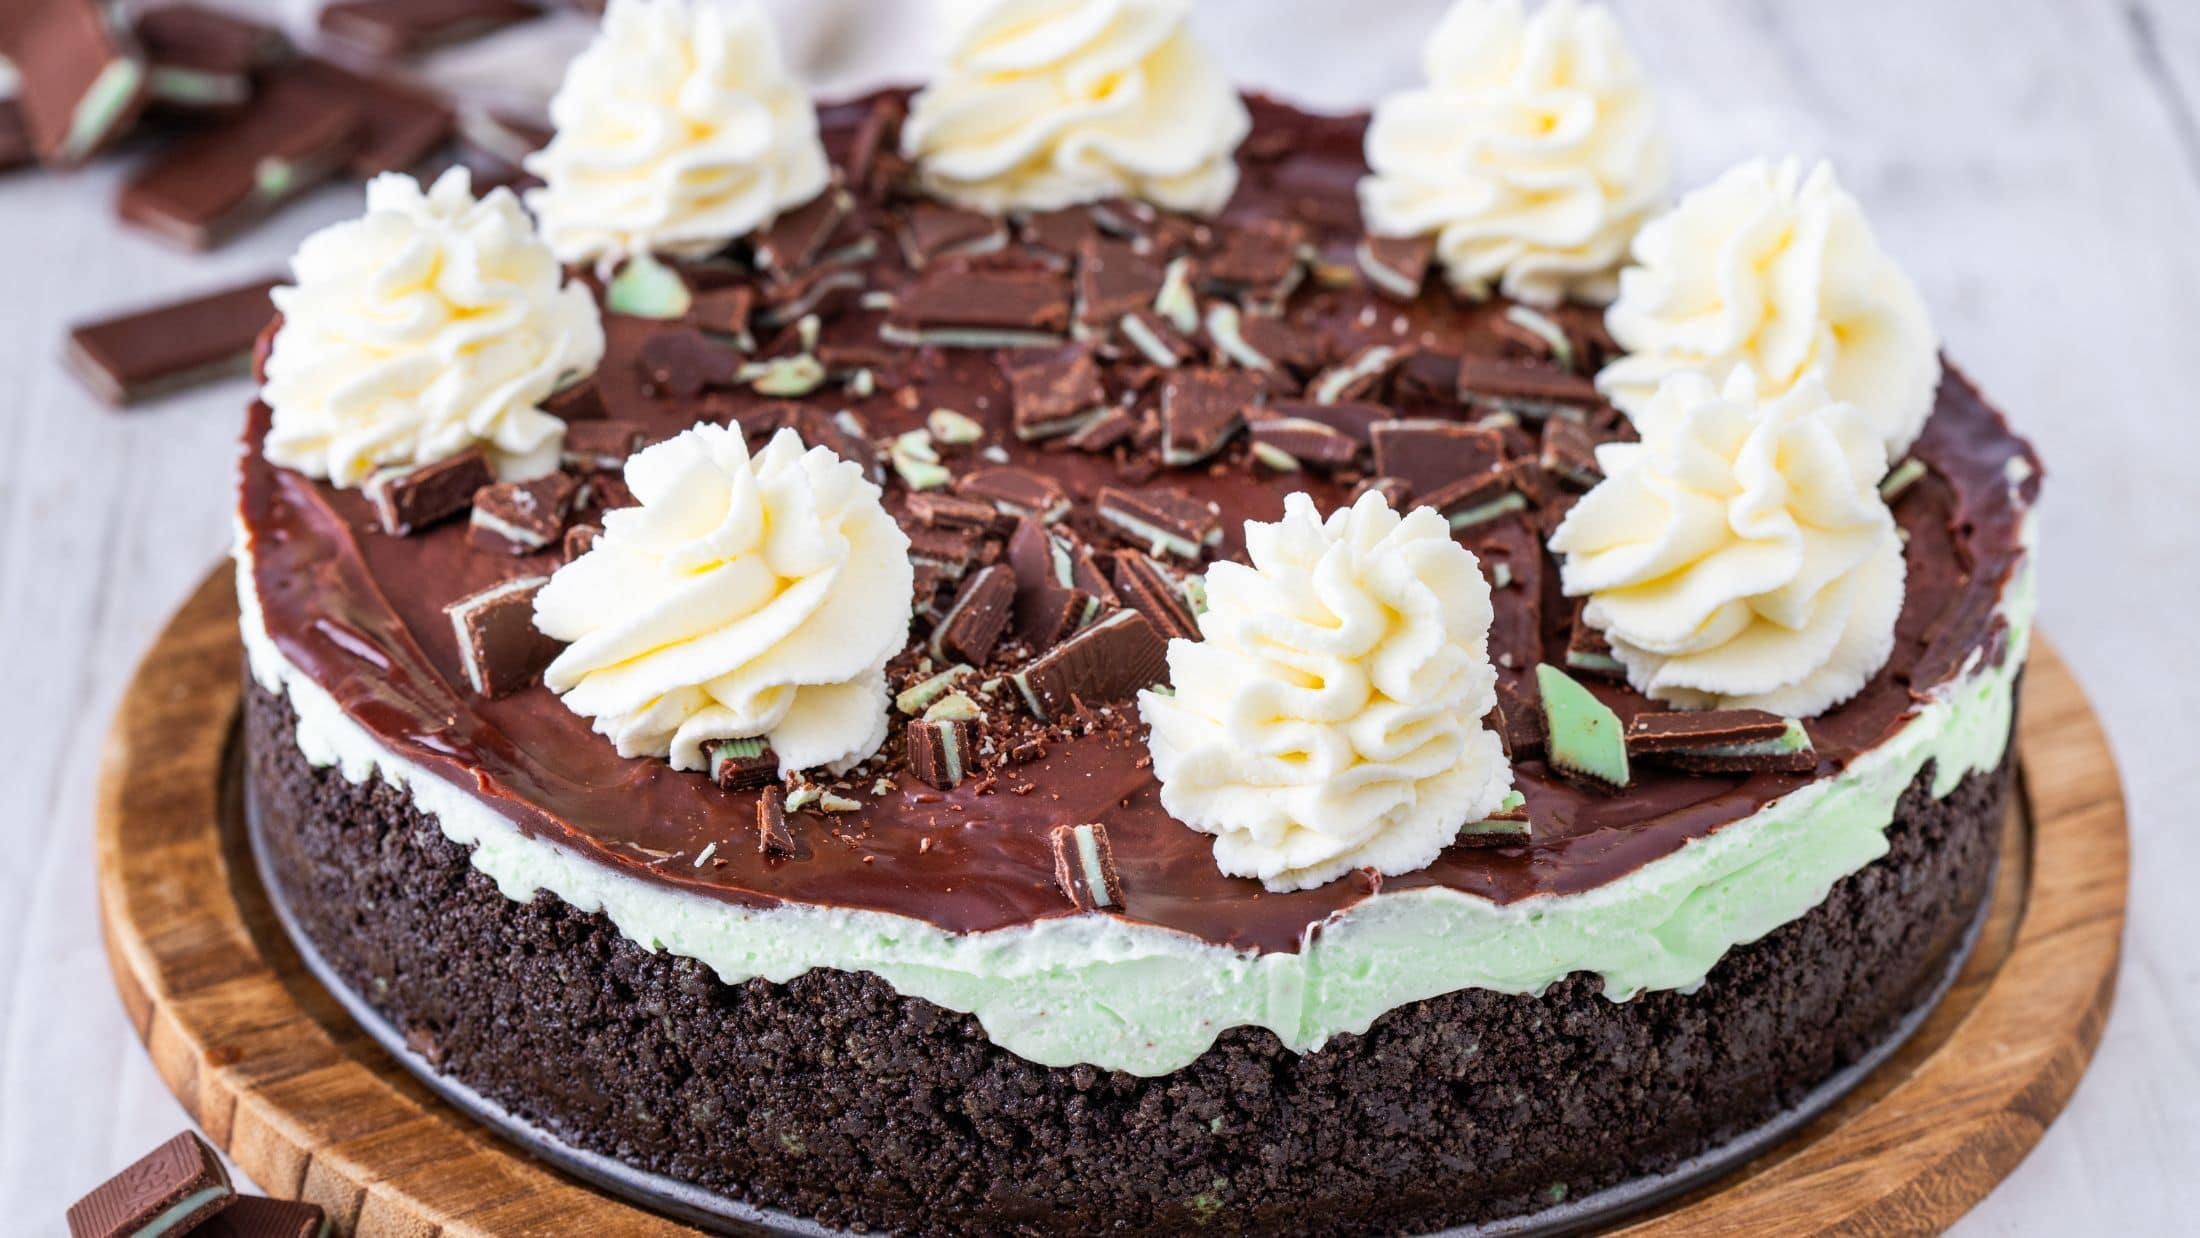
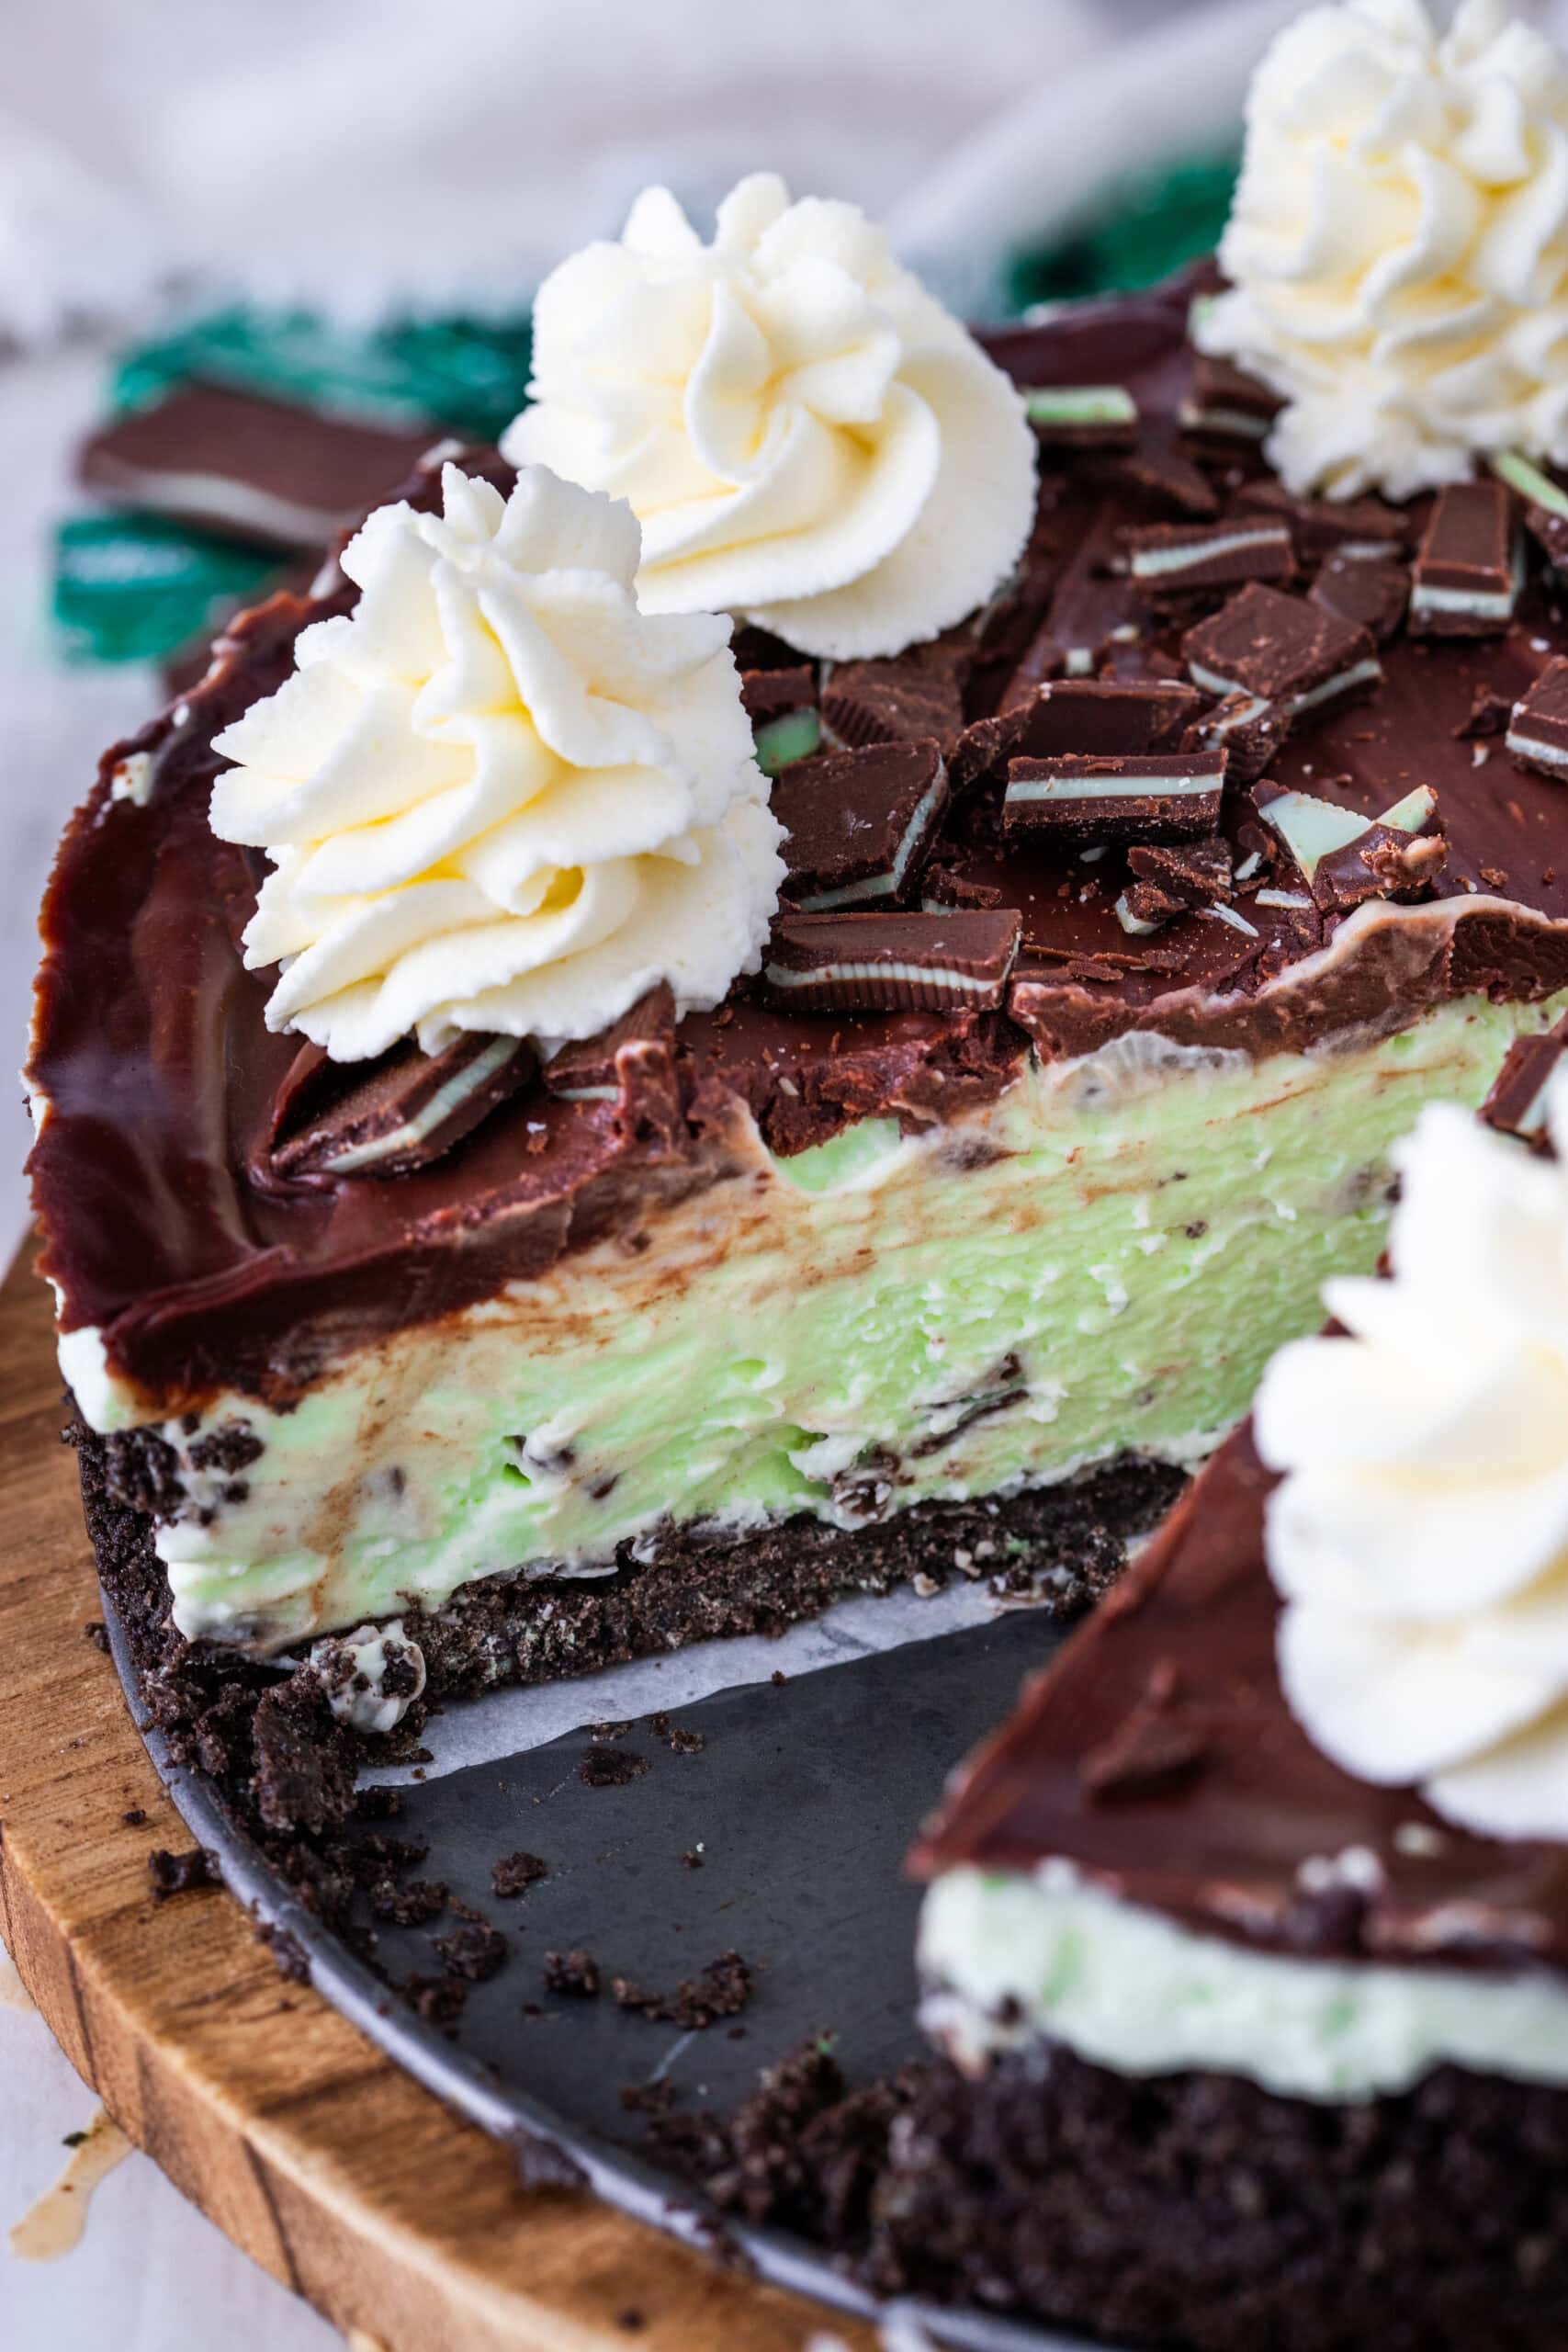
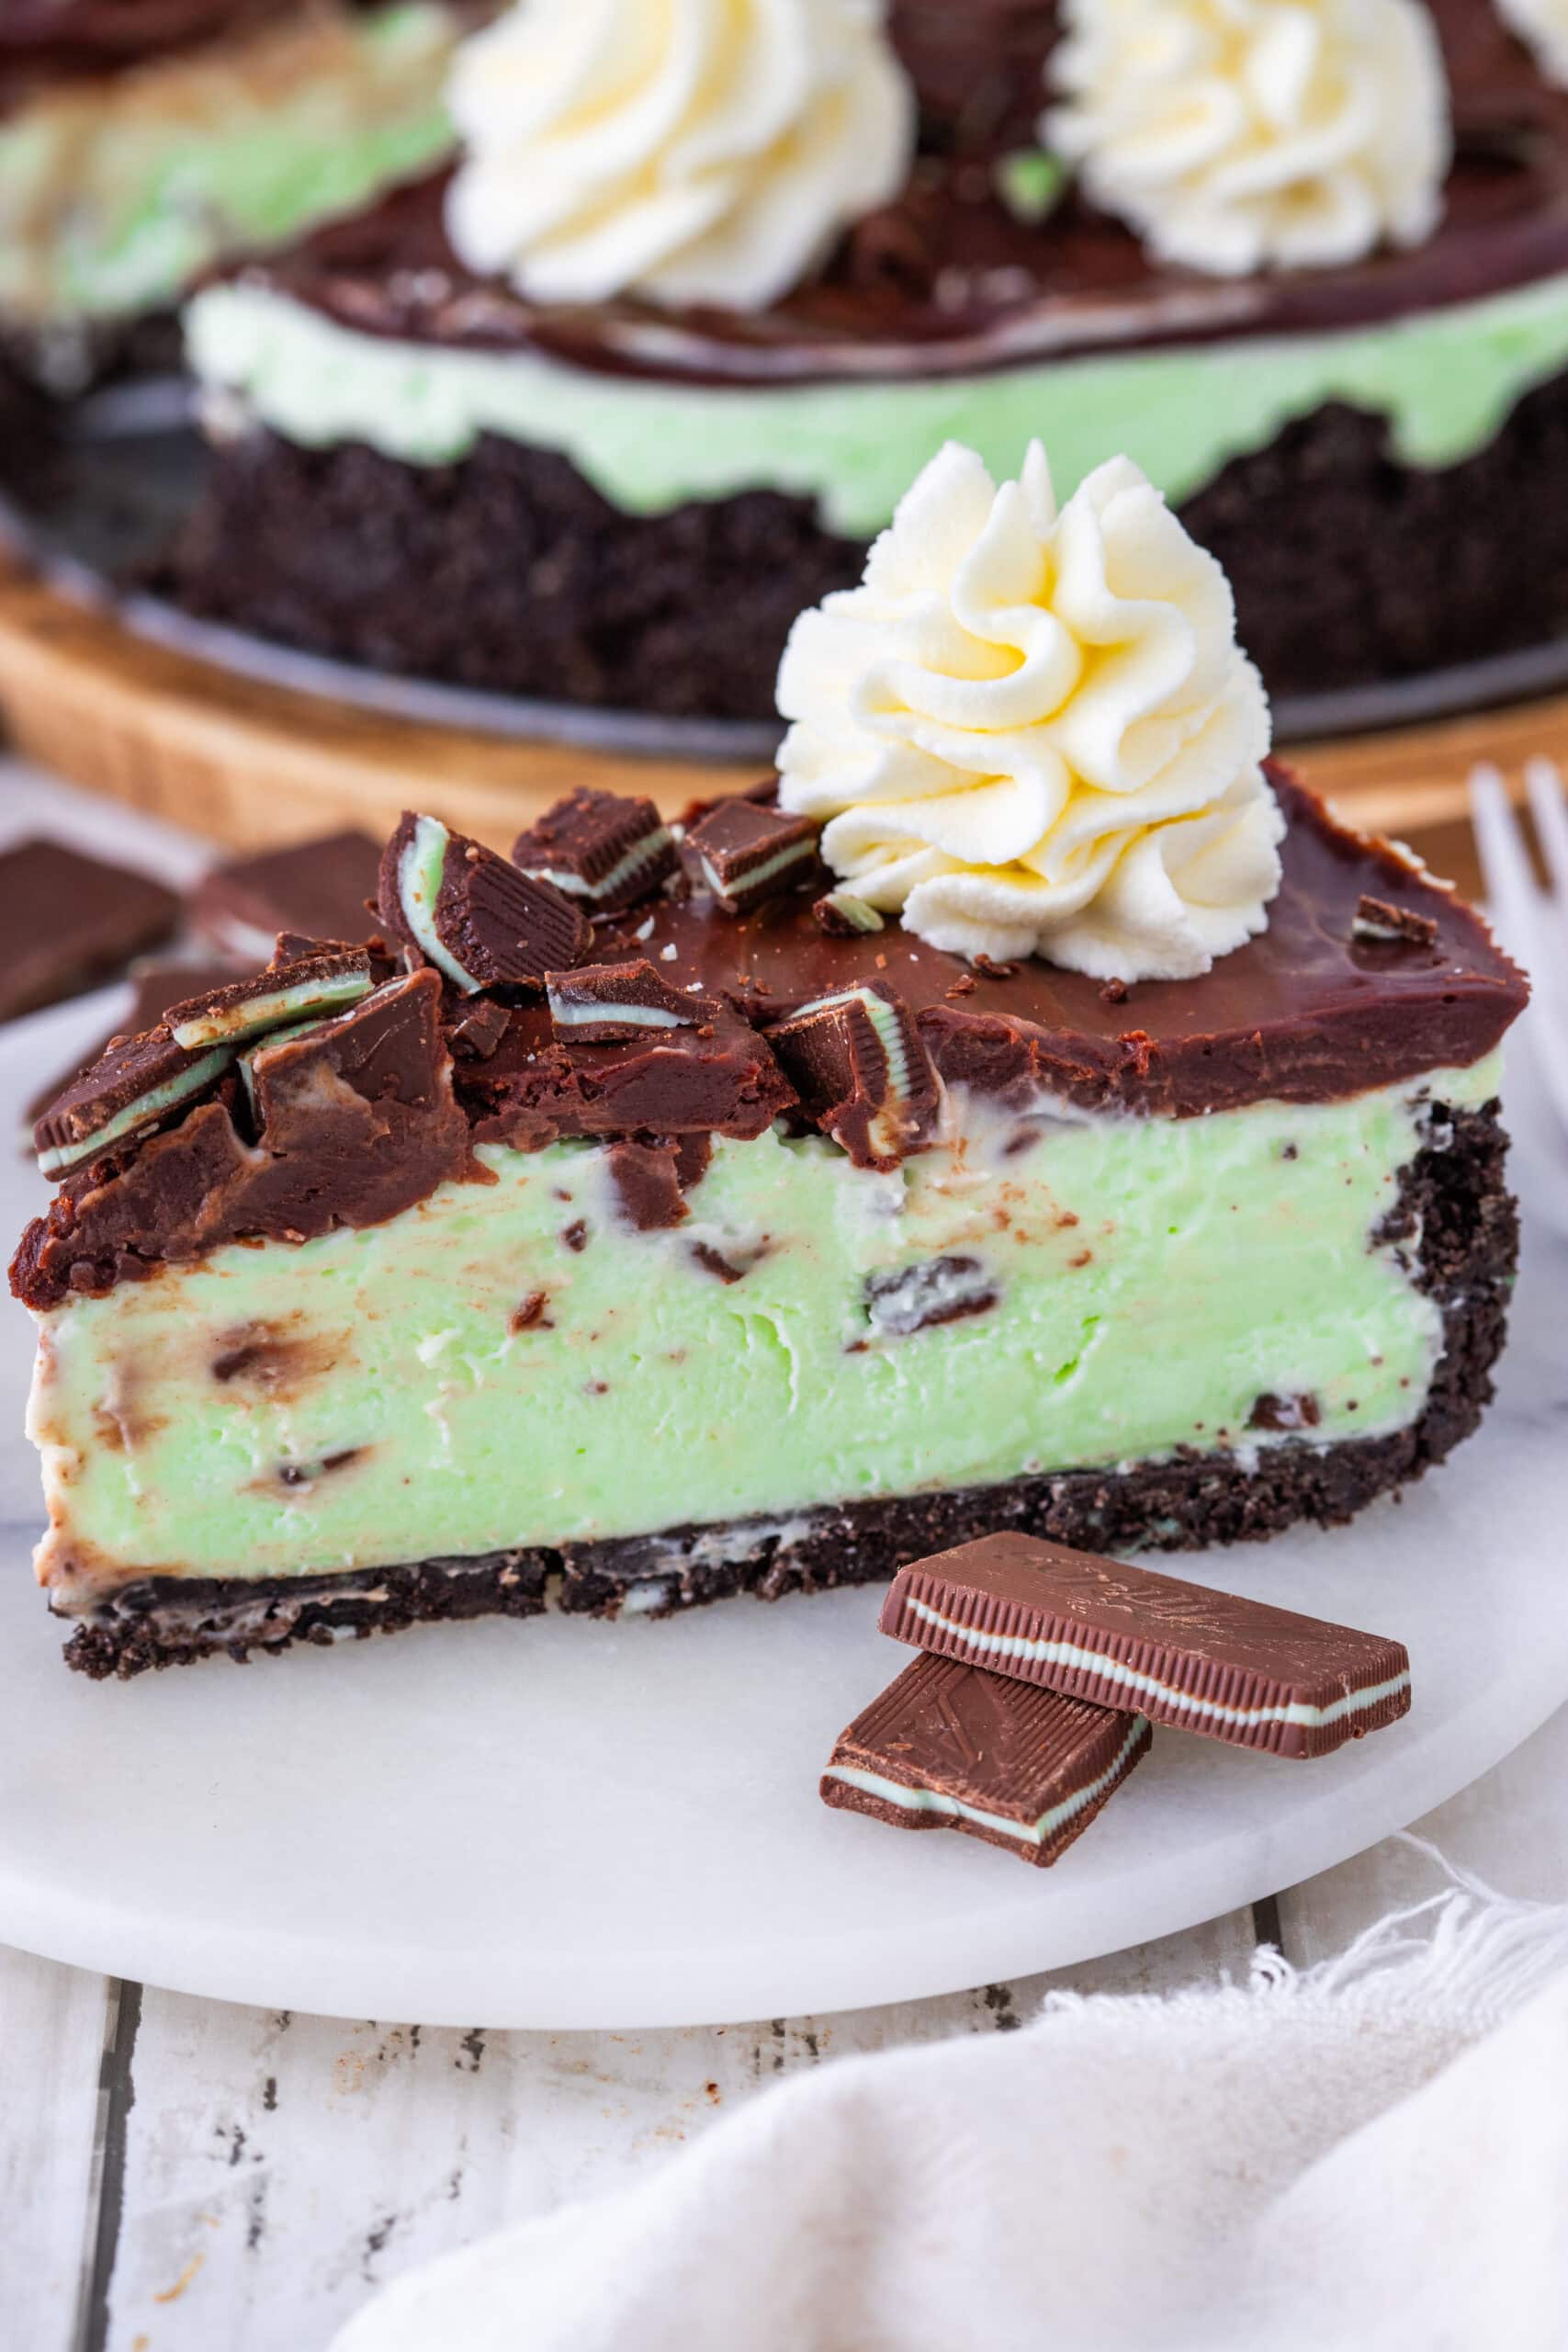
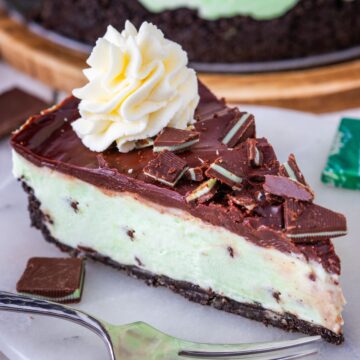
This No-Bake Andes Mint Cheesecake recipe is absolutely delicious! The combination of a homemade Mint Oreo chocolate cookie crust, mint-flavor cream cheese batter, chopped Andes mint chocolates, and then another layer of a chocolate ganache is absolutely divine!
This recipe makes the best dessert! Every bite is filled with rich, chocolately, minty flavor (the best combination!) that will delight both kids and adults alike. No one will want to stop at one slice of this cheesecake!
This is a quick and easy dessert or holiday gathering recipe. Start by making your Mint Oreo crust and pressing it into a springform pan. Create the minty cream cheese batter with a few simple ingredients. Let it chill, then create a quick ganache with 2 ingredients and pour it on top of the chilled cheesecake. Add more chopped Andes mints and whipped cream. That's all there is to it. It's a very easy cheesecake.
The ingredients for the dish are common and easy to find. You likely already have most of the simple ingredients for this easy minty chocolate cheesecake recipe in your pantry. If you need an ingredient or two, you can easily find them in most local grocery stores or on Amazon!
This Andes mint cheesecake recipe tastes amazing! This minty cheesecake is absolutely delicious on its own. But adding an extra-creamy texture of whipped cream piped on top of the cheesecake, along with more Andes chocolates, makes it a delightful dessert any time of the year!

What you'll need to make a No-Bake Mint Cheesecake
Equipment
- Food processor crushes the Oreos into a very fine powder. If you don't have a food processor, place all the Mint Oreos in a zippered plastic bag, squeeze out all the air, and use a rolling pin to crush the cookies into even crumbs. You won't get them as fine as the food processor, but they will work in an oreo crust.
- A springform pan is essential for cheesecakes because the sides open up and release from the edges, making it super easy to slice and serve.
- Electric mixer creams the filling ingredients so the cheesecake is light and fluffy.
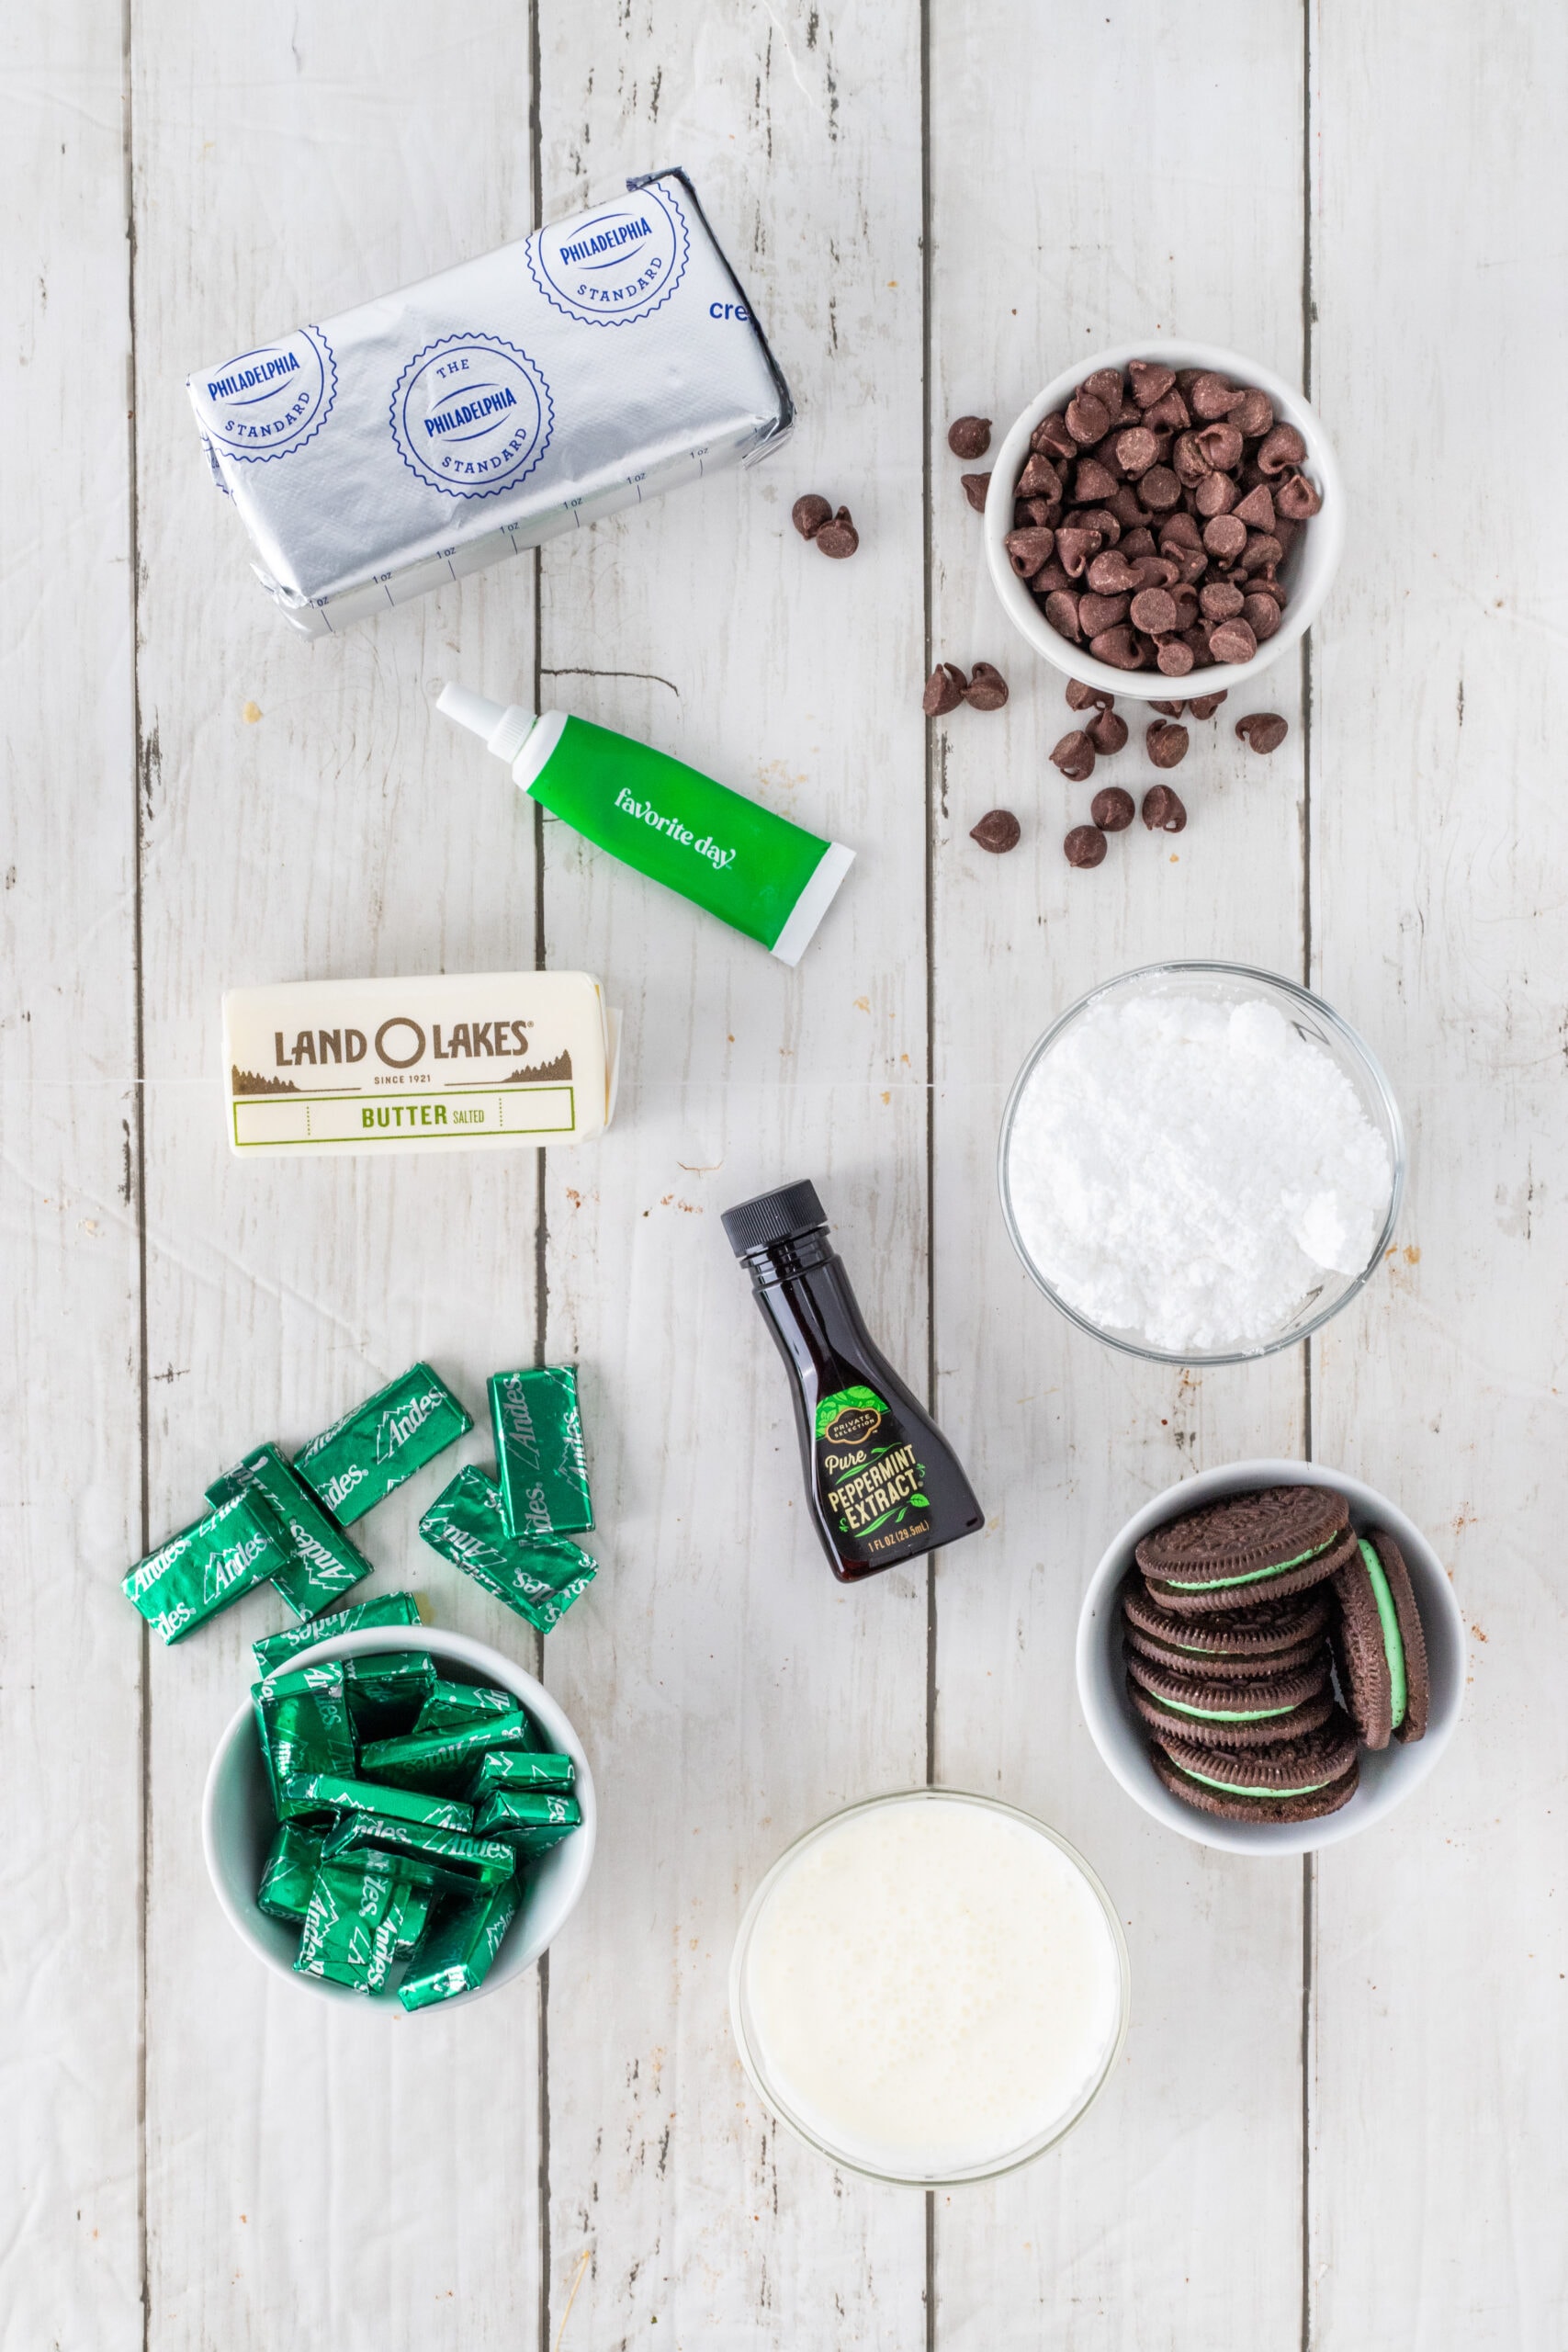
Ingredients
See the printable recipe card at the bottom of the page for all measurements and nutritional information.
- Mint Oreos - You'll be putting these in the food processor to make crumbs to make an easy Oreo crust for your cheesecake.
- unsalted butter - This will need to be melted. If you only have salted butter, go ahead and use it. It won't hurt anything.
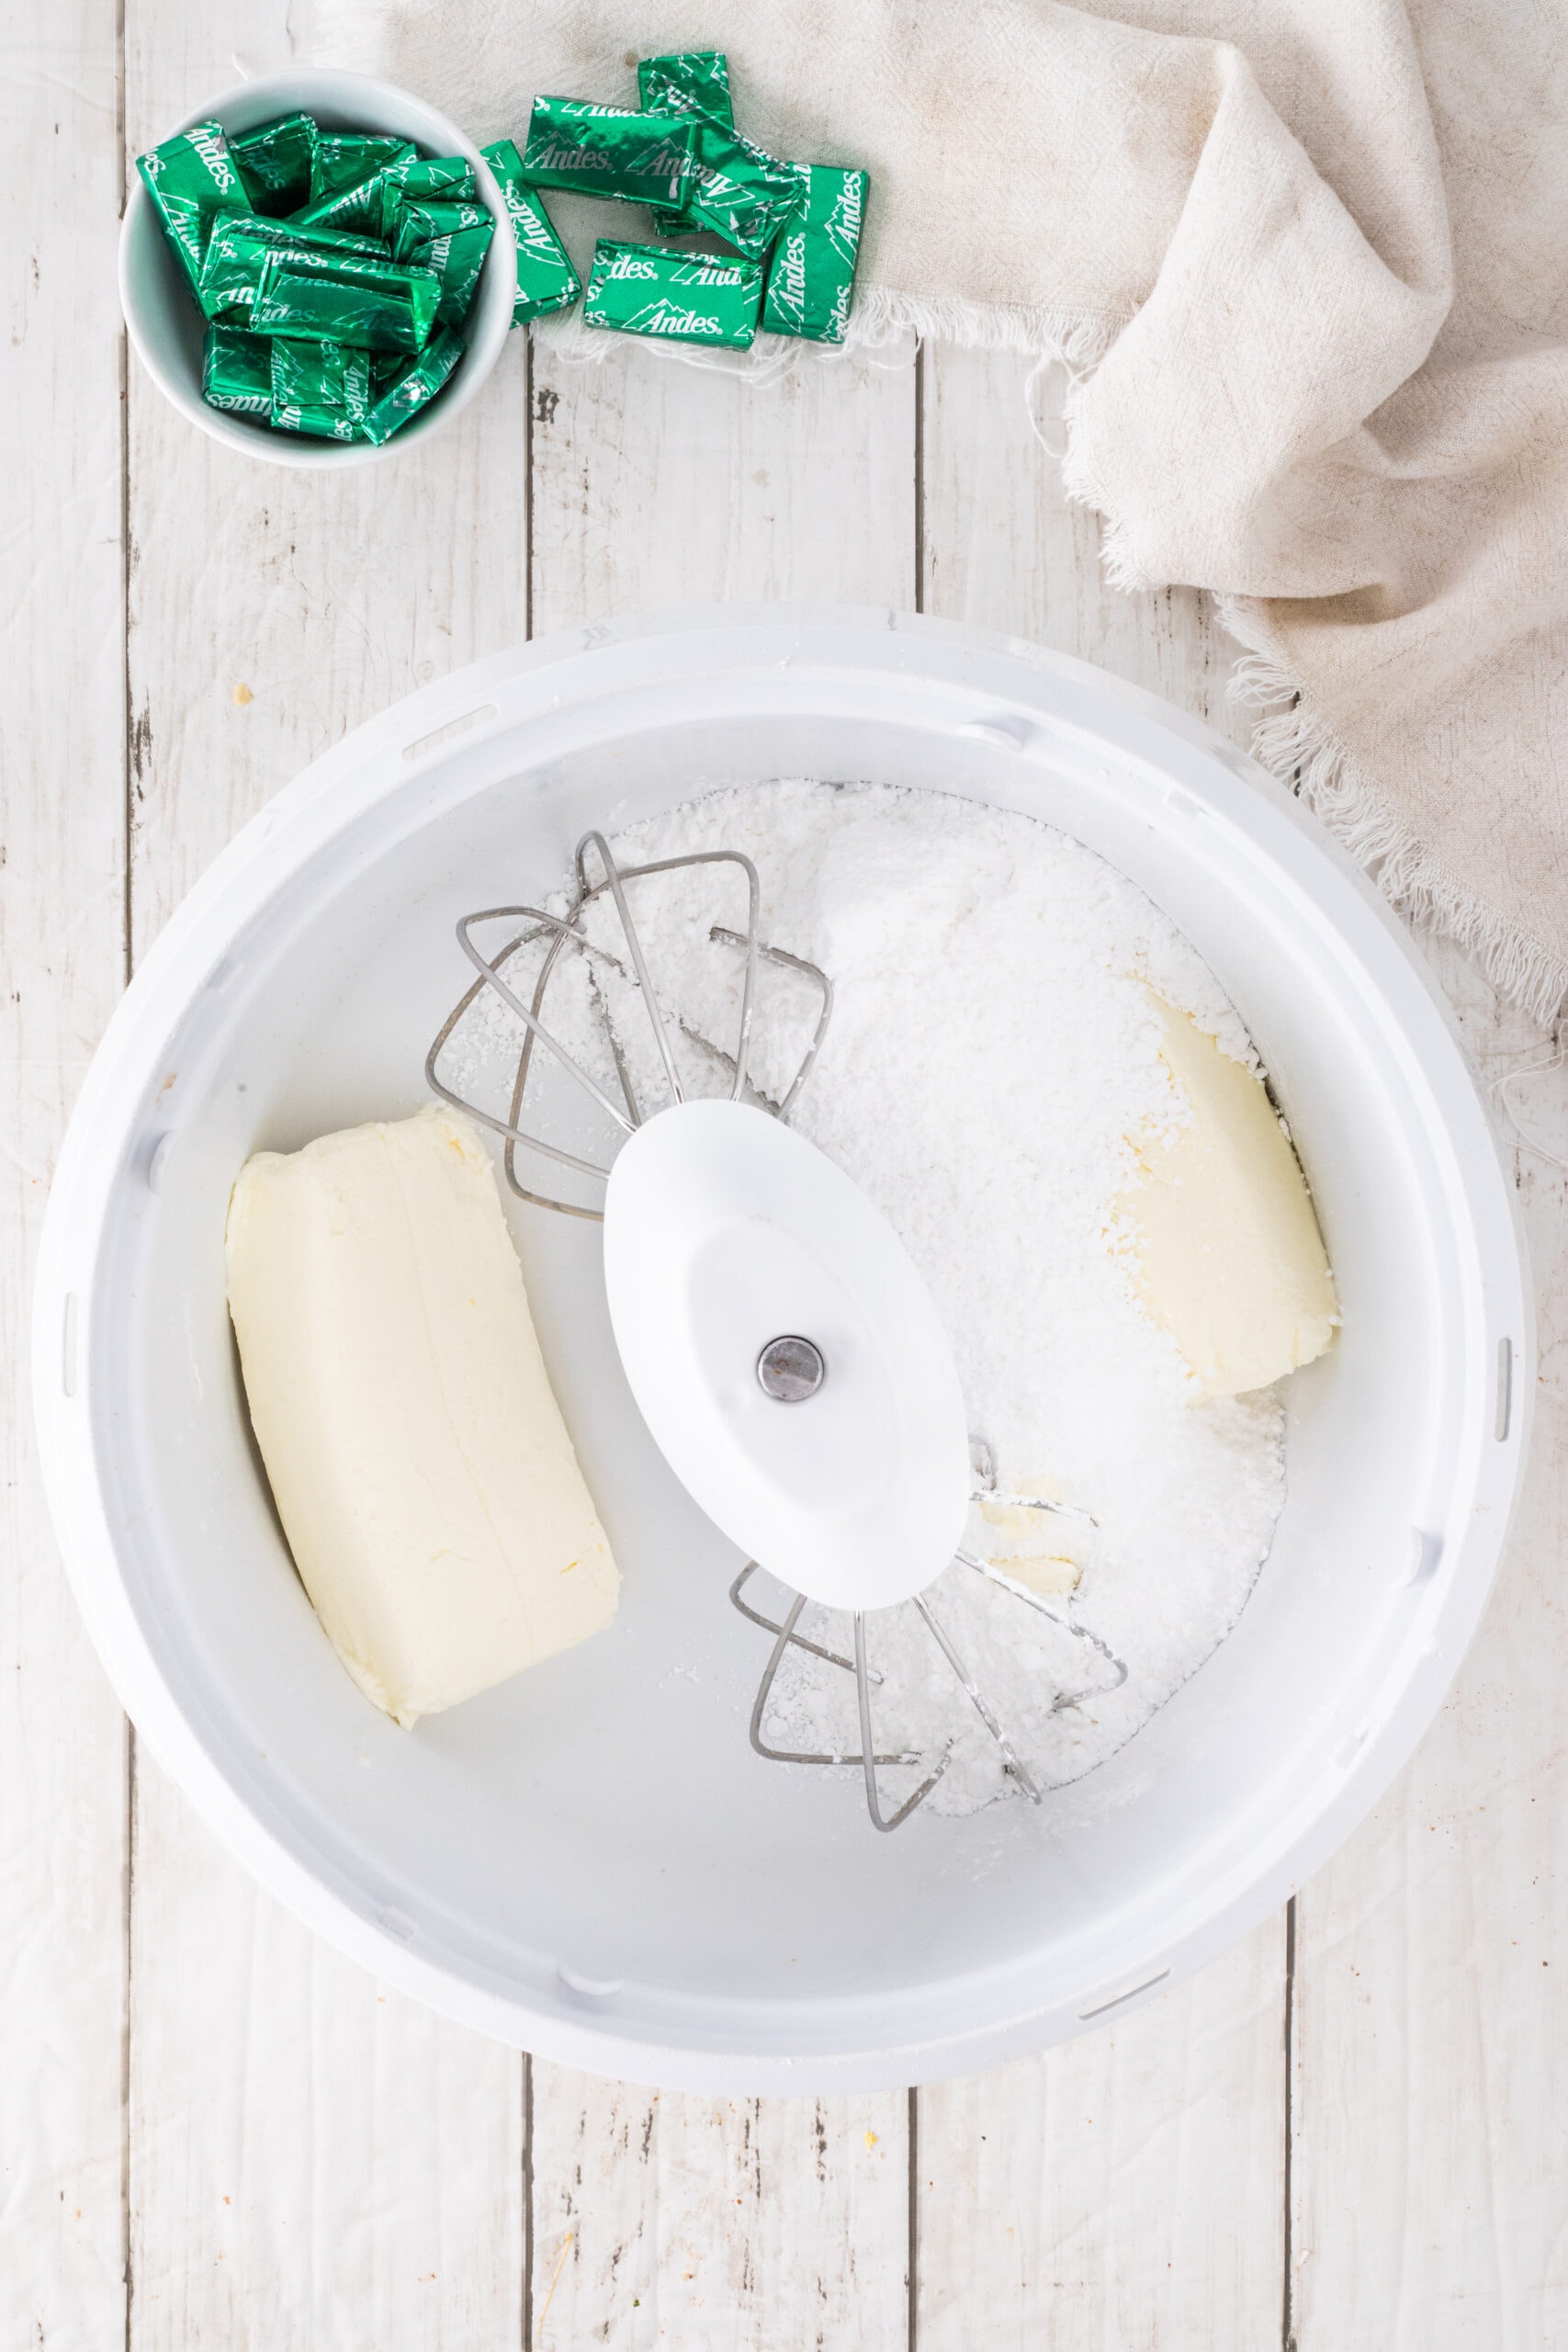
- cream cheese - This needs to be softened. The easiest way to soften it is to leave it out on the counter for a few hours, but you can also soften in your microwave in 20 second bursts.
- powdered sugar - This is used in the mint cheesecake filling.
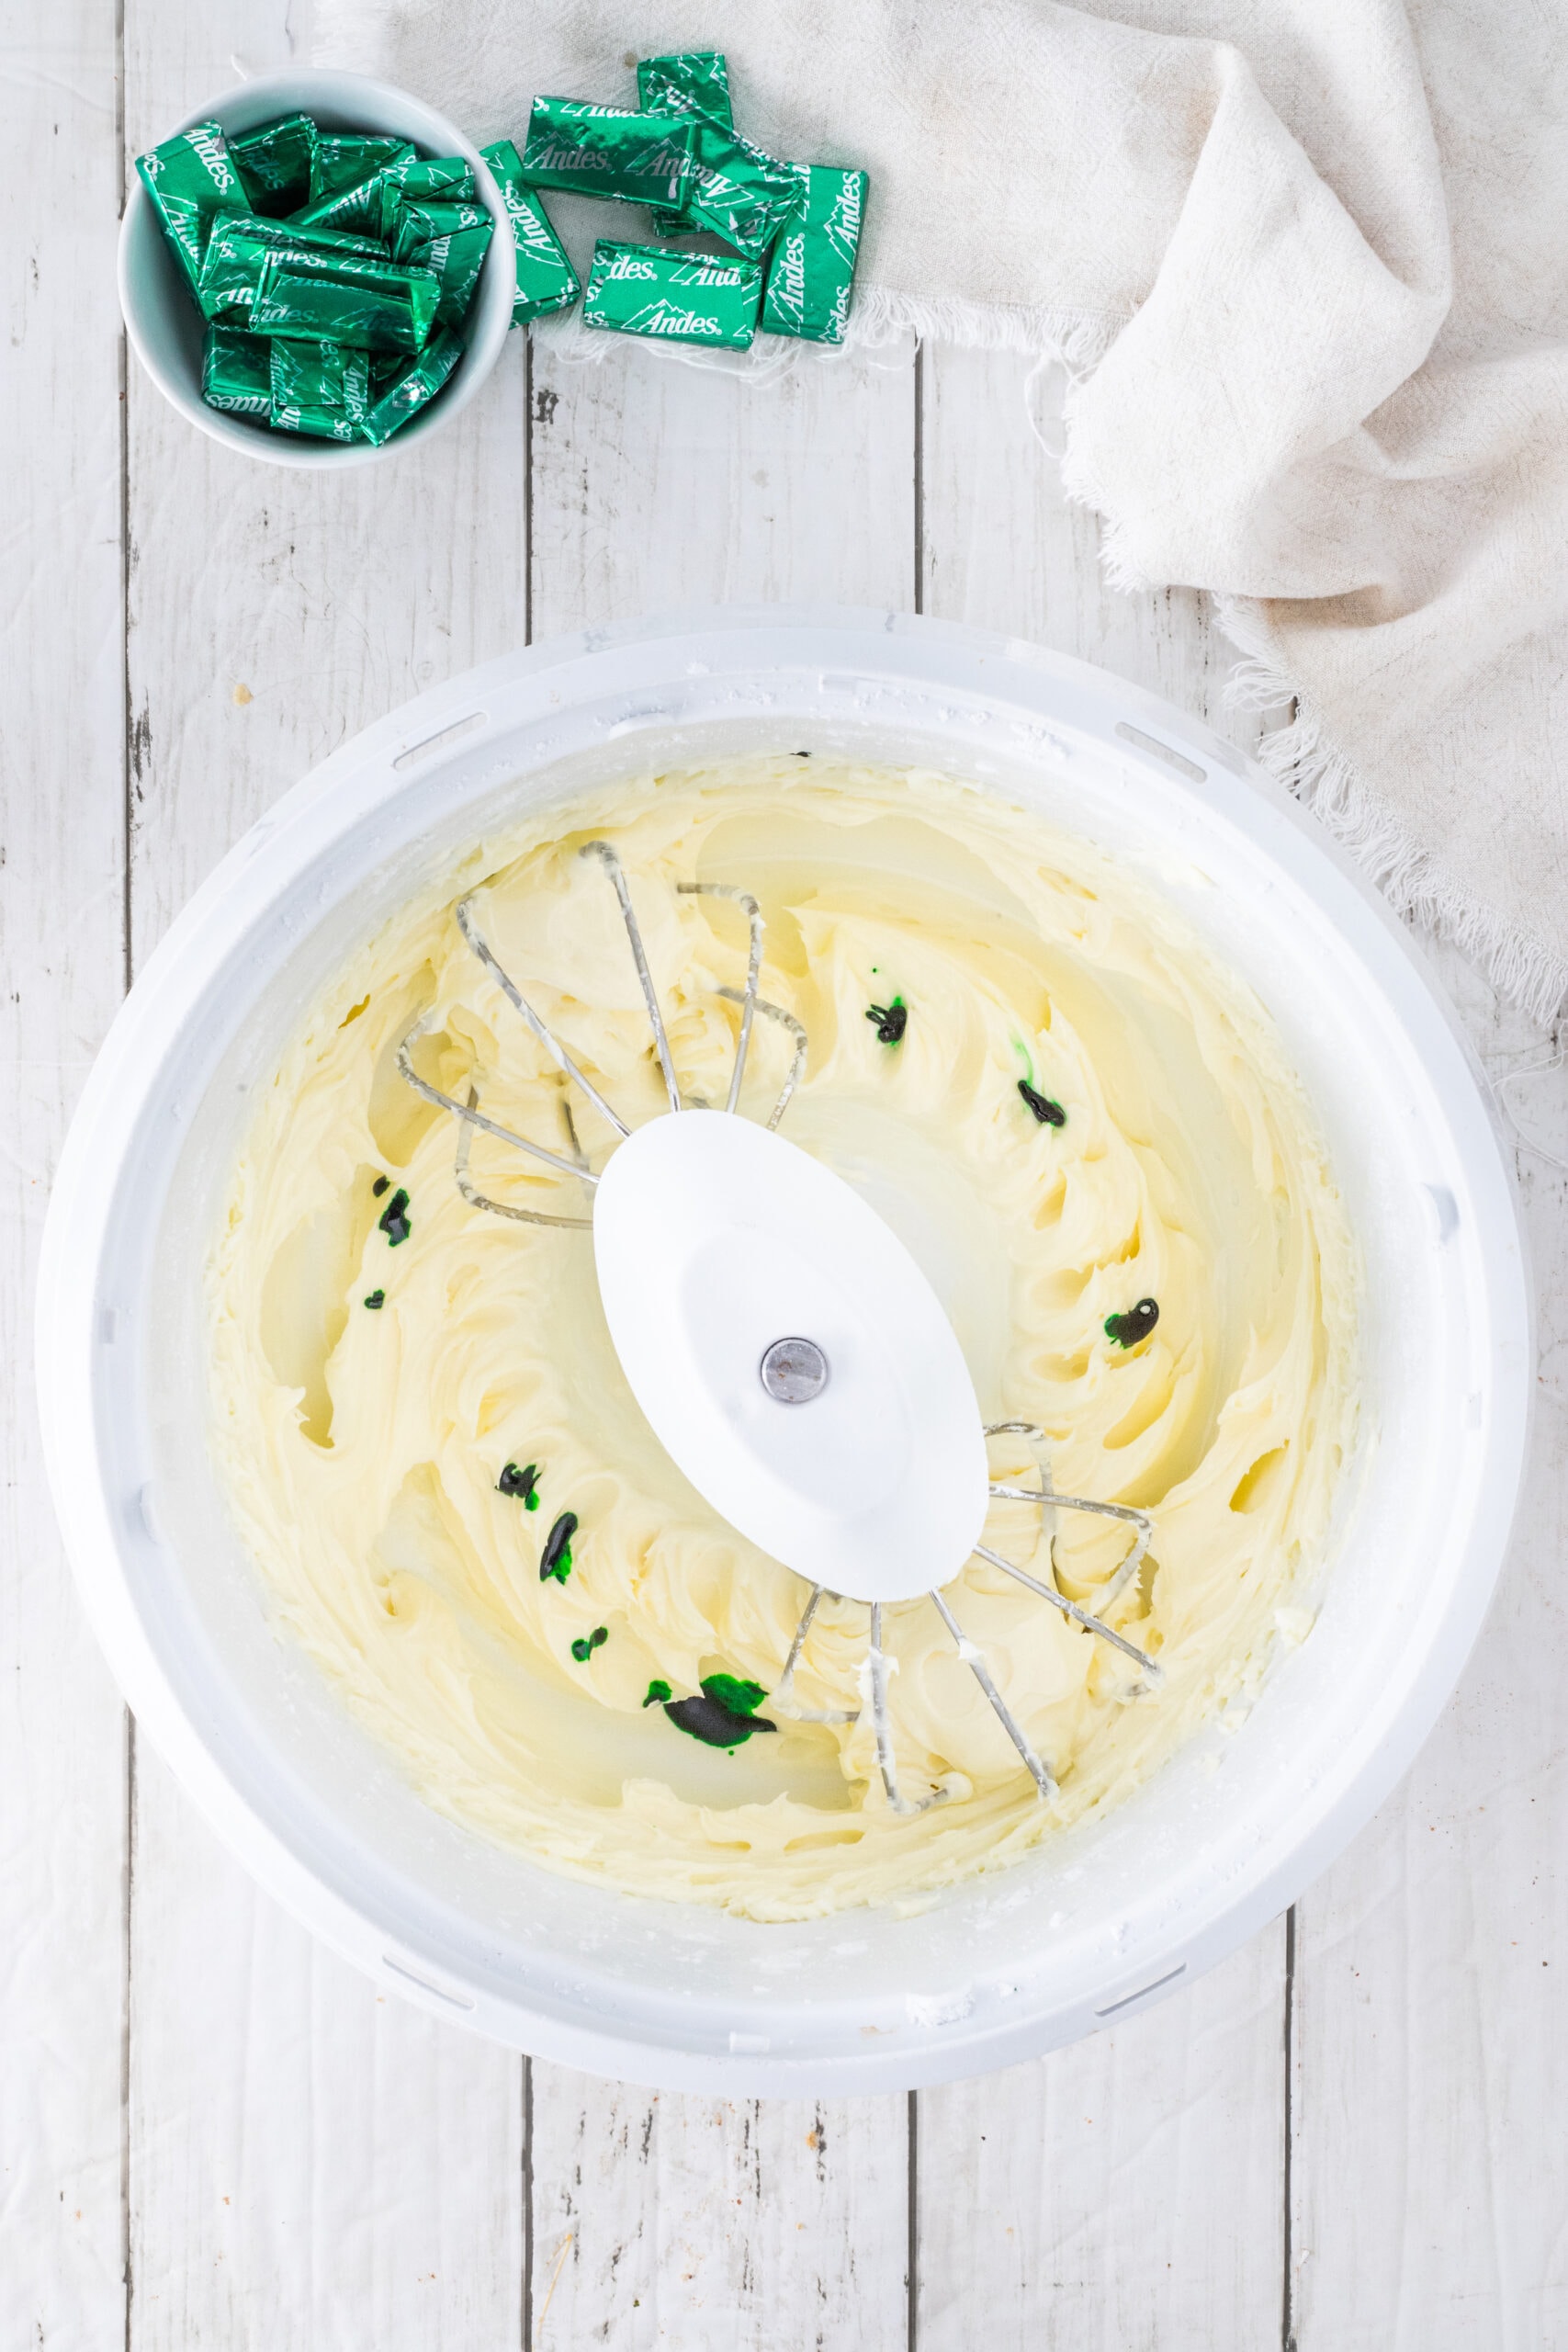
- peppermint extract - I have given a recommended amount of peppermint extract, but I recommend you use about half, taste the filling, and then add a little at a time until it is the flavor you want. Keep in mind that you're making the cheesecake at room temperature and serving it chilled, so you will want the taste to be just a little bit too strong. Cold food doesn't have as much flavor as warm food.
- green food color - This is completely optional. Use gel food color, rather than liquid food color. The liquid will dilute your cheesecake filling and could make it too runny.
- heavy cream - This should be cold from the fridge. It is used for the cheesecake filling as well as the chocolate ganache topping.
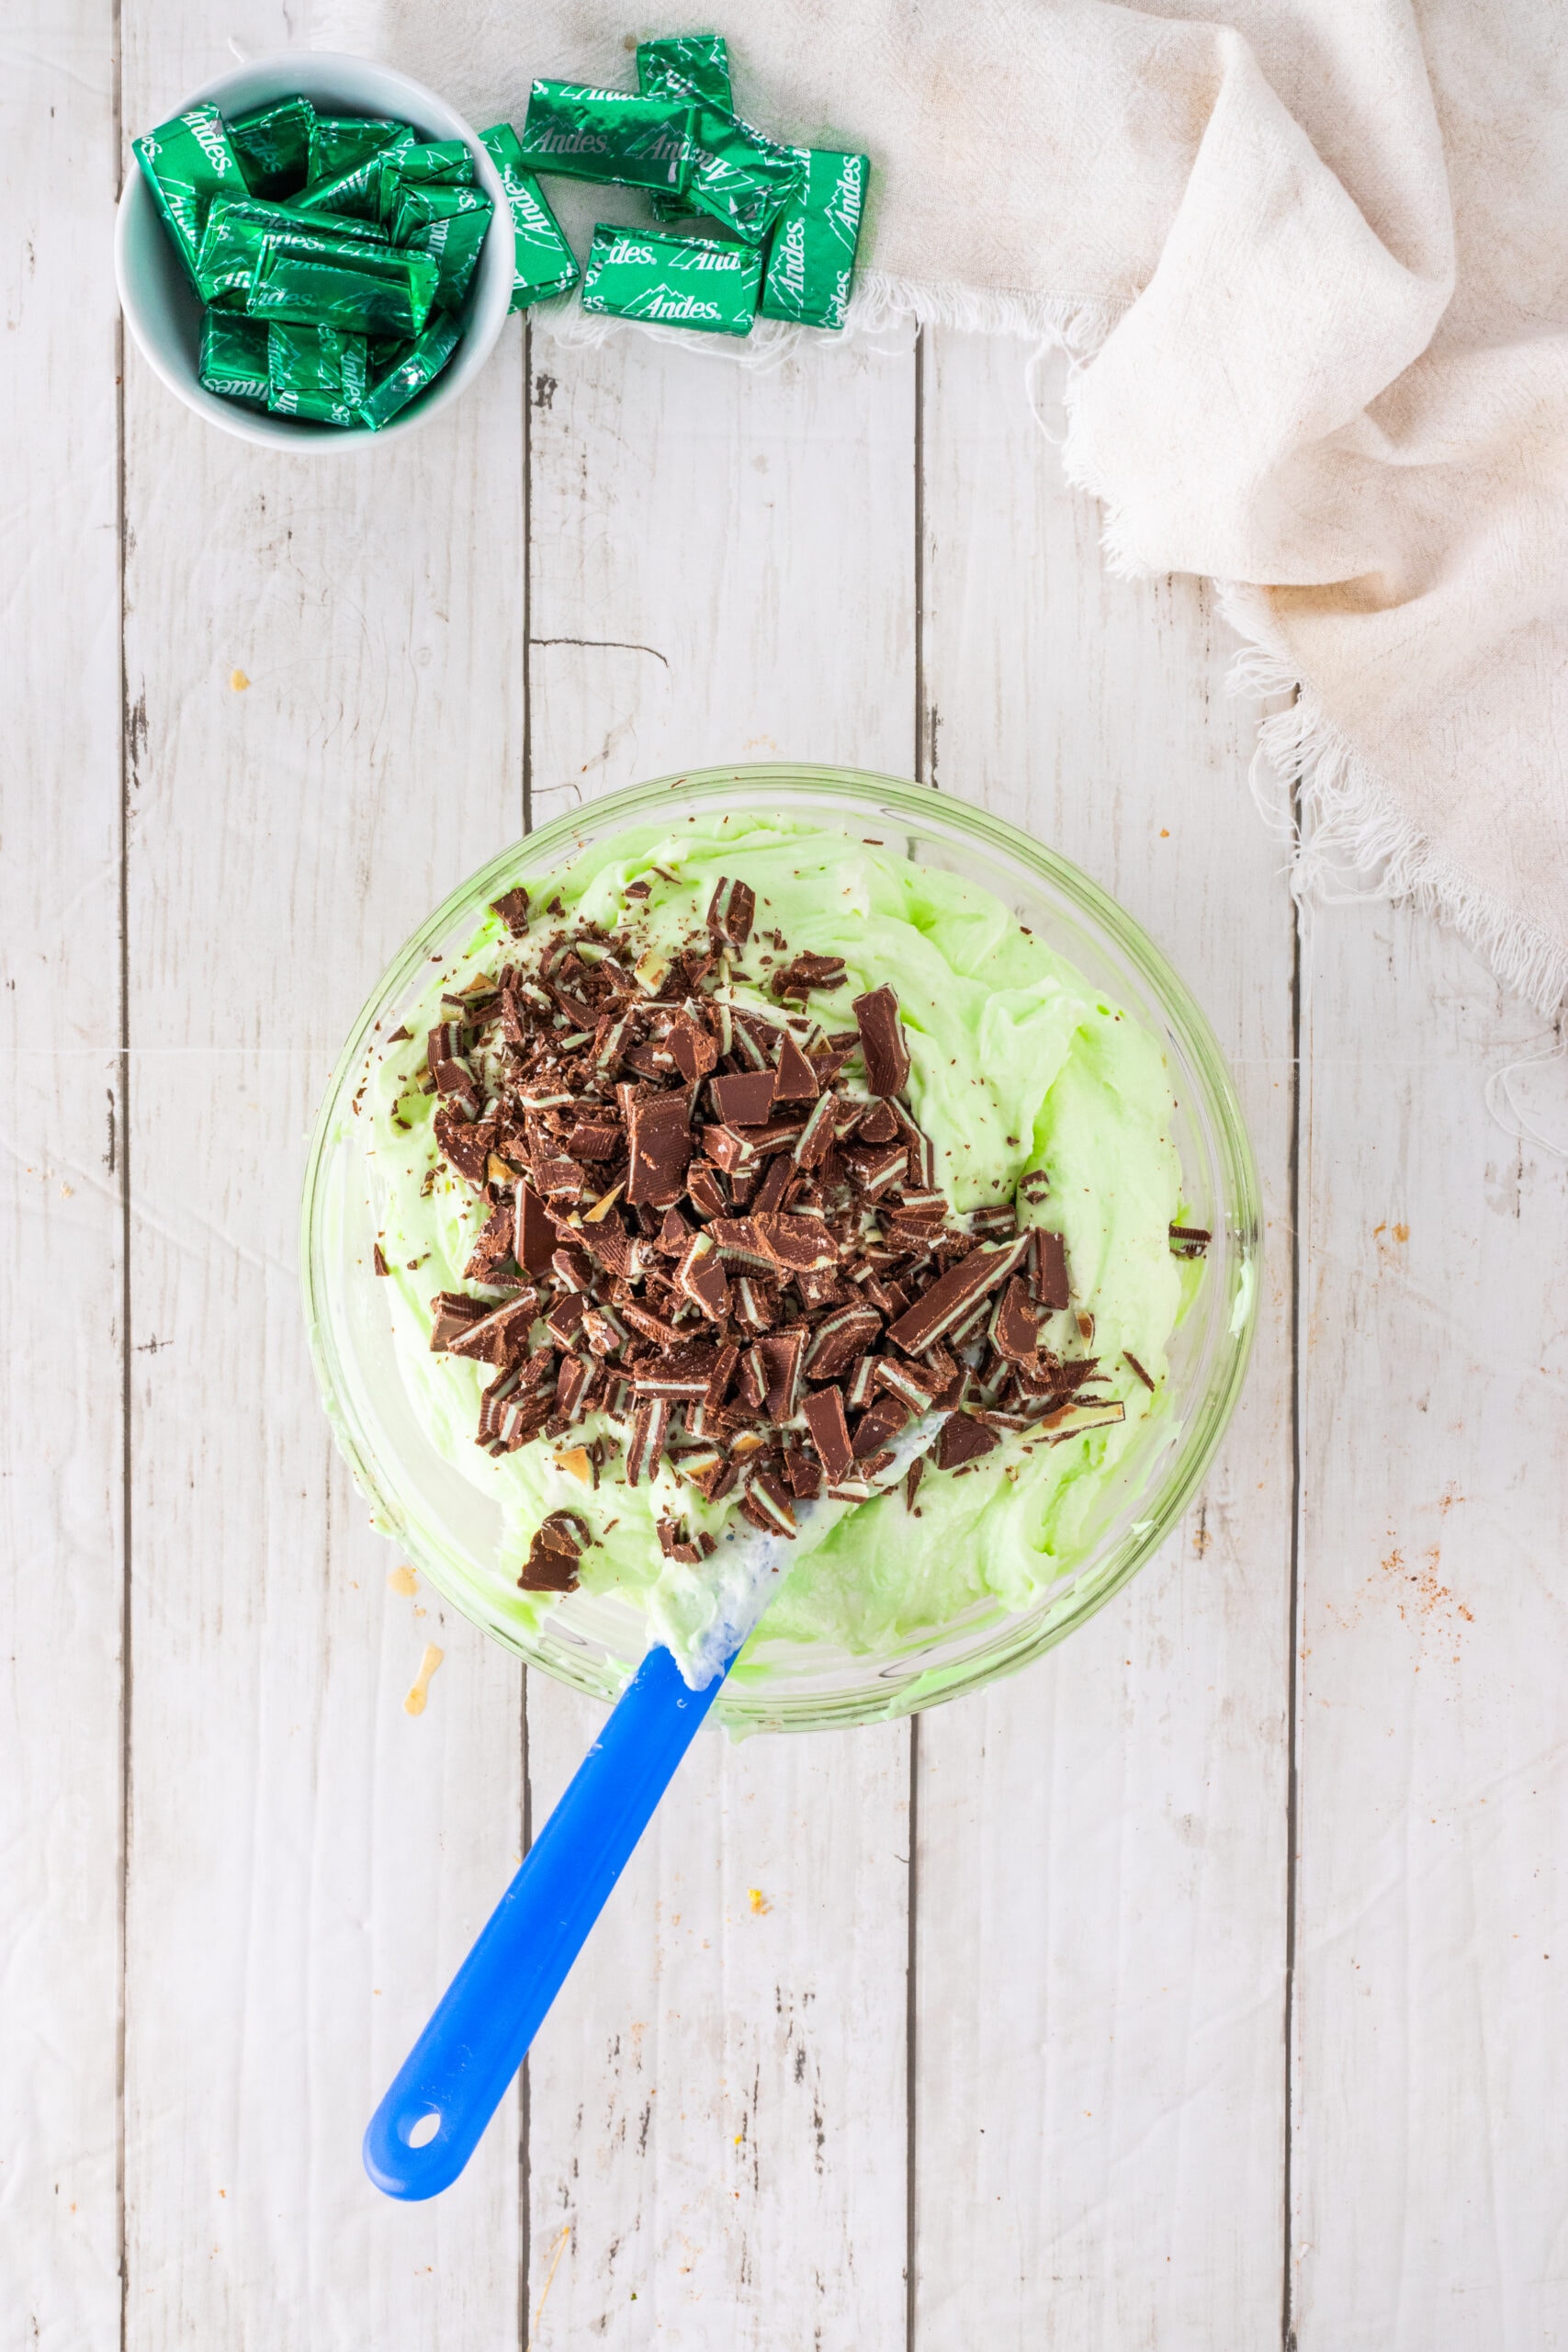
- Andes Mints - An Andes Mint Cheesecake wouldn't be the same without Andes Mints!
- semi-sweet chocolate chips - These are for the chocolate ganache.
- Whipped cream - This is optional but makes the cheesecake look nice.
How to make No-Bake Mint Chocolate Cheesecake
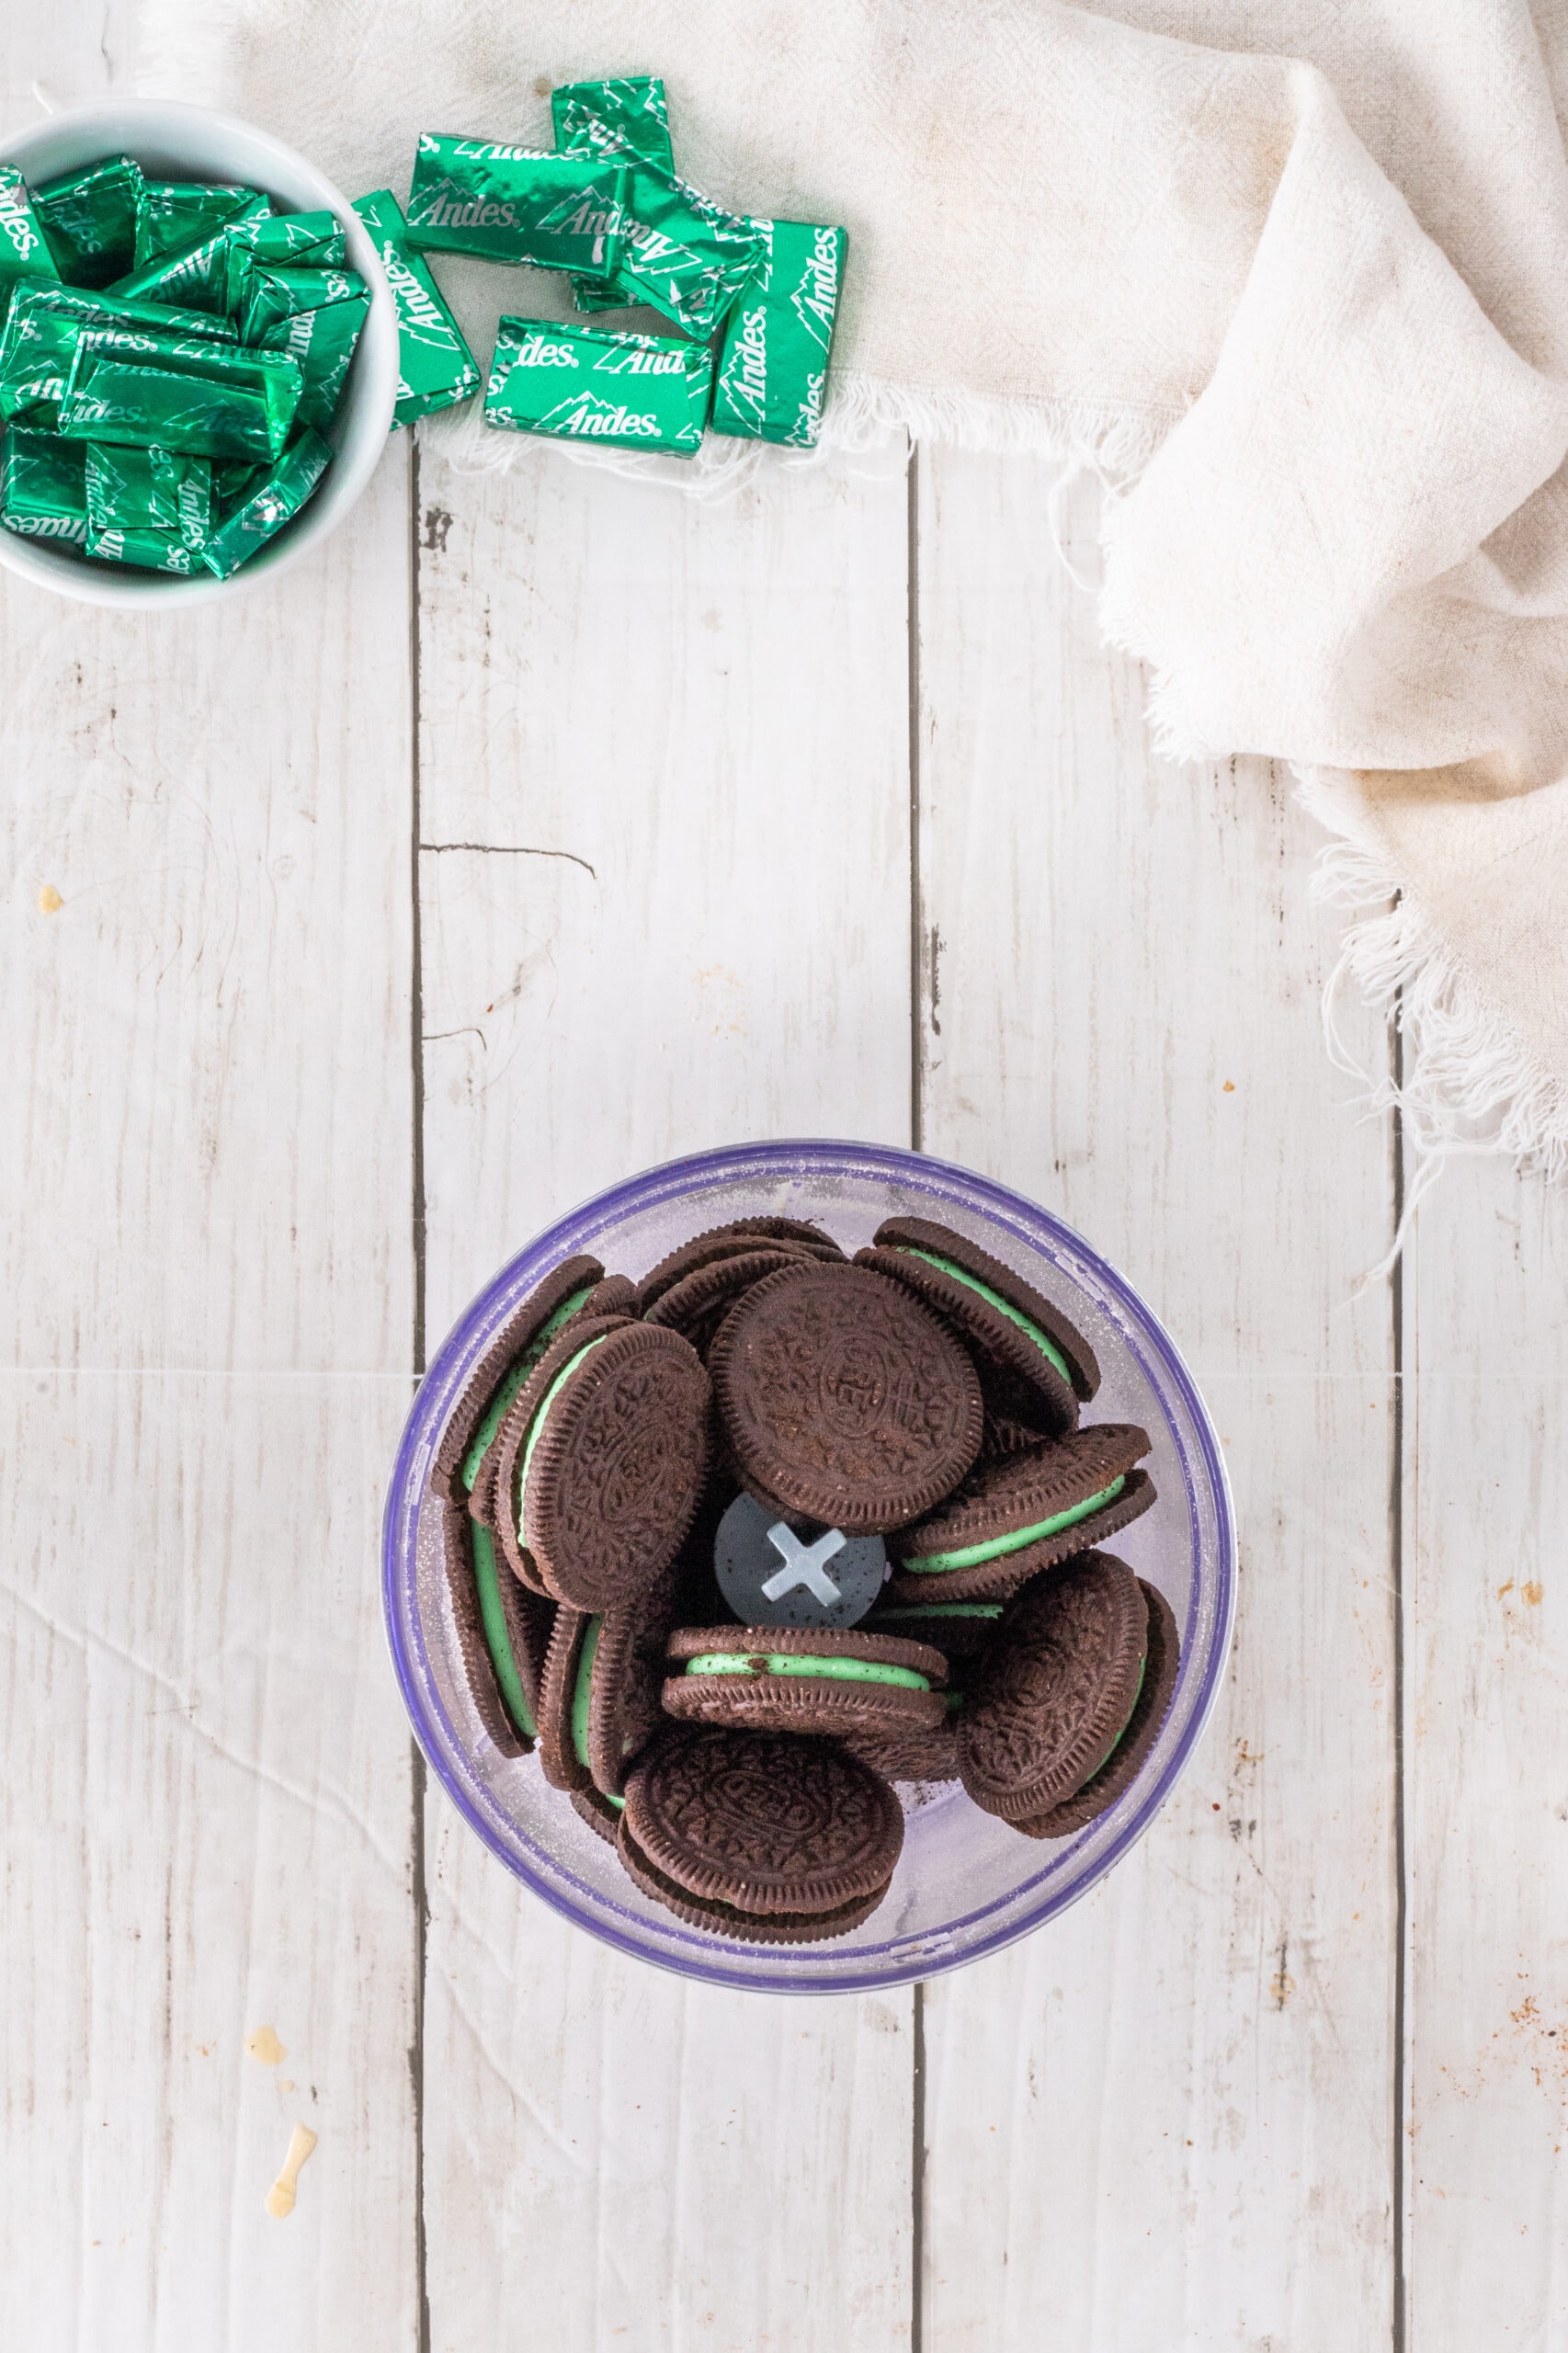
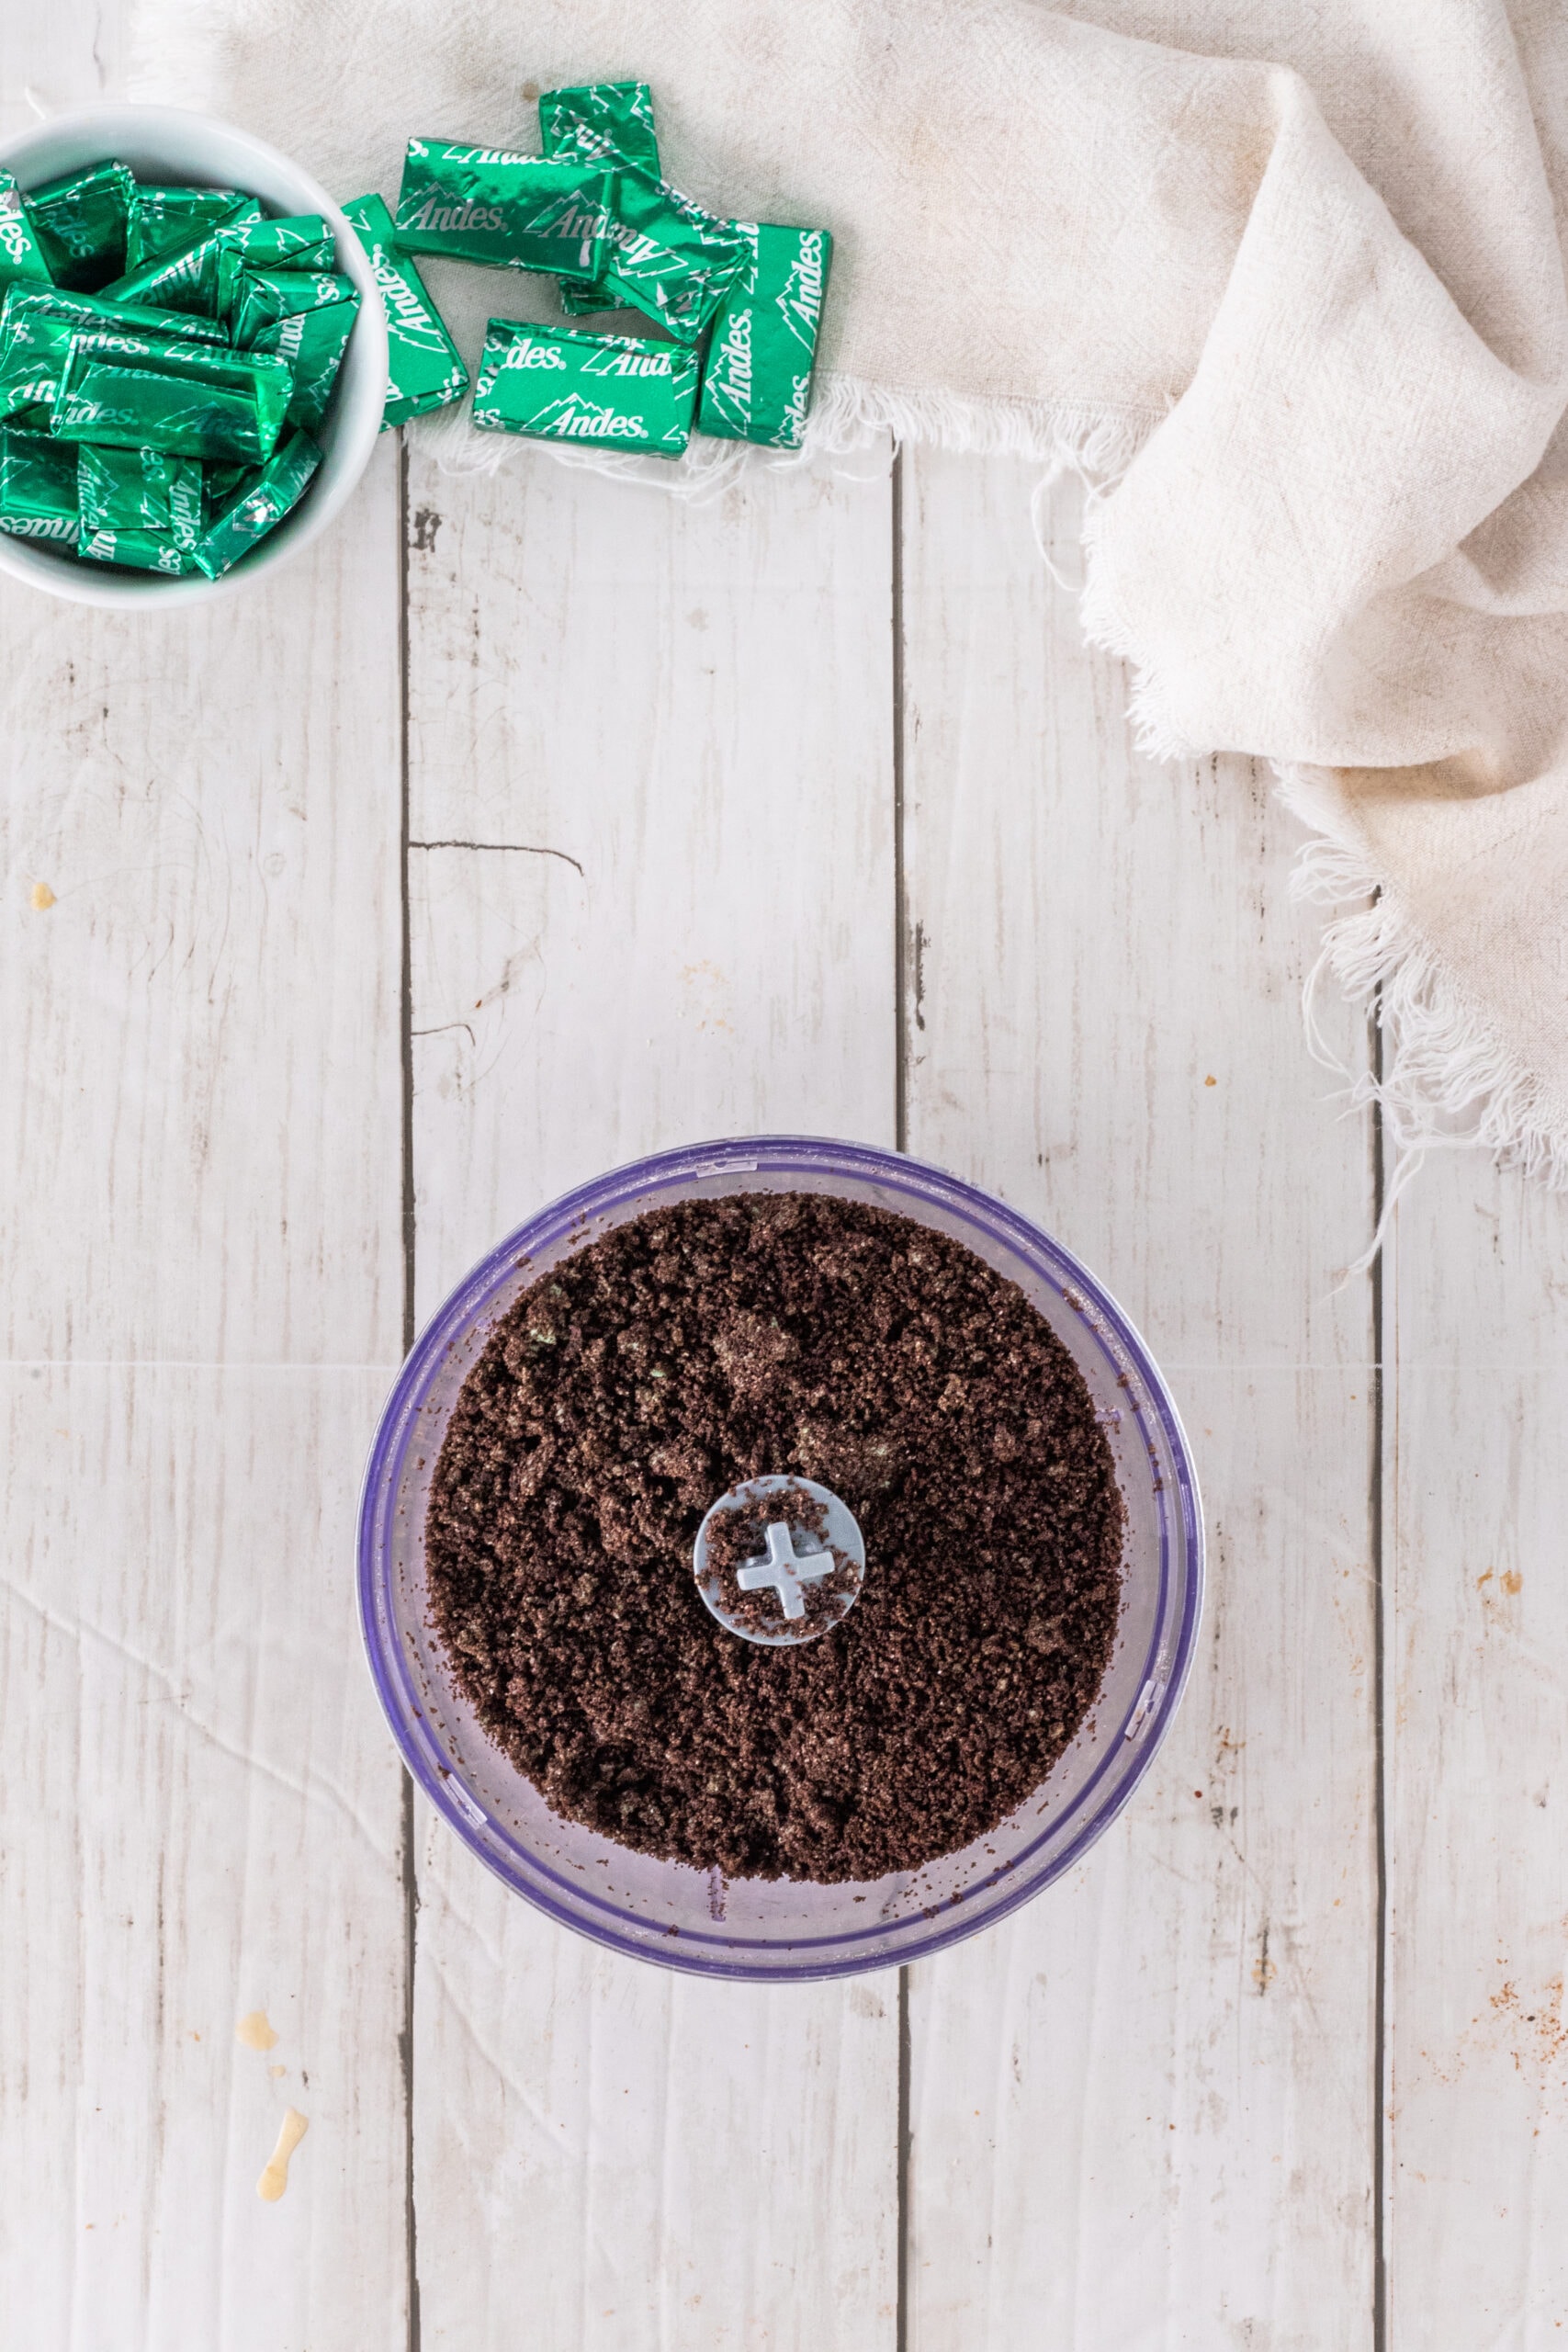
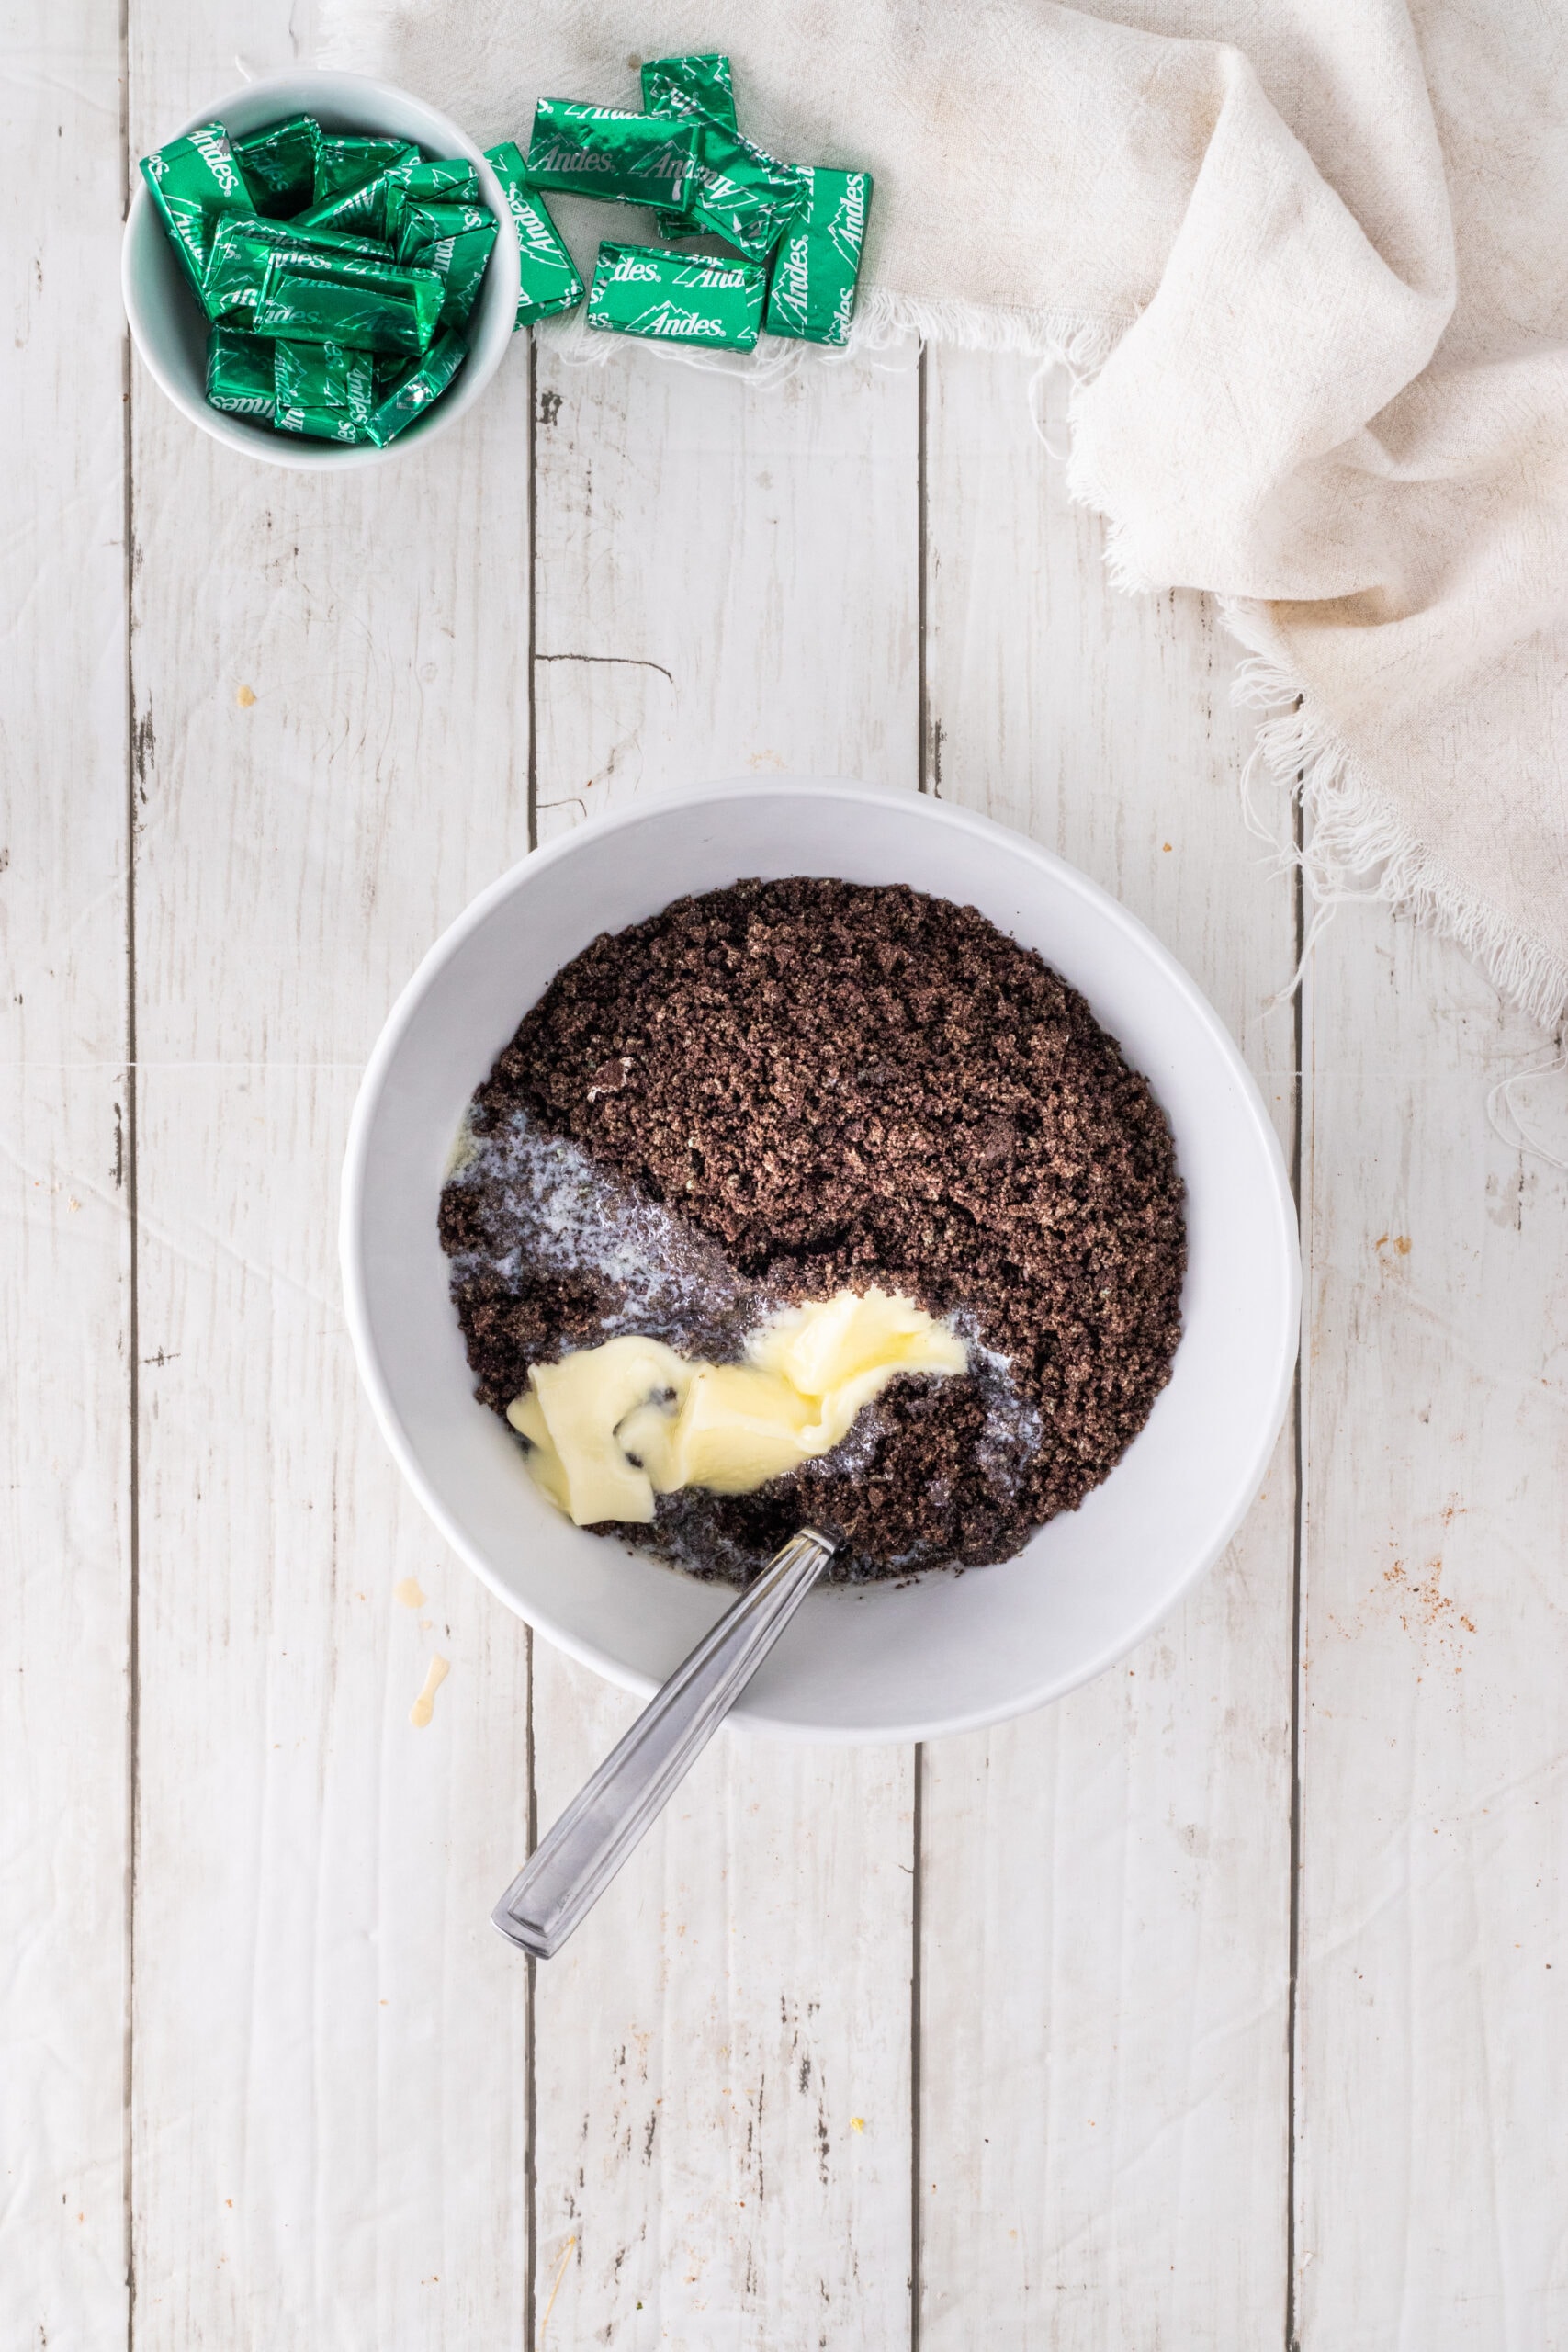
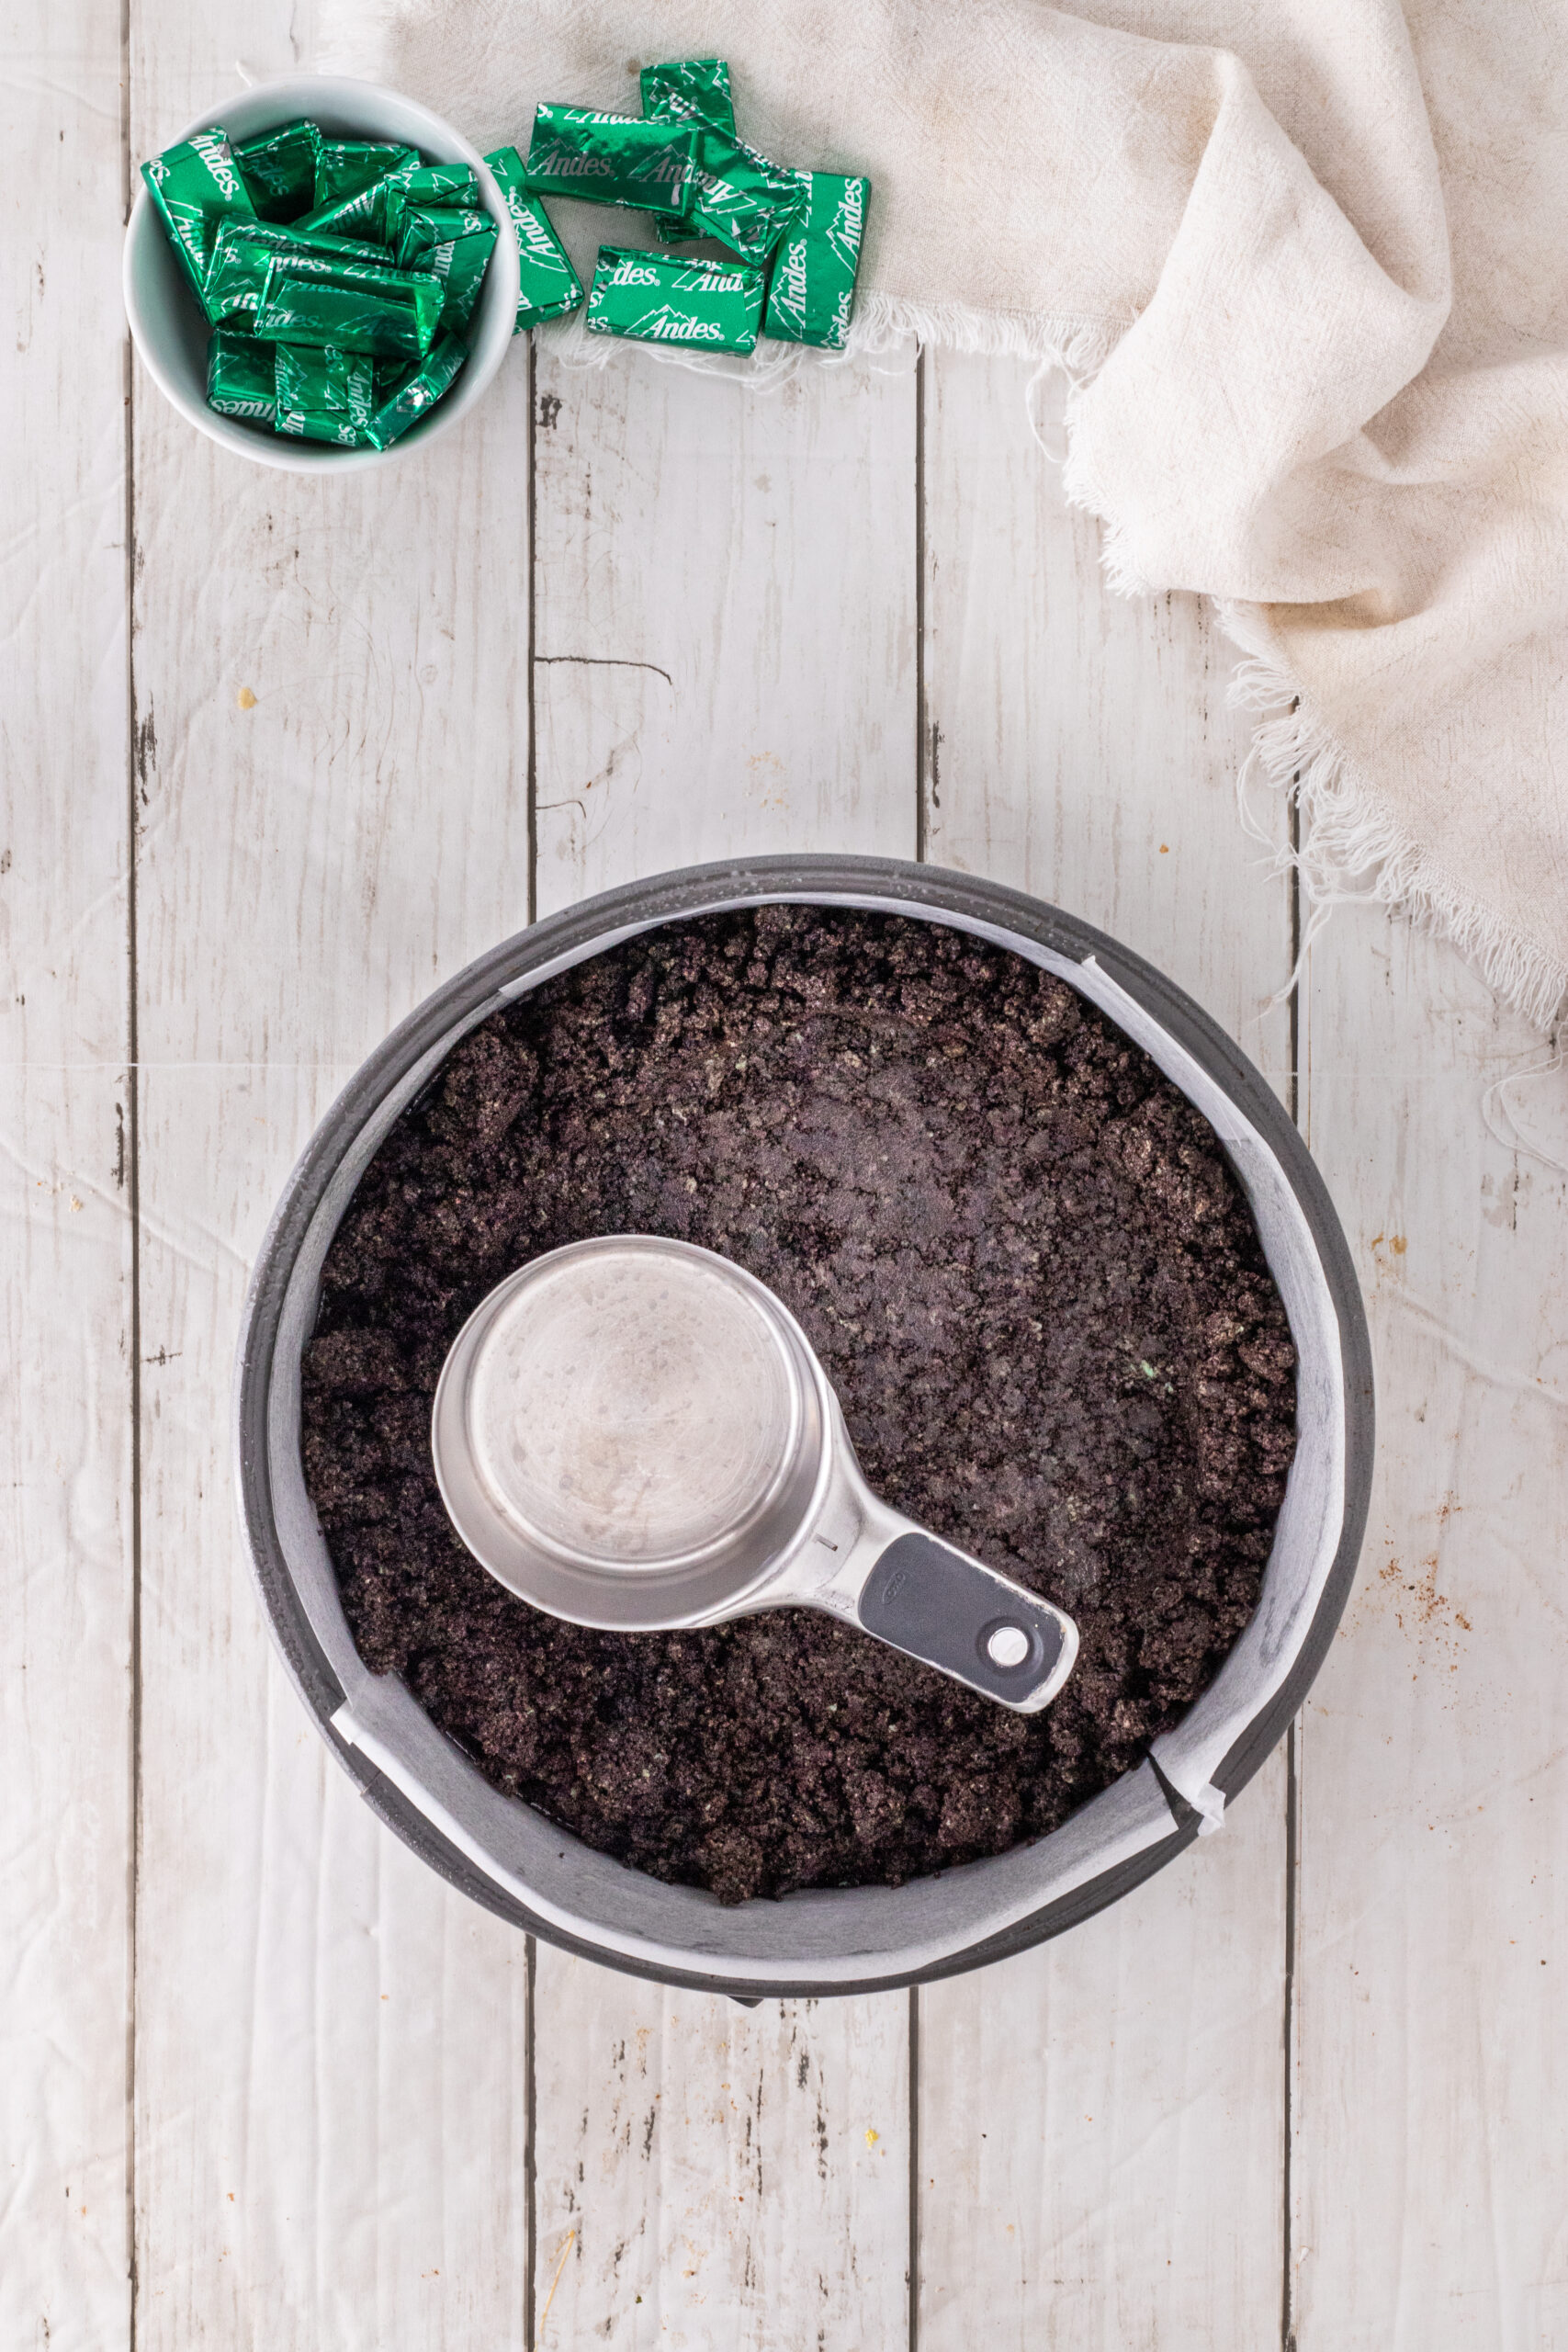
Step One: Make the Mint Oreo crust.
- Crush 24 Mint Oreos into fine crumbs using a food processor (or place in a zip-top bag and crush with a rolling pin).


- Mix Oreo crumbs with melted butter until the crumbs resemble wet sand.
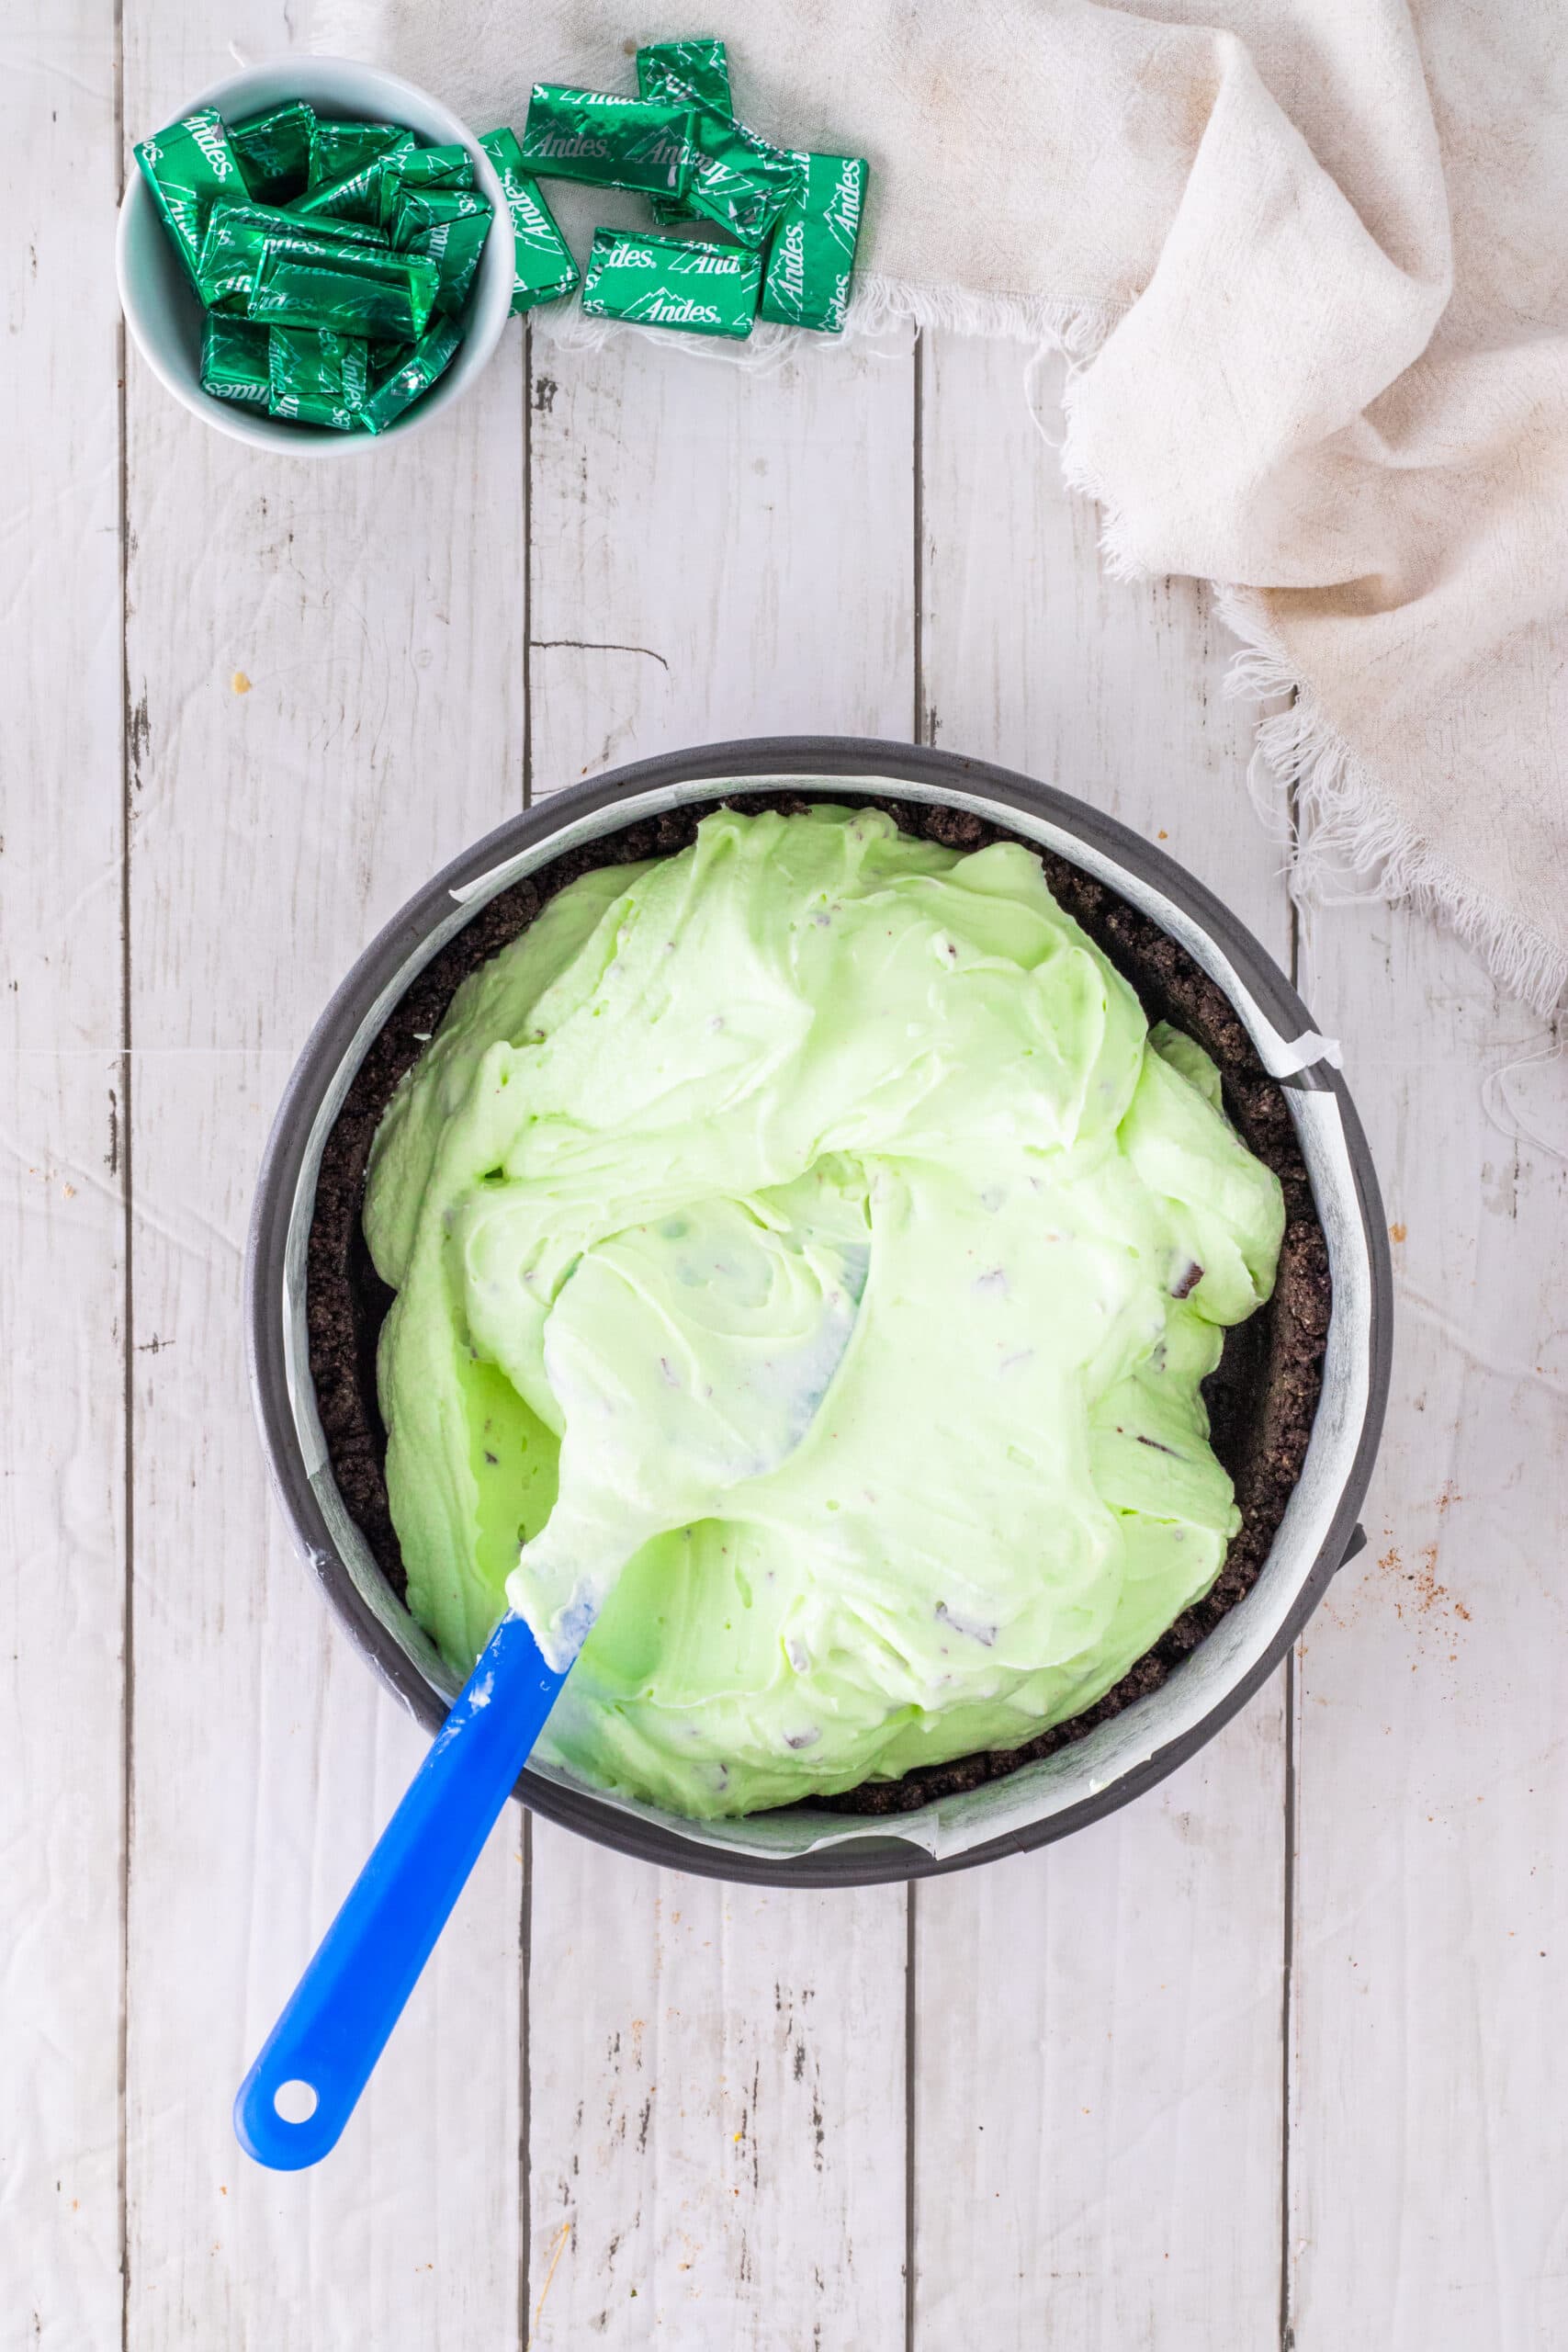
- Press the Oreo mixture firmly into the bottom and about an inch up the sides of a 9-inch springform pan. Place the crust in the freezer while preparing the filling.
Step Two: Prepare the no-bake cheesecake filling.
- In a large bowl, beat softened cream cheese and powdered sugar until smooth and creamy. Add peppermint extract and green food coloring, mixing until evenly tinted.
- In a separate bowl, whip cold heavy cream with ½ cup powdered sugar until stiff peaks form.
- Gently fold the whipped cream into the cream cheese mixture until well distributed. The peppermint cheesecake filling should be light and fluffy. Fold in the chopped Andes Mints.
- Spread filling evenly over the chilled crust. Refrigerate at least 4 hours or until firm (overnight is best). Place in the freezer for the first hour or two to speed the chilling process.

Step Three: Make the ganache topping.
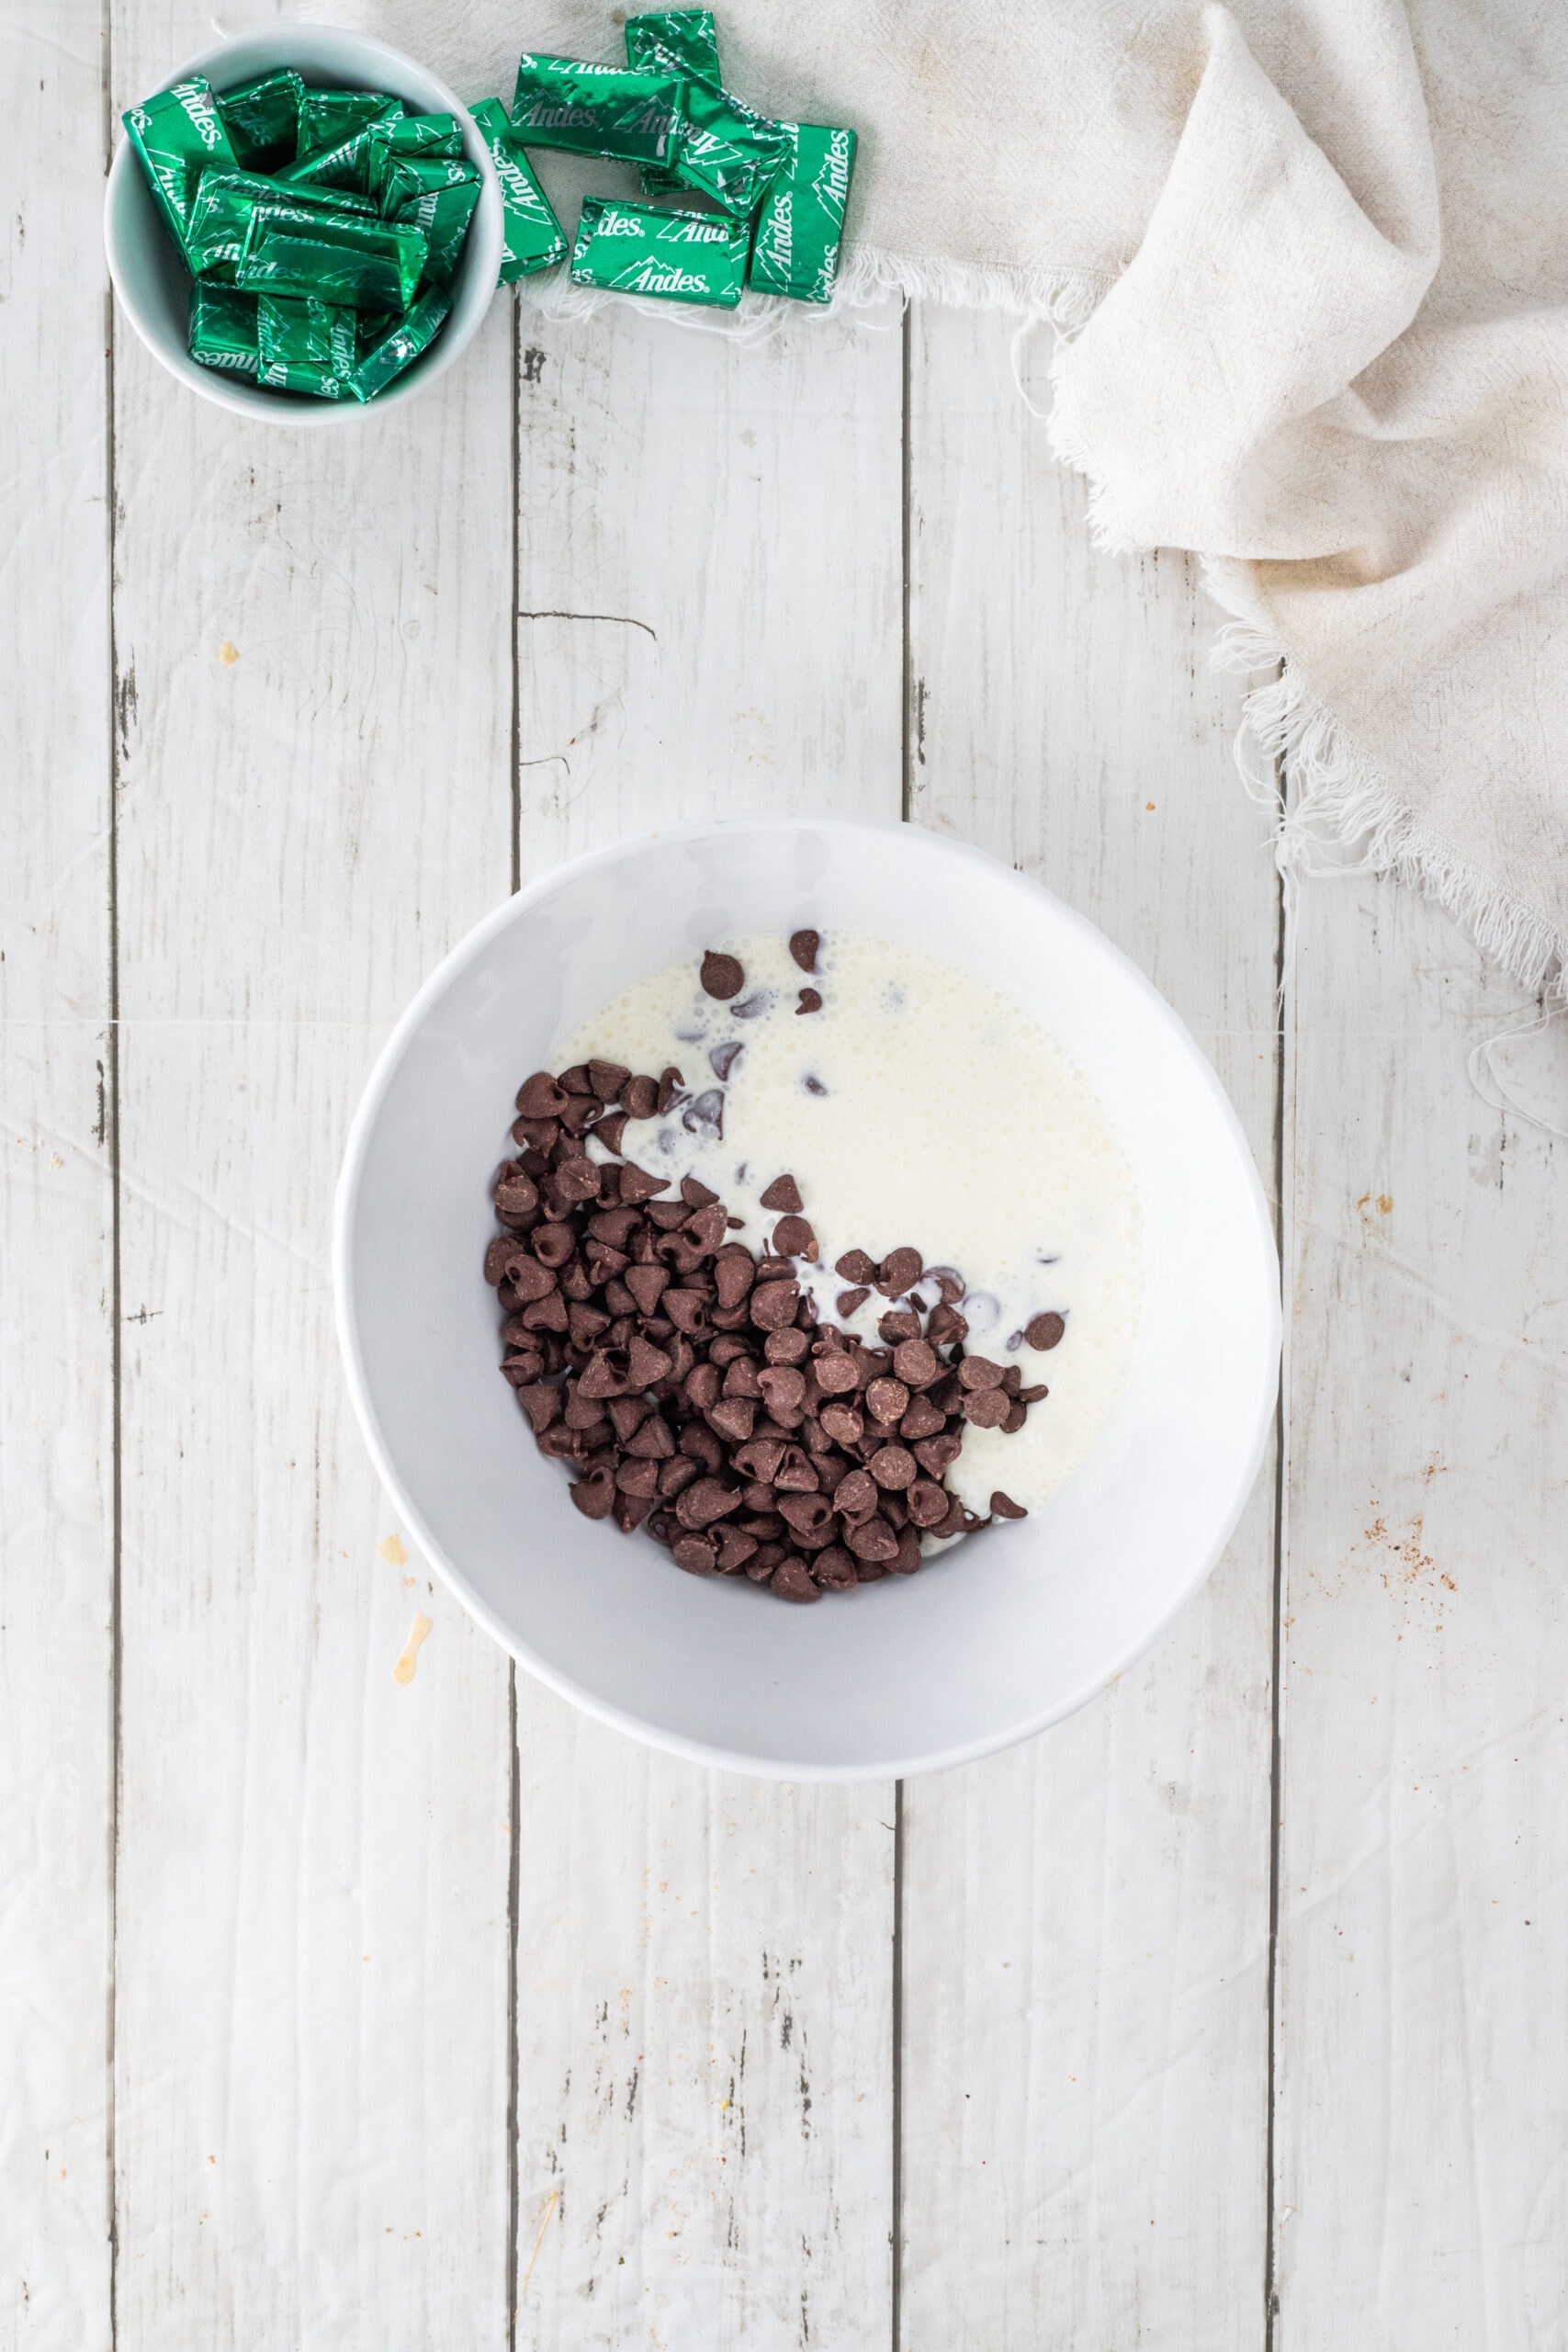
- Place the chocolate chips and remaining heavy cream in a microwave-safe bowl, and heat in microwave in 20 second bursts, stirring thoroughly after each time, until melted. This should only take 2-3 bursts. Stir until smooth. If your chocolate gets softer and then starts to get hard again, you've burned it and will need to start over.
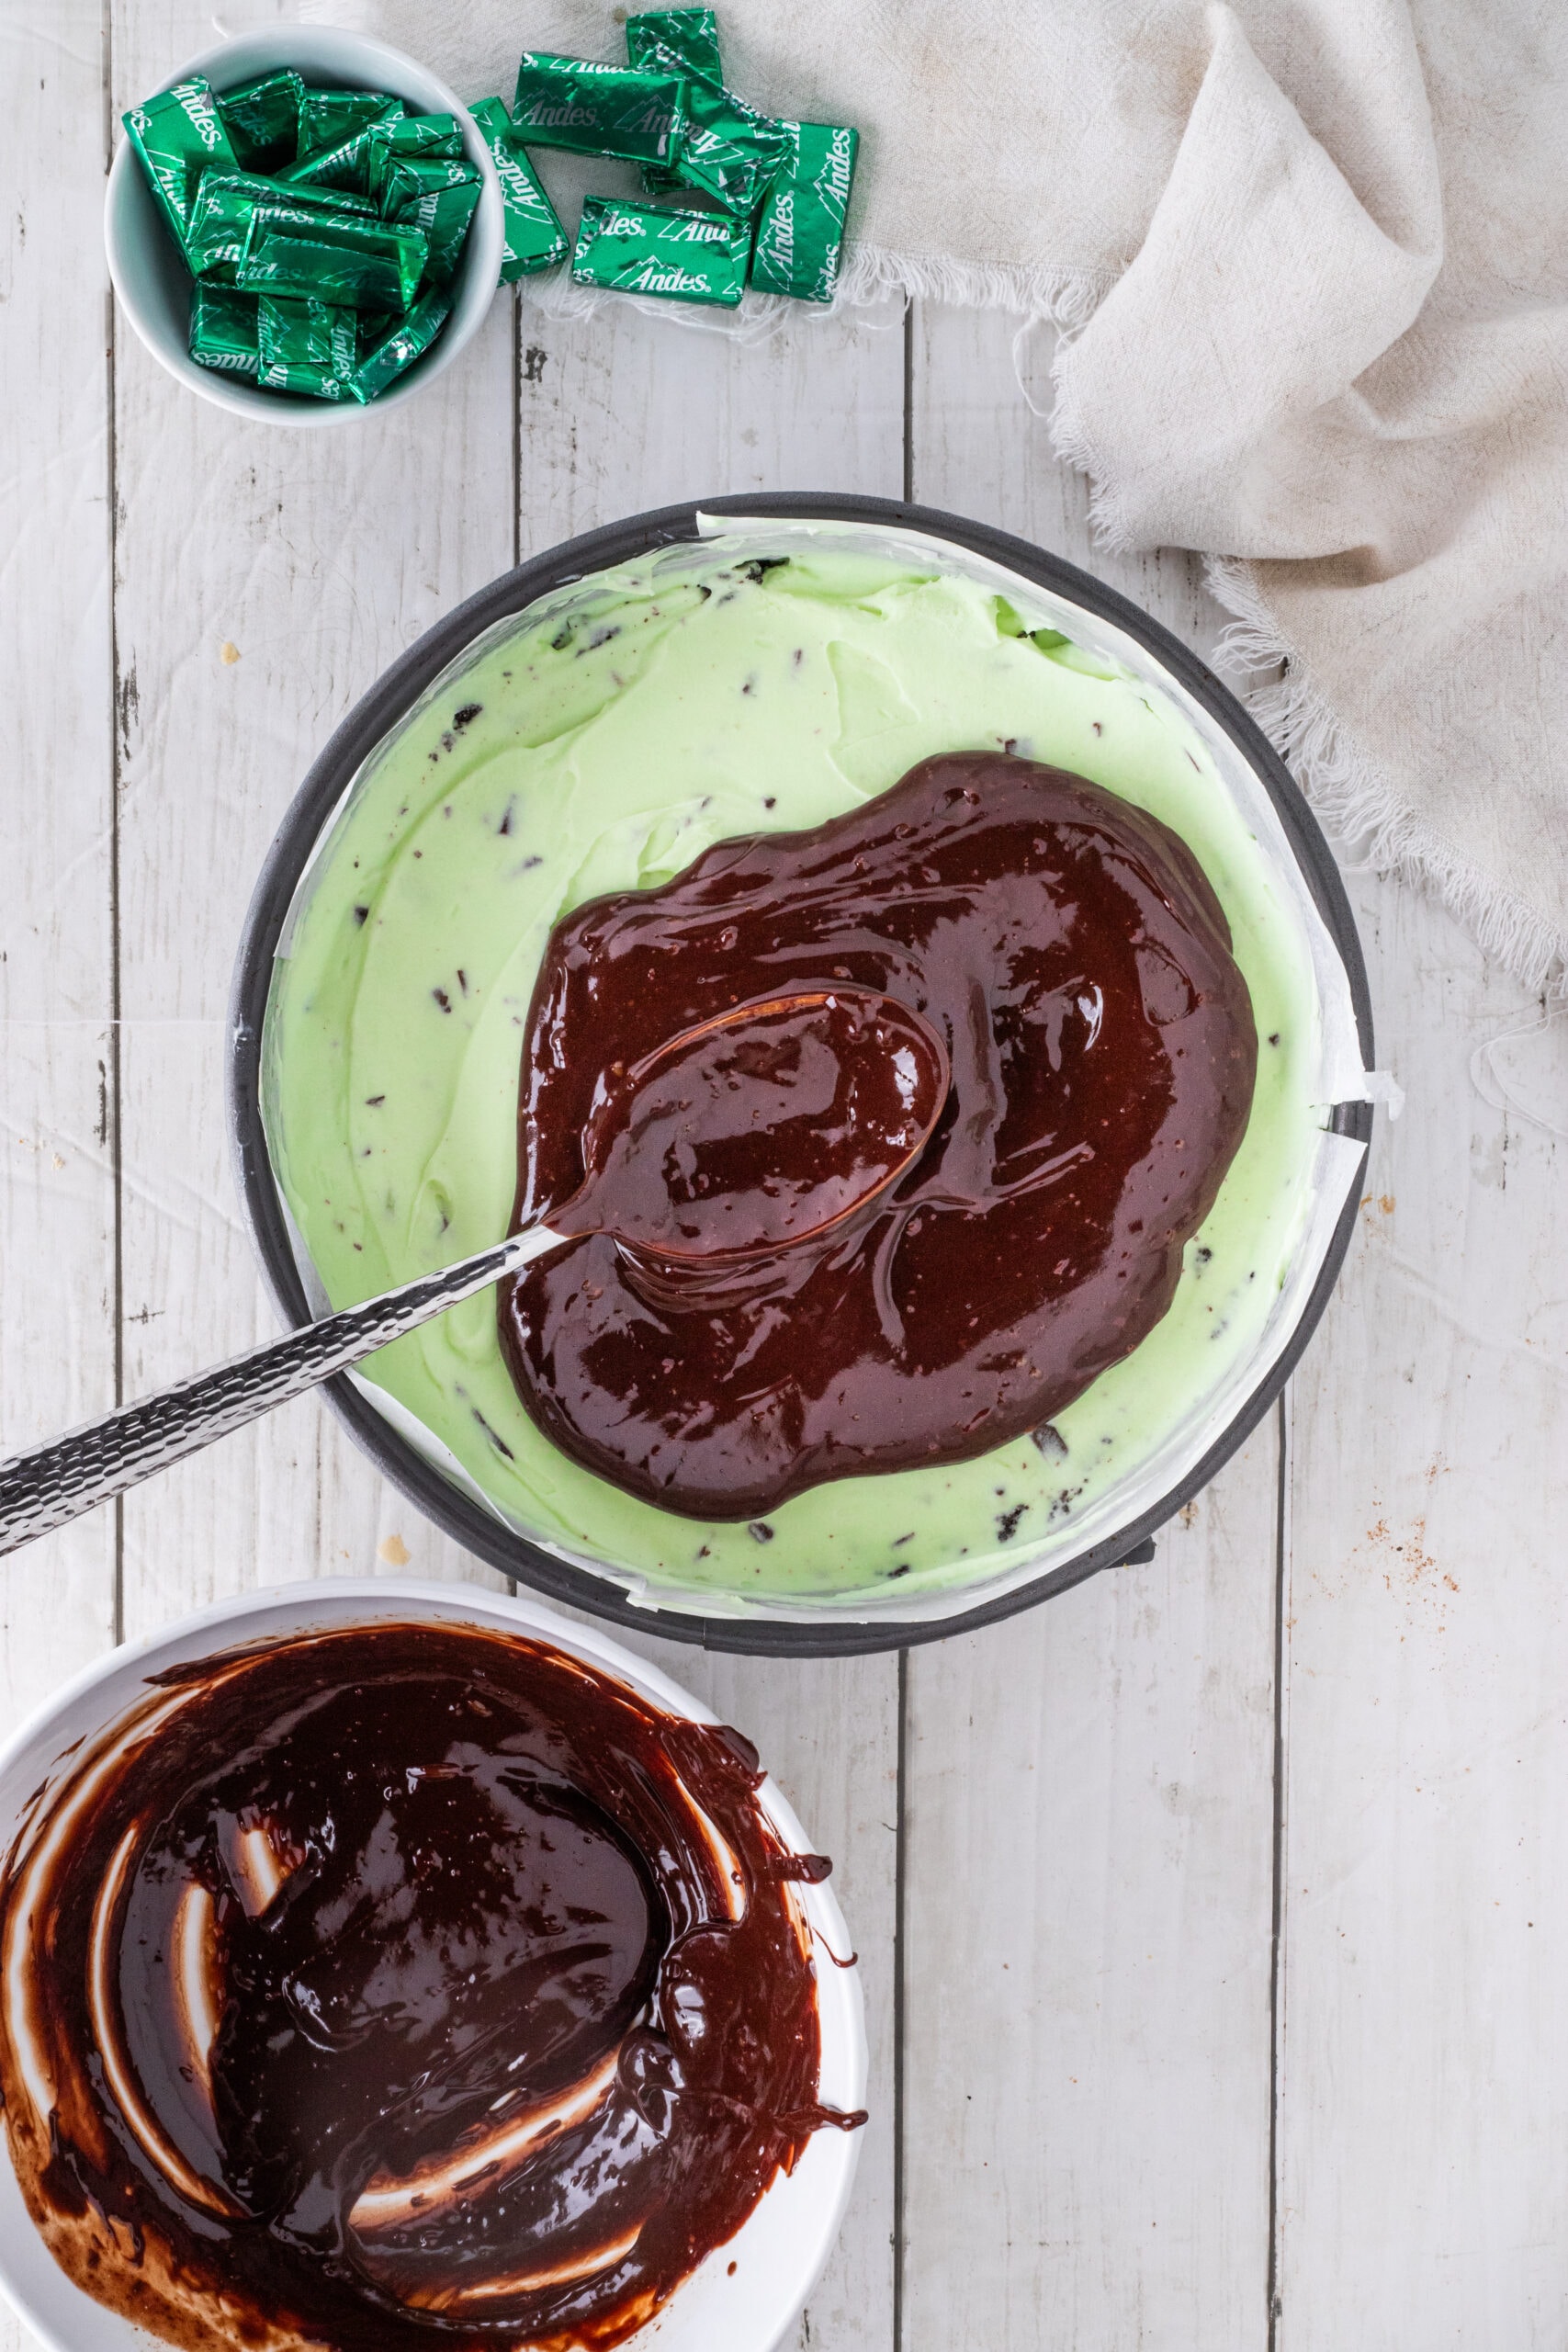
- Allow the ganache to cool for about 10 minutes, then pour over the chilled cheesecake, spreading evenly. Chill for another 30 minutes in the freezer until the ganache is set. Do not allow plastic wrap or any other cover to touch the ganache while it sets. This will make the surface dull and ugly.
Step Four: Garnish and serve.
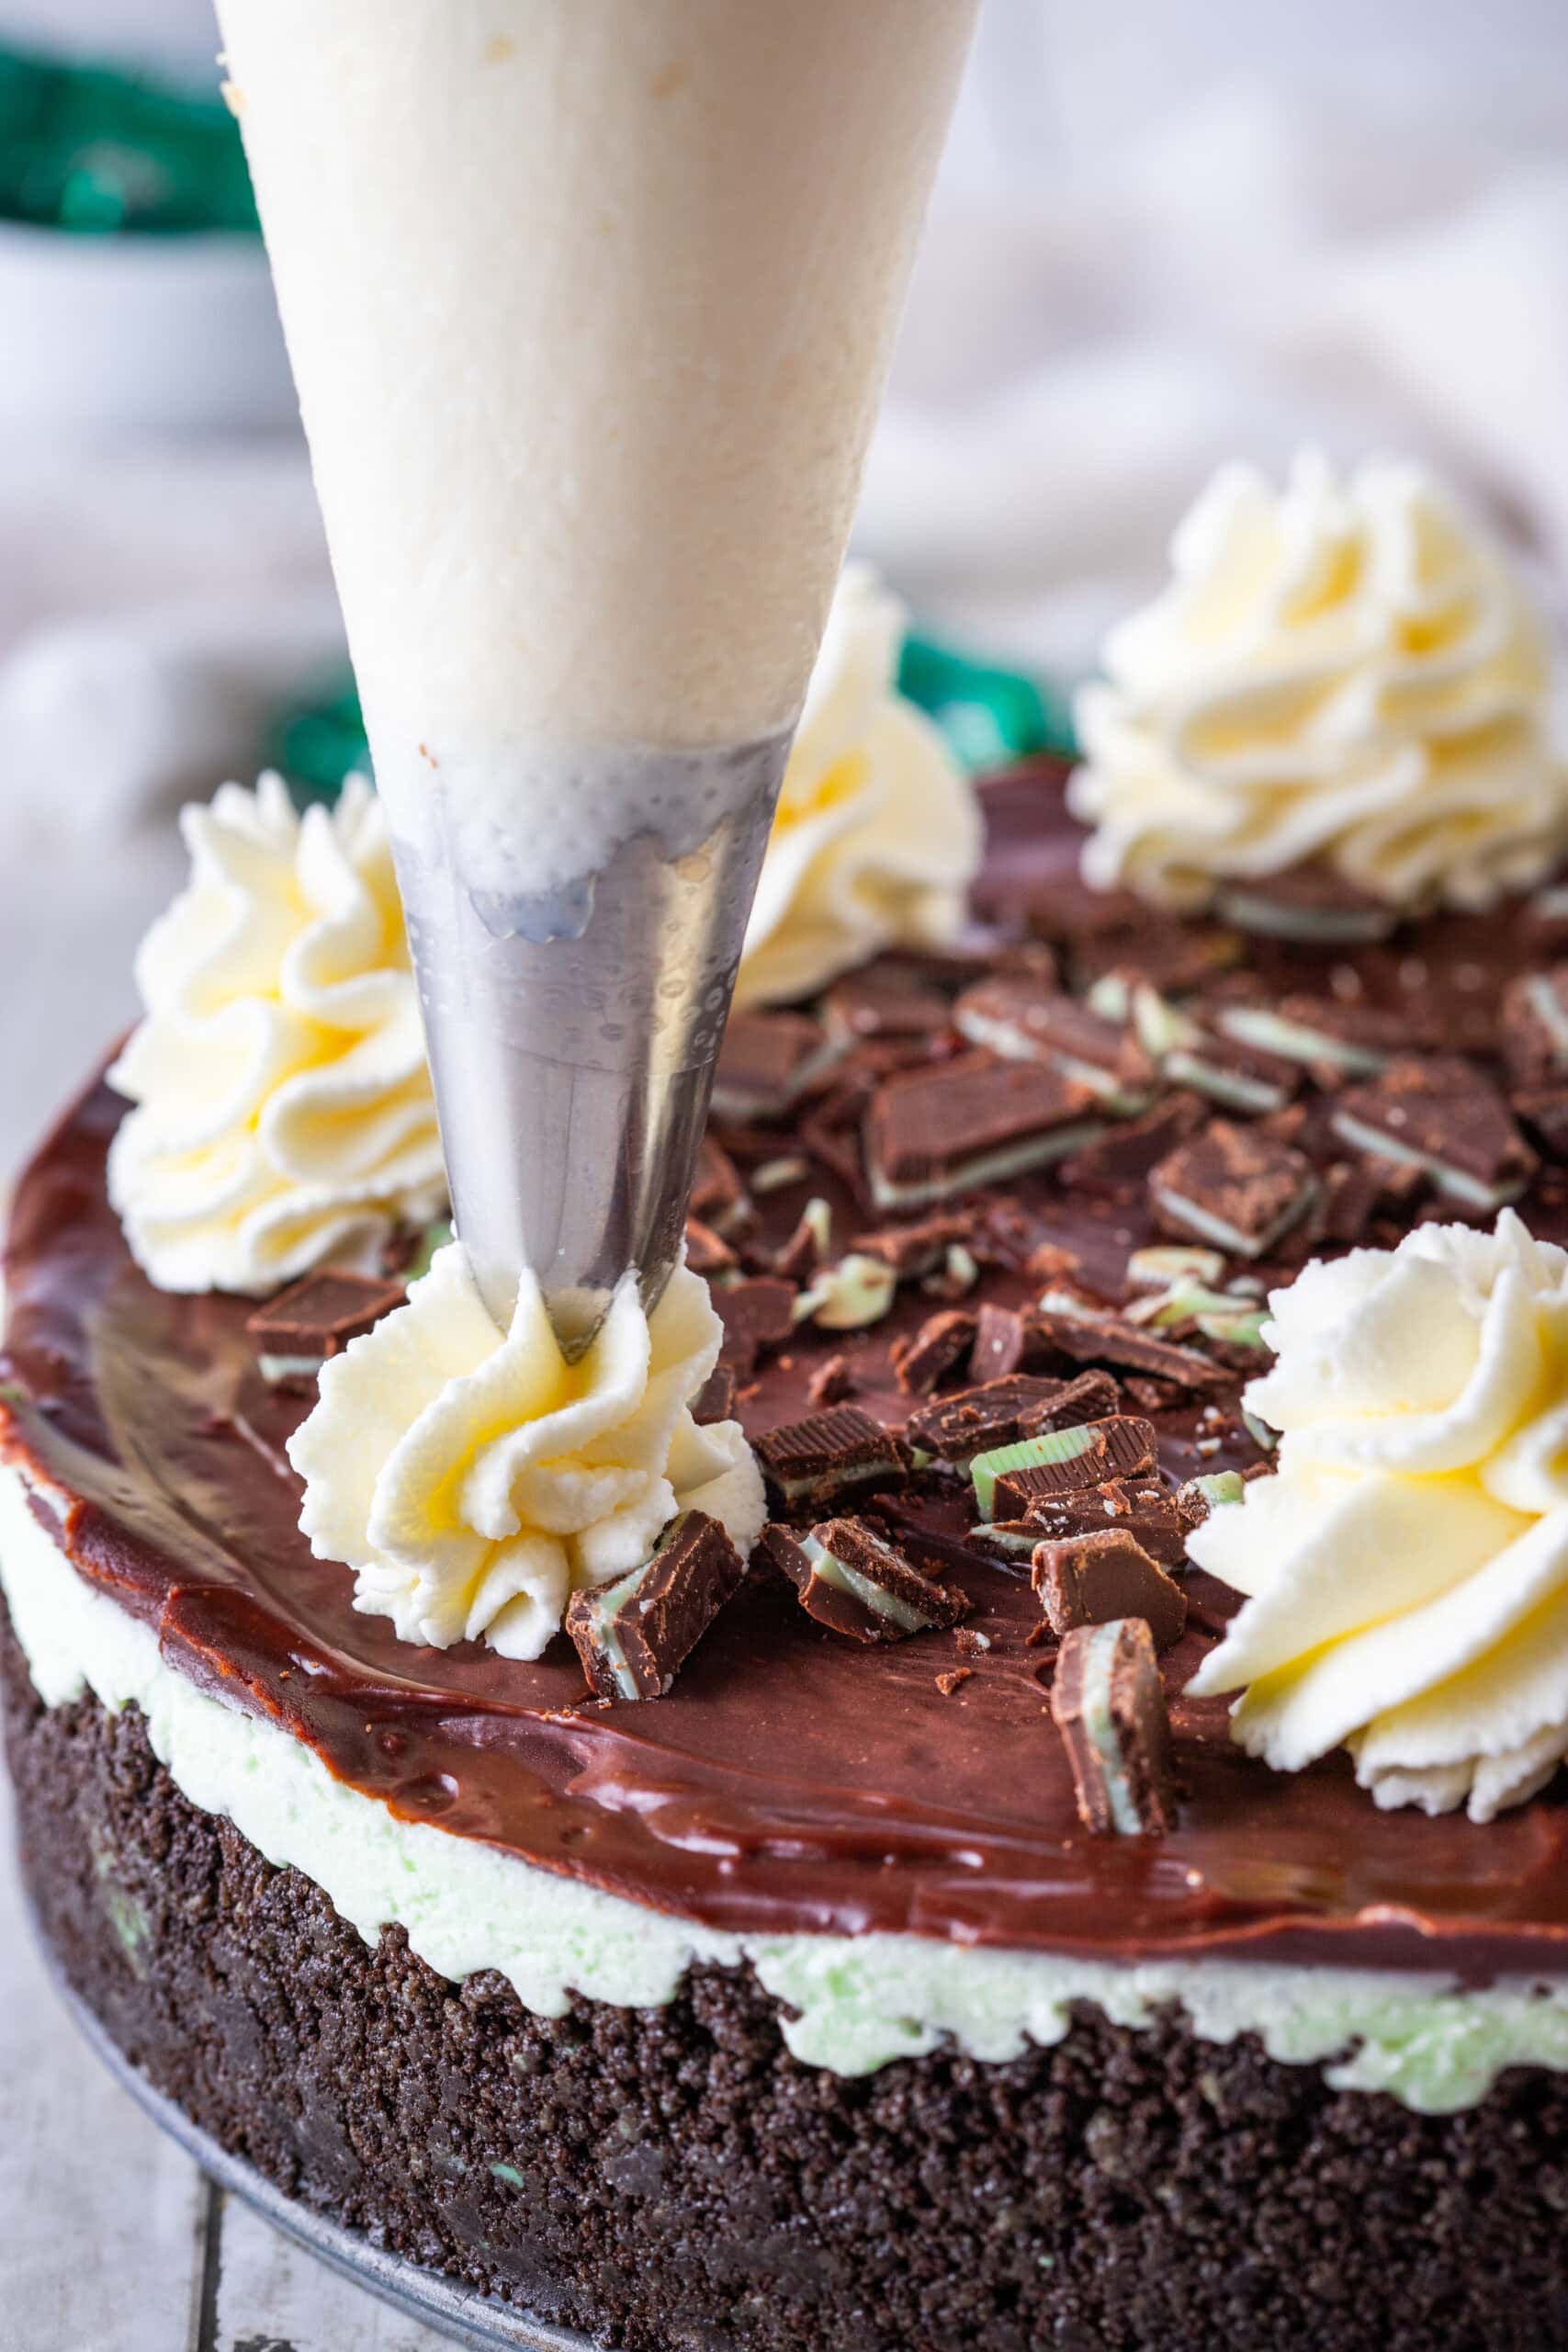
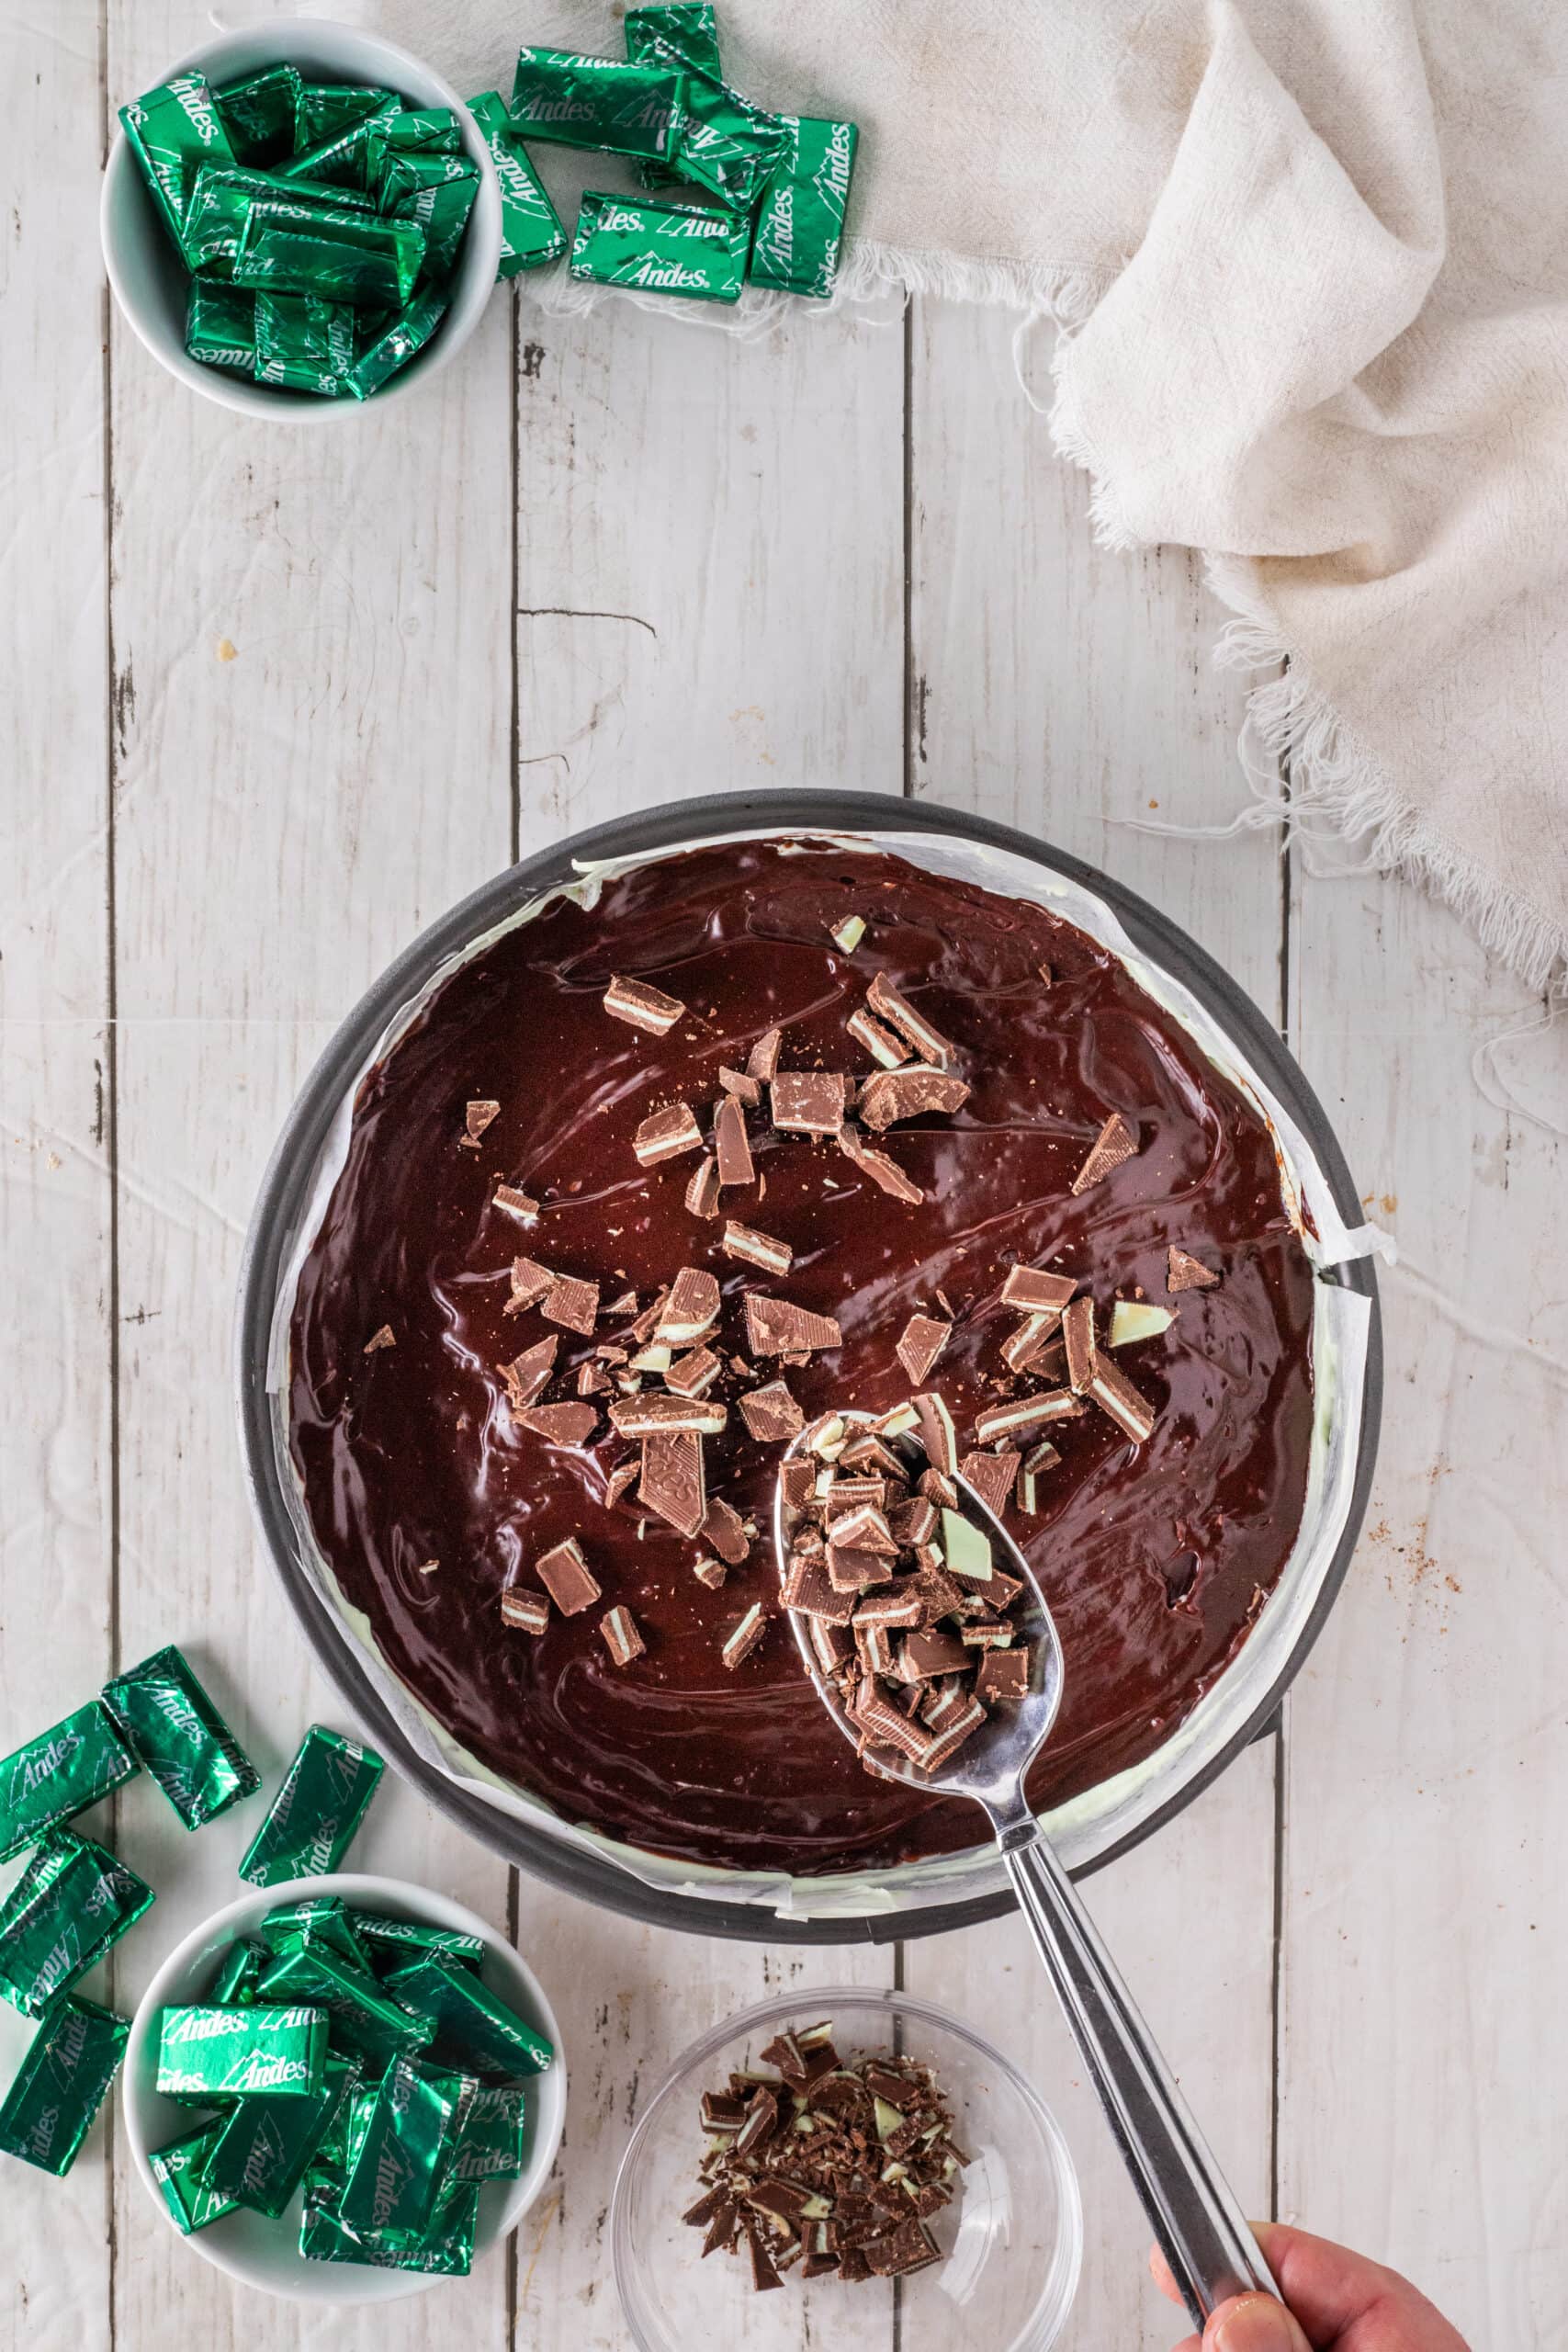
- Pipe or dollop whipped cream around the edges.
- Sprinkle chopped Andes Mints over the whipped cream. Garnish with halved Andes Mints for a show-stopping finish. (See photos.)
Substitutions & variations
This no-bake mint chocolate dessert is impressive just the way it is, especially at Christmas time and for your holiday parties. If you'd like to mix things up, I can share a few ideas with you!
Instead of a Mint Oreo cookie crust, use a prepared crust, such as a graham cracker crust or a chocolate graham cracker crust.
You can add a little creme de menthe and a swirl of chocolate fudge into the filling.
You can pour half the batter into the springform pan, add a layer of partly cooled hot fudge sauce, then add the remaining cheesecake batter on top, then the ganache or a drizzle of hot fudge and the chopped Andes Mints.
Don't put the chocolate ganache in the middle unless you make it very very thin. Ganache gets pretty hard in the fridge and will make your cheesecake hard to cut if it's in the center.
Storing leftovers
Cover the cheesecake tightly with plastic wrap or keep it in an airtight container. Store in the fridge for 3-5 days. Because it's made with heavy cream, this cheesecake needs to be refrigerated.
You can freeze the whole cheesecake or individual slices. Wrap each slice (or the entire cake) in plastic wrap, then foil, or place in a freezer-safe, airtight container. Freeze for up to 1 month for the best texture. Thaw overnight in the refrigerator before serving. Avoid thawing at room temperature. That can cause the filling to soften too much, weep, or spoil.
Check out more delicious cheesecake recipes.
- Chocolate Peppermint Cheesecake (baked)
- Candy Cane Kisses Cheesecake
- Fruity Pebbles Cheesecake (no bake)
- Cherry Cheesecake Brownies
- Chocolate Orange Cheesecake
- Chocolate Cherry Cheesecake
- S'mores Cheesecake
- Mini Pecan Pie Cheesecakes
- Mini Reese's Peanut Butter Cup Cheesecakes
- 15+ Christmas Cheesecake Recipes
Recipe
No-Bake Andes Mint Cheesecake
Ingredients
For the Mint Oreo Crust
- 24 Mint Oreos about 2 cups crumbs
- 5 tablespoons unsalted butter melted
For the Andes Mint Cheesecake
- 16 ounces cream cheese softened
- 1½ cups powdered sugar divided
- 1½ teaspoon peppermint extract adjust to taste
- A few drops green food color optional
- 2 cups heavy cream cold
- 1 cup chopped Andes Mints
For the Chocolate Ganache
- 1 cup semi-sweet chocolate chips
- ½ cup heavy cream
For Andes Mint Topping and Garnish
- ½ cup Whipped cream optional
- ½ cup chopped Andes Mints
- Andes Mints cut diagonally (see photos)
Instructions
Step One: Make the Mint Oreo crust.
- Crush 24 Mint Oreos into fine crumbs using a food processor (or place in a zip-top bag and crush with a rolling pin).
- Mix Oreo crumbs with melted butter until the crumbs resemble wet sand.
- Press Oreo mixture firmly into the bottom and about an inch up the sides of a 9-inch springform pan. Place crust in the freezer while preparing the filling.
Step Two: Prepare the no-bake cheesecake filling.
- In a large bowl, beat softened cream cheese and powdered sugar until smooth and creamy. Add peppermint extract and green food coloring, mixing until evenly tinted.
- In a separate bowl, whip cold heavy cream with ½ cup powdered sugar until stiff peaks form.
- Gently fold the whipped cream into the cream cheese mixture until well distributed. The peppermint cheesecake filling should be light and fluffy. Fold in the chopped Andes Mints.
- Spread filling evenly over the chilled crust. Refrigerate at least 4 hours or until firm (overnight is best). Place in freezer for the first hour or two to speed the chilling process.
Step Three: Make the ganache topping.
- Place the chocolate chips and remaining heavy cream in a microwave-safe bowl, and heat in microwave in 20 second bursts, stirring thoroughly after each time, until melted. This should only take 2-3 bursts. Stir until smooth.
- Allow the ganache to cool for about 10 minutes, then pour over the chilled cheesecake, spreading evenly. Chill for another 30 minutes in the freezer until the ganache is set. Do not allow plastic wrap or any other cover to touch the ganache while it sets.
Step Four: Garnish and serve.
- Pipe or dollop whipped cream around the edges.
- Sprinkle chopped Andes Mints over the whipped cream. Garnish with halved Andes Mints for a show-stopping finish. (See photos.)


Emily says
Is the 761 calories per slice or for the whole cheesecake?
Tara Gerner says
There are twelve 761 calorie servings in each cheesecake, according to my calculator. I’m not entirely confident in the number. I think it’s too high, but it is calculated automatically when I input the ingredients.
You will get the best estimate for calories by using the labels of all your ingredients and then dividing by how many slices you cut yours into. It’s definitely not a low calorie dessert.
Gordon says
This is the best kind of dessert - easy, delicious, takes no time to prepare. Everyone raved!