
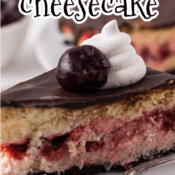

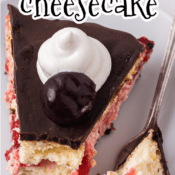
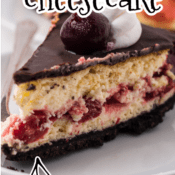
This chocolate cherry cheesecake recipe makes a rich, almond-flavored cheesecake with a layer of cherries in the center and a layer of chocolate ganache on top.
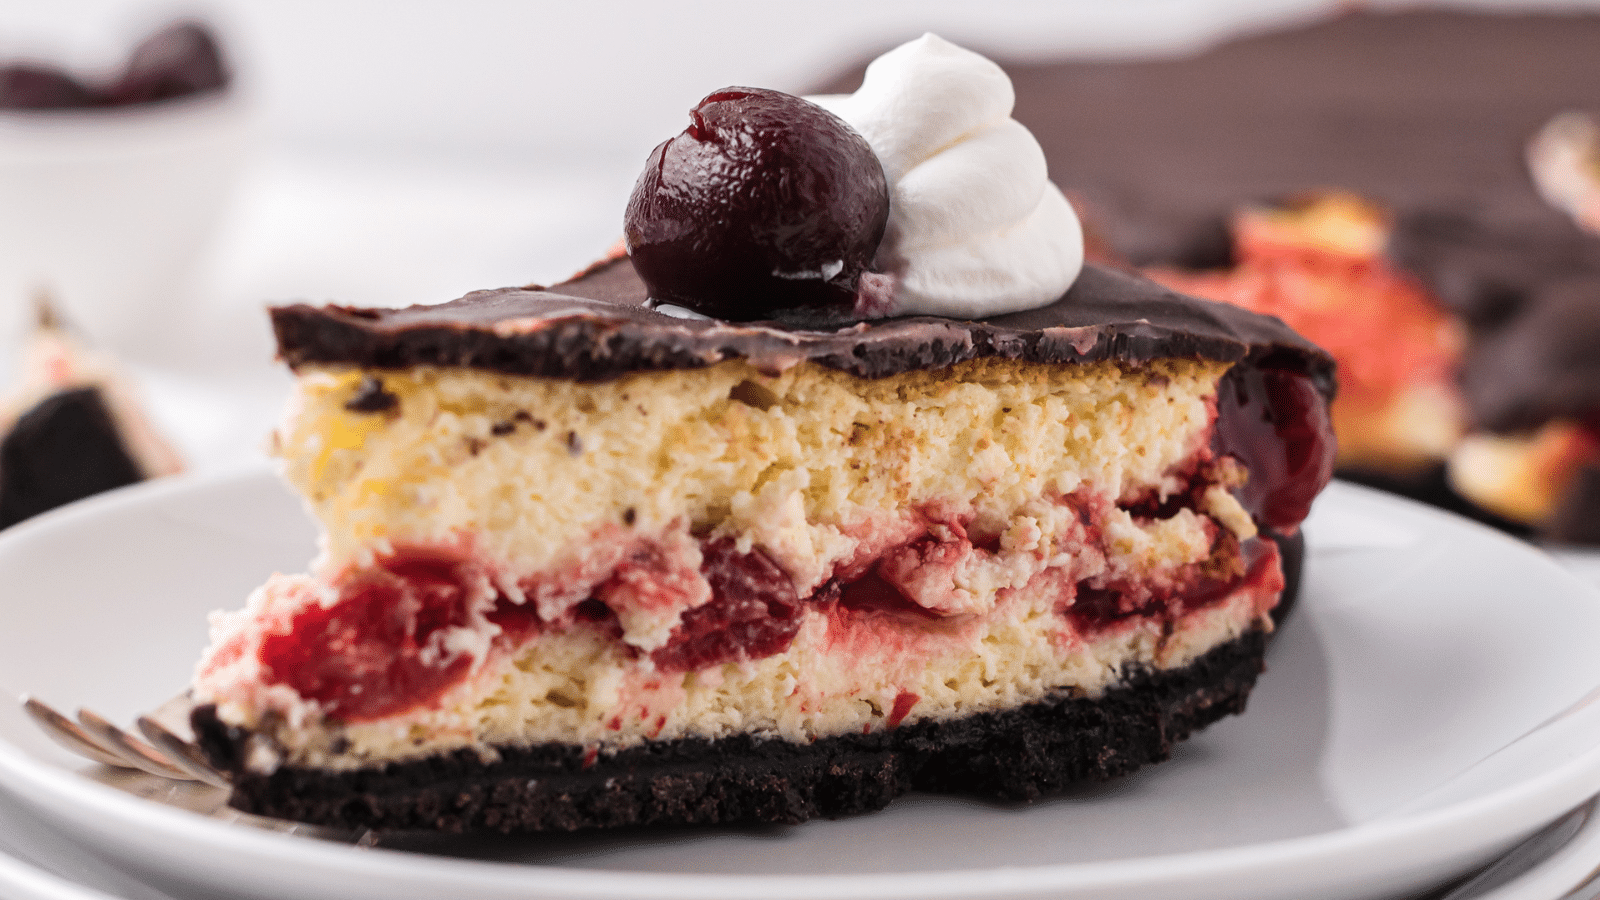
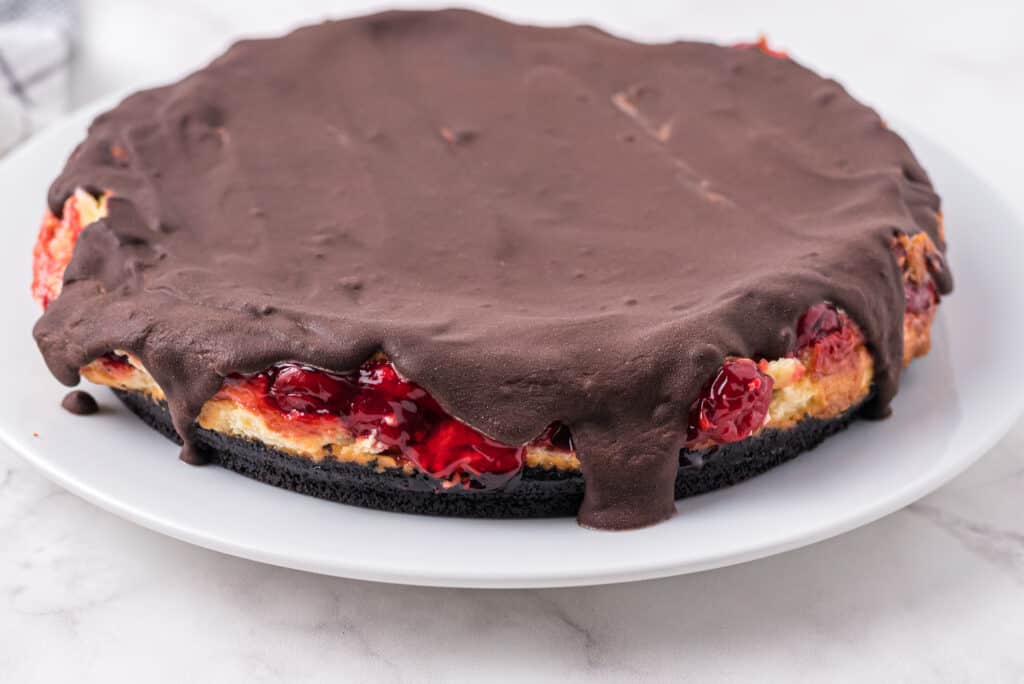
Imagine a black forest layer cake with cherries in the center and rich, chocolate ganache covering the top and pouring down over the sides.
Sounds decadent, doesn't it?
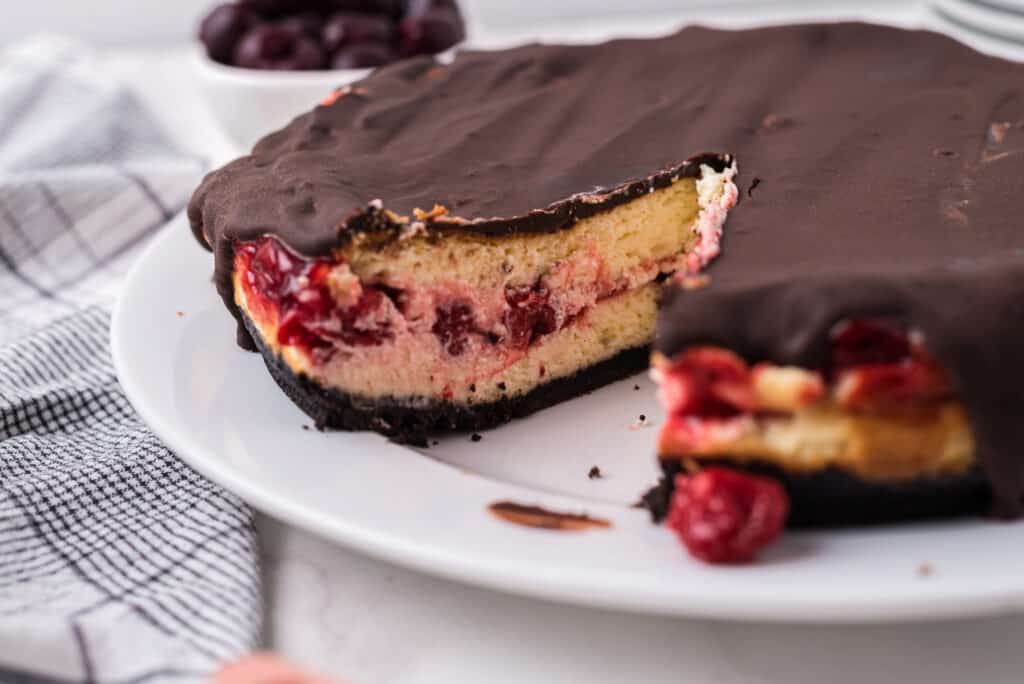
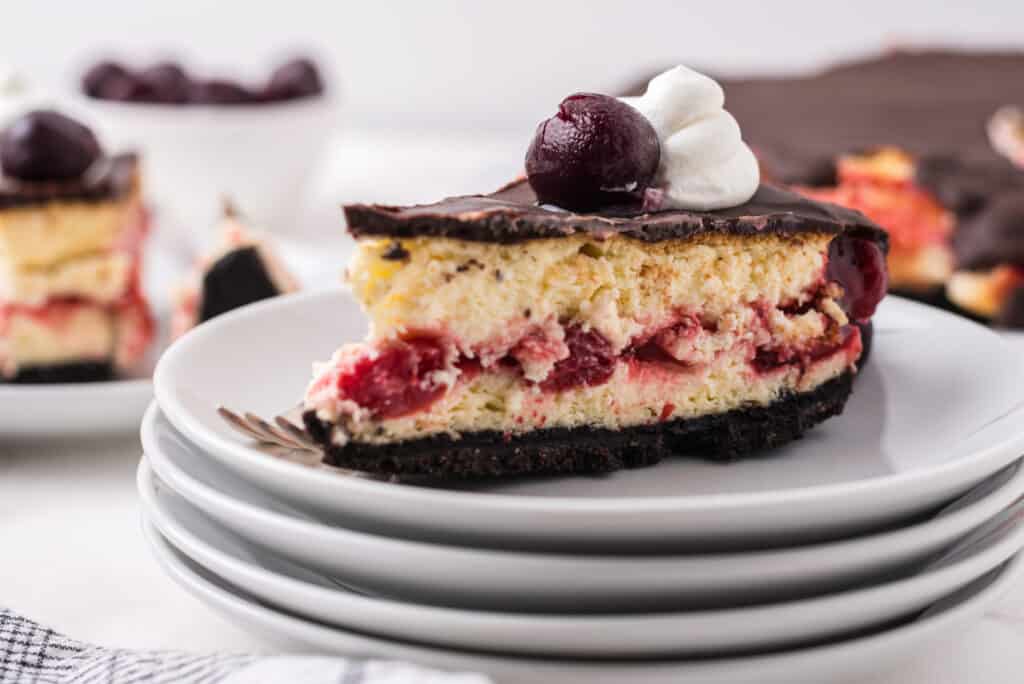
Now imagine the layers are made of cheesecake. That's what this cheesecake is - an Oreo cookie crust topped with a layer of cheesecake, then a layer of cherries, then another layer of cheesecake, and the whole thing is topped with rich chocolate ganache.
I took this cheesecake to my church's Thanksgiving service years ago, and there was nary a morsel left to bring home. It was sliced and resliced because everyone wanted a little piece.
I said to an older man, "I'll be sure to make that for our next event," and he replied, "Would you mind going home to start now?" with a straight face. It really is that good.
Since that year, I have made this chocolate cherry cheesecake every Christmas. The whole family looks forward to it.
To be honest, I only make this cheesecake once a year because making a cheesecake is challenging for me. I always overbeat the filling which always causes it to crack.
If you look back through the cheesecake posts on my blog, you will see a long history of cracked cheesecakes.
This cracking is why most of my cheesecakes get chocolate ganache on top. Chocolate ganache is little more than a thin layer of melted chocolate. It can be tough to cut through if you make it too thick, so keep it thin, but thick enough to cover the cracks.
Then you can pretend that your cheesecake didn't crack and looked magazine-worthy.
Who cares what it looks like? It's cheesecake. Your guests will love it.
One more thing before the recipe. One time, my daughter and I were making this chocolate cherry cheesecake recipe and one of us (I think it was her, but it might have been me) dropped it on the floor on the way into the oven. Fortunately, we were making it the day before we needed it, and there was time to run to the store and get new ingredients to start over. It happens to everyone at some point.
What you'll need to make the best chocolate cherry cheesecake recipe
EQUIPMENT
- Food processor - This makes easy work of the Oreo crust. If you have to crush the chocolate sandwich cookies by hand using a rolling pin or a mallet, it will take a lot longer and be a lot more tedious. Do yourself a favor and use a food processor or even a blender for the chocolate cookie crust.
- Springform pan - I don't know of any way to make a cheesecake without a springform pan. It's a special pan that has a glass bottom and sides that open and come off using a spring mechanism.
- Electric mixer - You don't need both a stand mixer and an electric hand mixer. One or the other will do. But I do recommend a mixer of some sort because cheesecake batter is heavy and difficult to mix properly with a whisk.
- Stand mixer
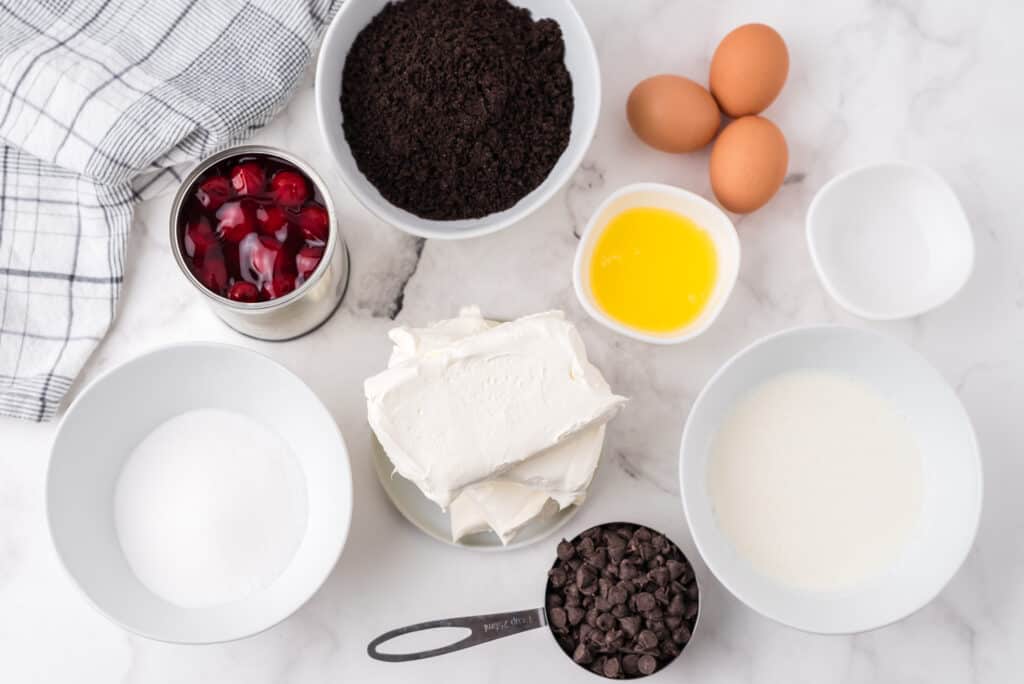
INGREDIENTS
See printable recipe card at the bottom of the page for all measurements and nutritional information.
- Oreo cookies or something similar. I bought the generic ones. - You will need to make crumbs which is easy to do if you have a food processor. If you don't have one, you can put the cookies in a zippered plastic bag and use a rolling pin to crush the cookies.
- Melted butter - This is what makes the crushed Oreos hold together to make a crust.
- Softened cream cheese - Get the real stuff! This is not the time for low-fat cream cheese. It needs to be room temperature. If you forget to leave it out (like I always do), you can microwave it one block at a time for about 30 seconds.
- Large eggs
- Heavy whipping cream
- White sugar
- Almond extract - I love the flavor of almond extract, and I go a little heavy-handed with it. If you prefer, you can leave it out or use vanilla extract instead.
- Cherry pie filling
- Semi-sweet chocolate chips
How to make a chocolate cherry cheesecake
- Preheat oven to 325º.
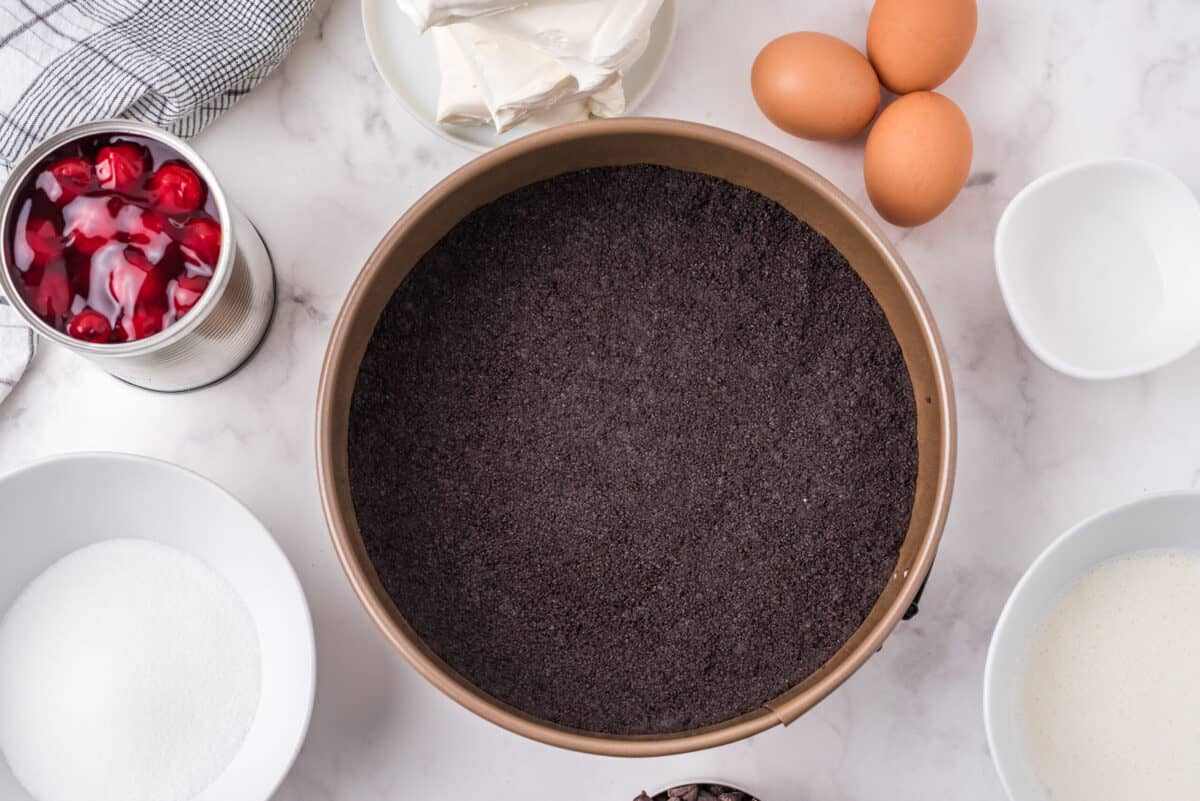
- Chop the cookies in your blender or food processor. The food processor makes quick work of this otherwise tedious and awful job. You want to end up with 2 cups of cookie crumbs. It took ¾ of the package of cookies for me, but could take more or less for you, depending on how fine you want the crumbs to be.
- Add the melted butter to the cookie crumbs and pulse it a bit more to blend everything together.
- Press the cookie crumbs into the bottom and sides of a springform pan. Aim to go about halfway up the sides and make it thin and uniform across the bottom of the pan.

- If you haven't already softened the cream cheese, put it in a medium bowl and microwave it for 30 seconds at a time, until it is soft enough to work with. (I used my stand mixer to mix the cream cheese and associated ingredients. I recommend that option, but if you don't have one, you could use a whisk or spatula. Prepare to have a sore arm.)
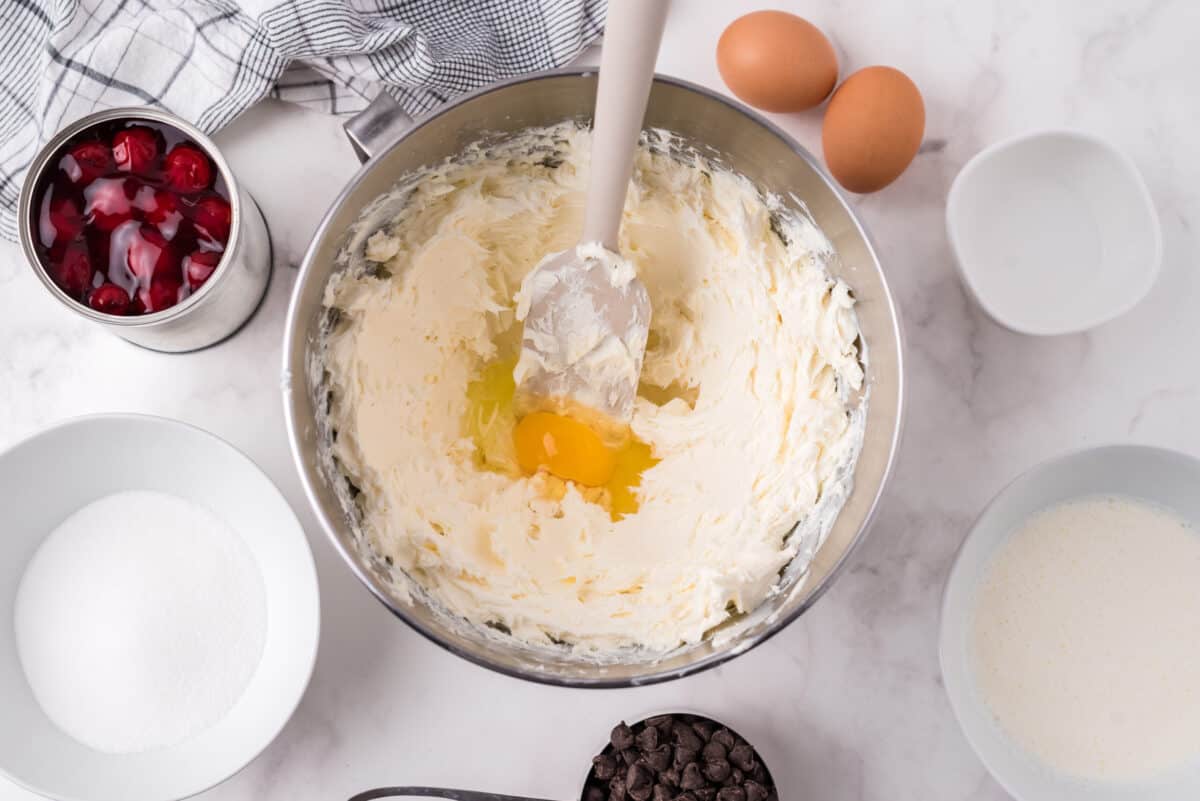
- Beat the cream cheese in your mixer until it is smooth. Just the cream cheese for now; don't add anything to it.
- Add the eggs, one at a time, and beat just until they are fully incorporated. Don't over beat the mixture. Beating too much will add air to your cheesecake, and that will make it rise too much in the oven and crack as it cools. Not the end of the world, but it looks nicer if it doesn't crack. And also, mine almost always cracks, so don't feel bad if it does.
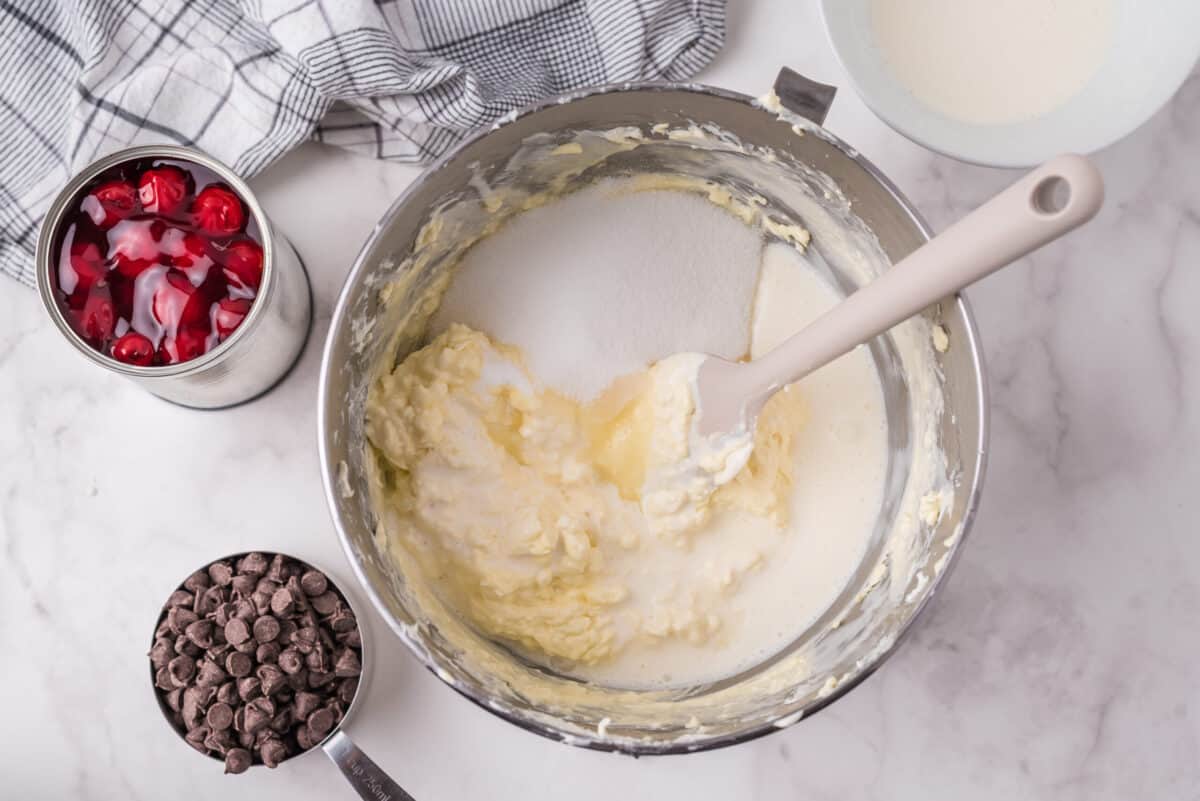
- Add ½ cup of the heavy cream along with the sugar and almond extract and beat until the mixture is smooth and evenly blended.
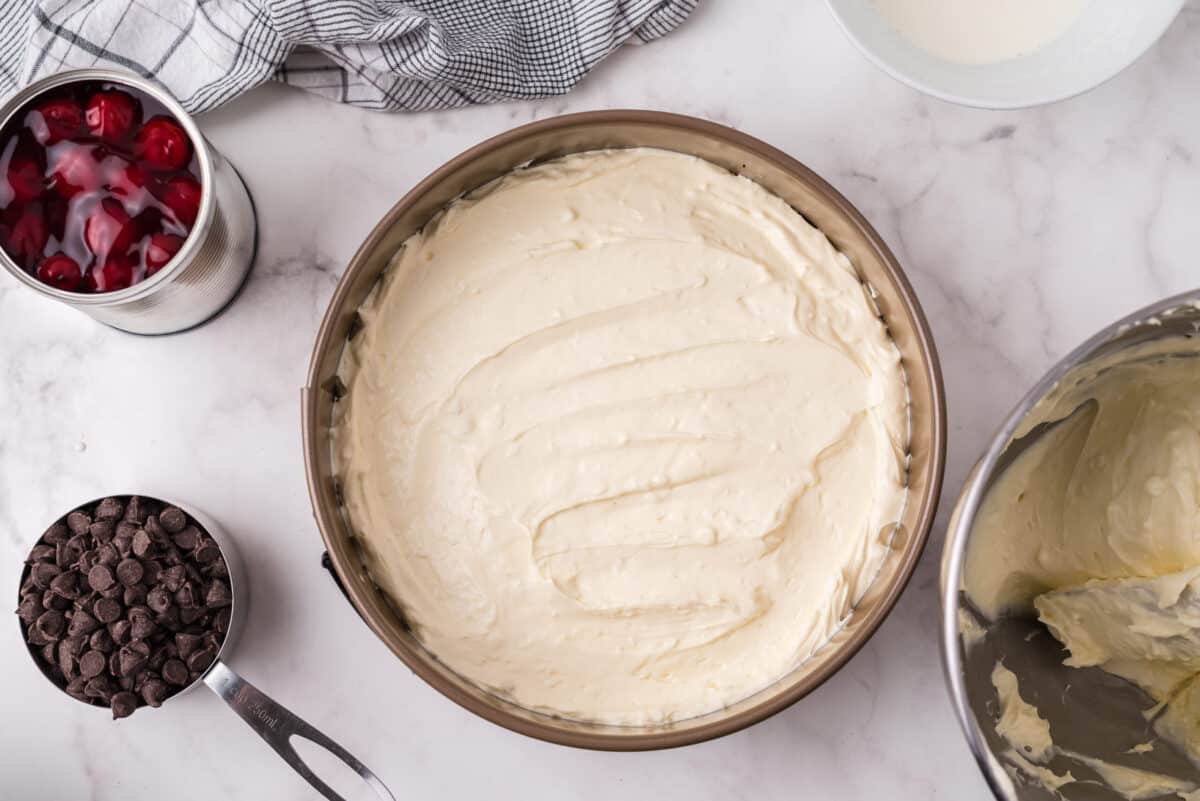
- Carefully pour a little more than half of the cream cheese mixture on top of the crust in the springform pan. Tap the pan on your counter a bit to work out air bubbles.
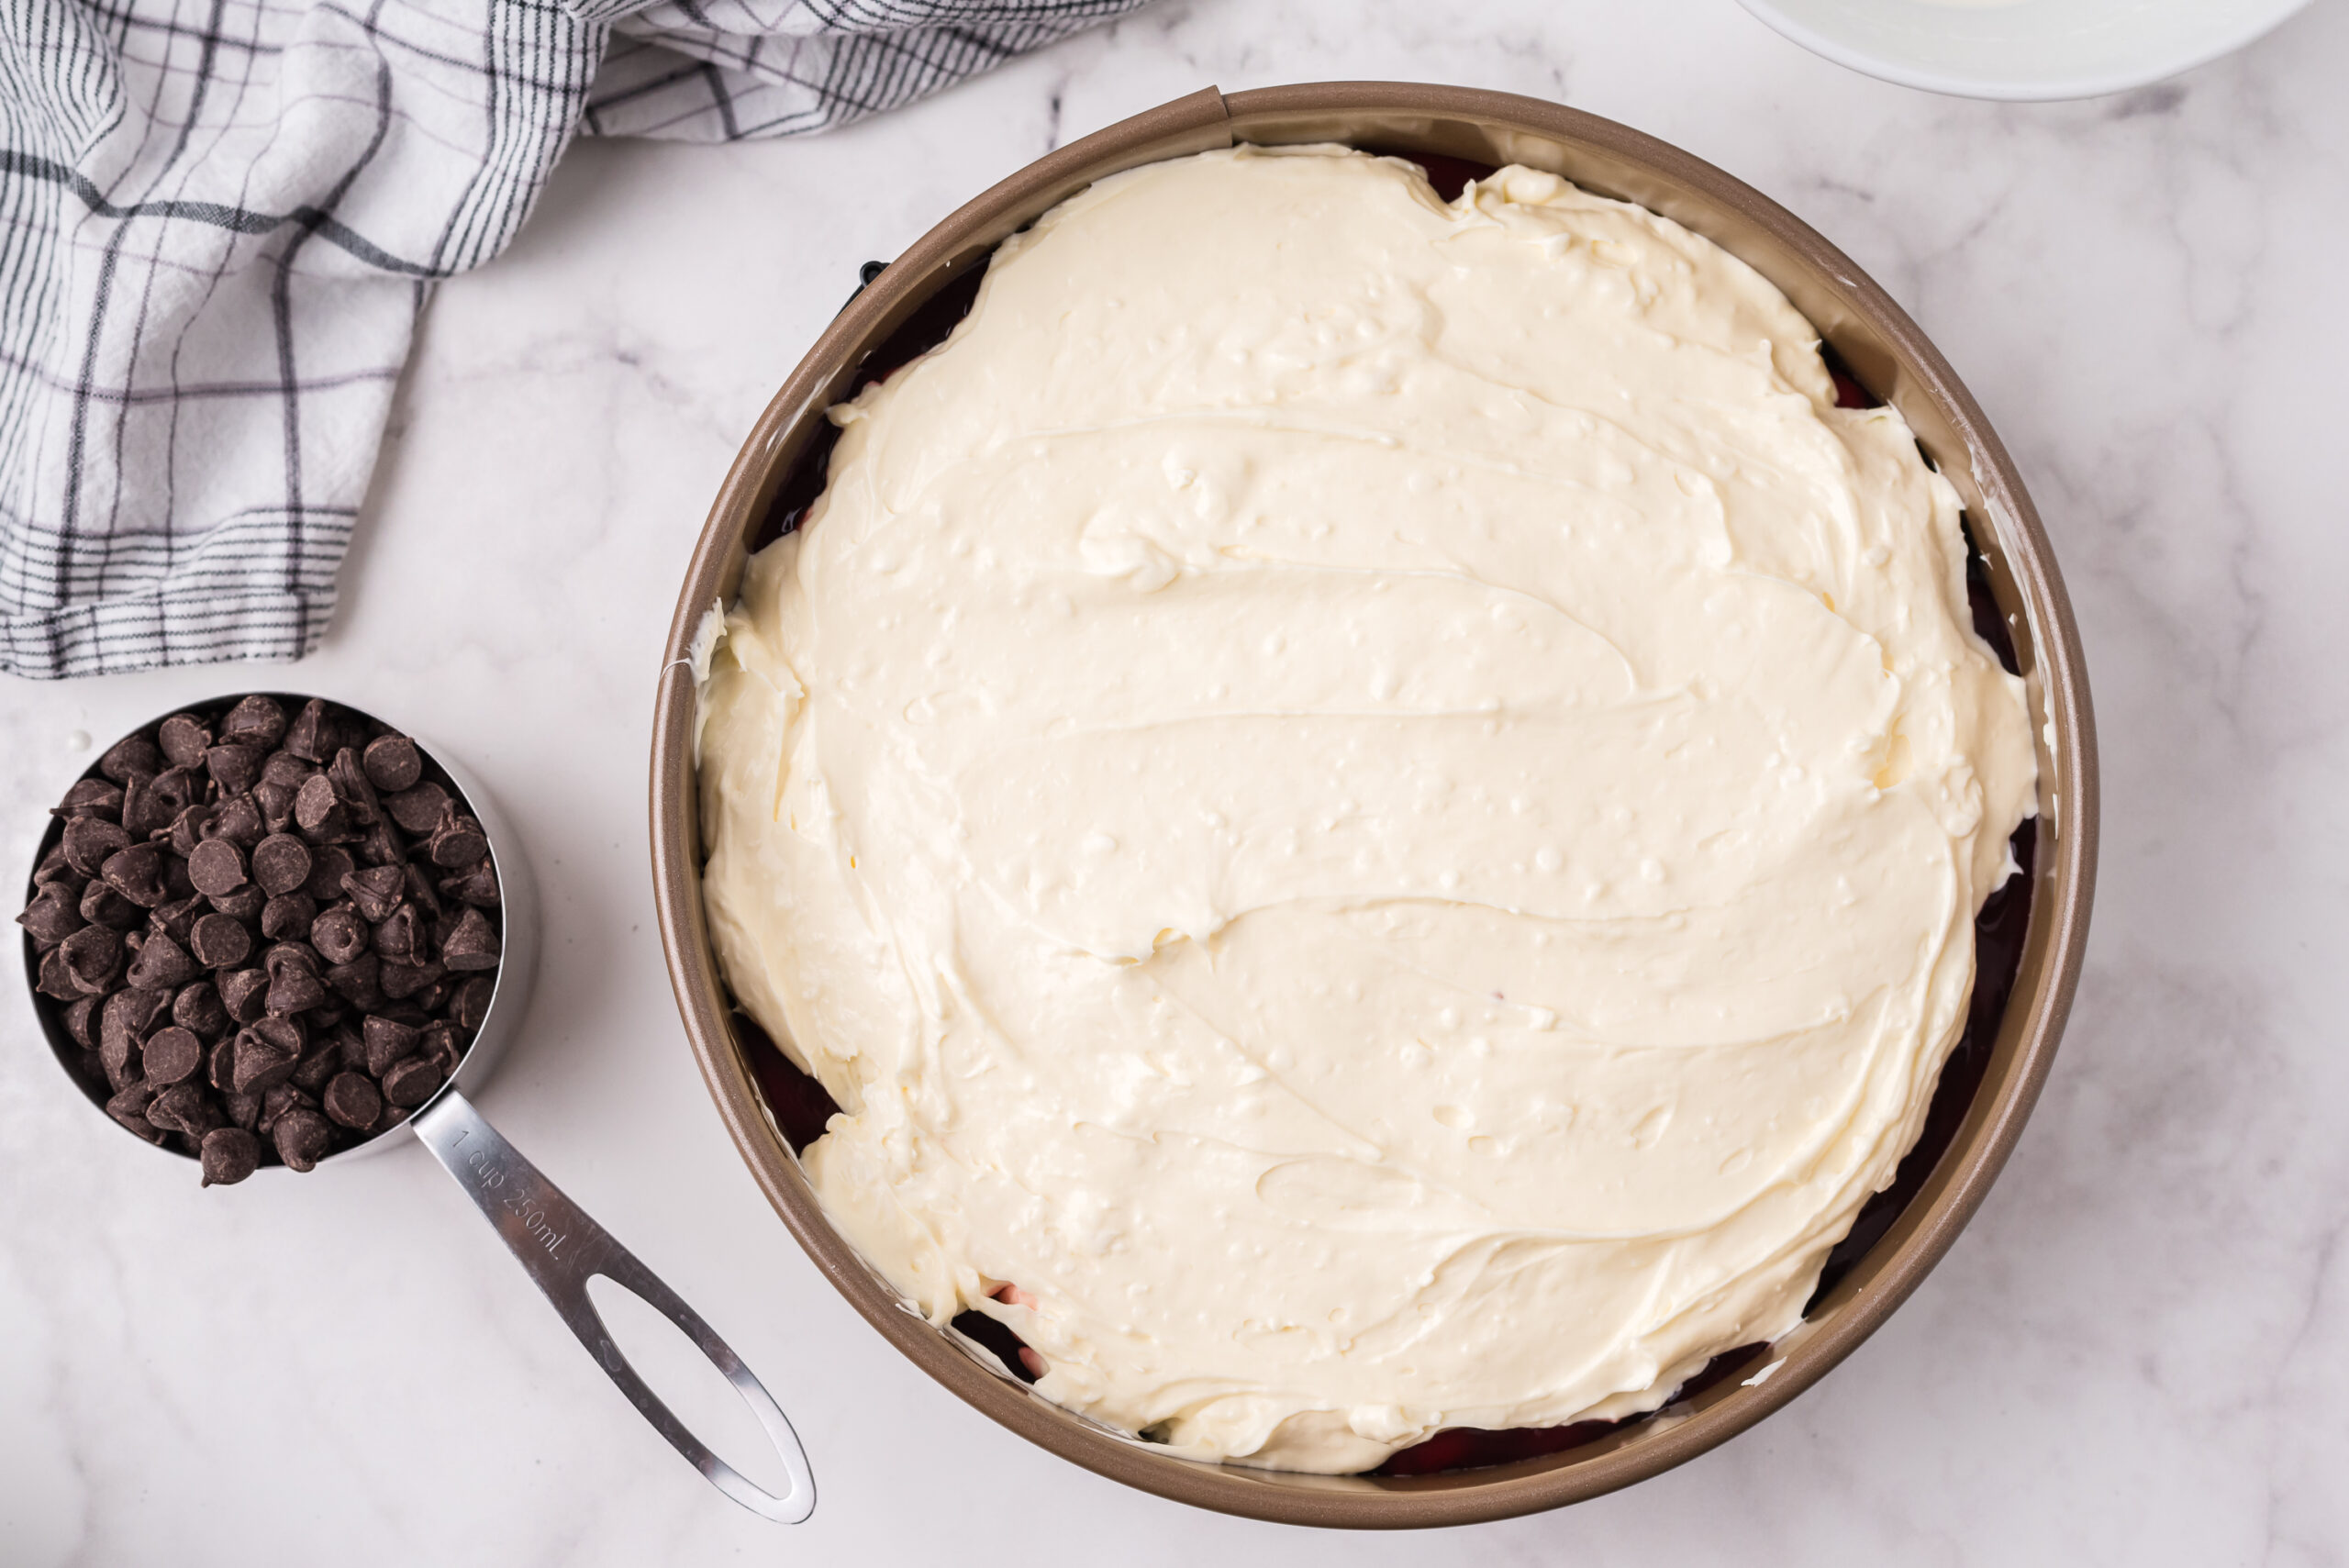
- Very carefully pour the can of cherry pie filling over the cream cheese mixture and spread it to the edges of the springform pan.

- Pour the rest of the cream cheese mixture over the cherry pie filling and smooth it out, again to the edges of the pan. Tap the pan on the counter again to work out any air bubbles.

- Place the springform pan in the middle of the oven, and put a cookie sheet or casserole dish underneath to catch the drips. THERE WILL BE DRIPS. Bake your cheesecake for 1 hour and 15 minutes. Mine took 1 hour and 25 minutes, but you should start checking it after an hour or so.
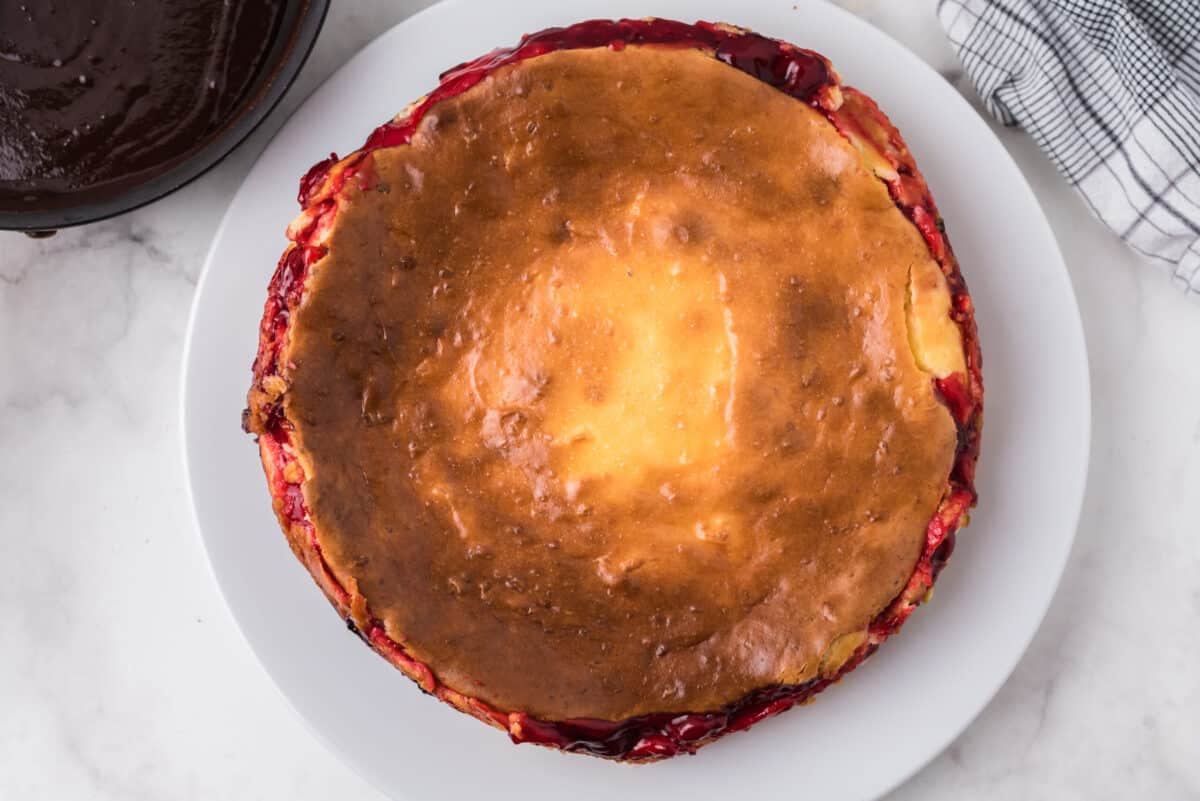
- When the outer half of the cheesecake is golden brown, the cheesecake is done. The center will still be soft and jiggle, but it will firm up while cooling. Turn the oven off and prop the oven door open a couple of inches. Let the cheesecake sit in the partially open oven for an hour to cool. Cooling it gently like this helps to prevent cracking.
- After an hour or so, remove the cheesecake from the oven and set it on a wire cooling rack. At this point, I run a knife around the edge of the cheesecake to free it from the springform pan, and I remove the pan sides. If you're in a hurry, you can move the cheesecake to the freezer at this point, but it's better to let it cool in the fridge overnight.
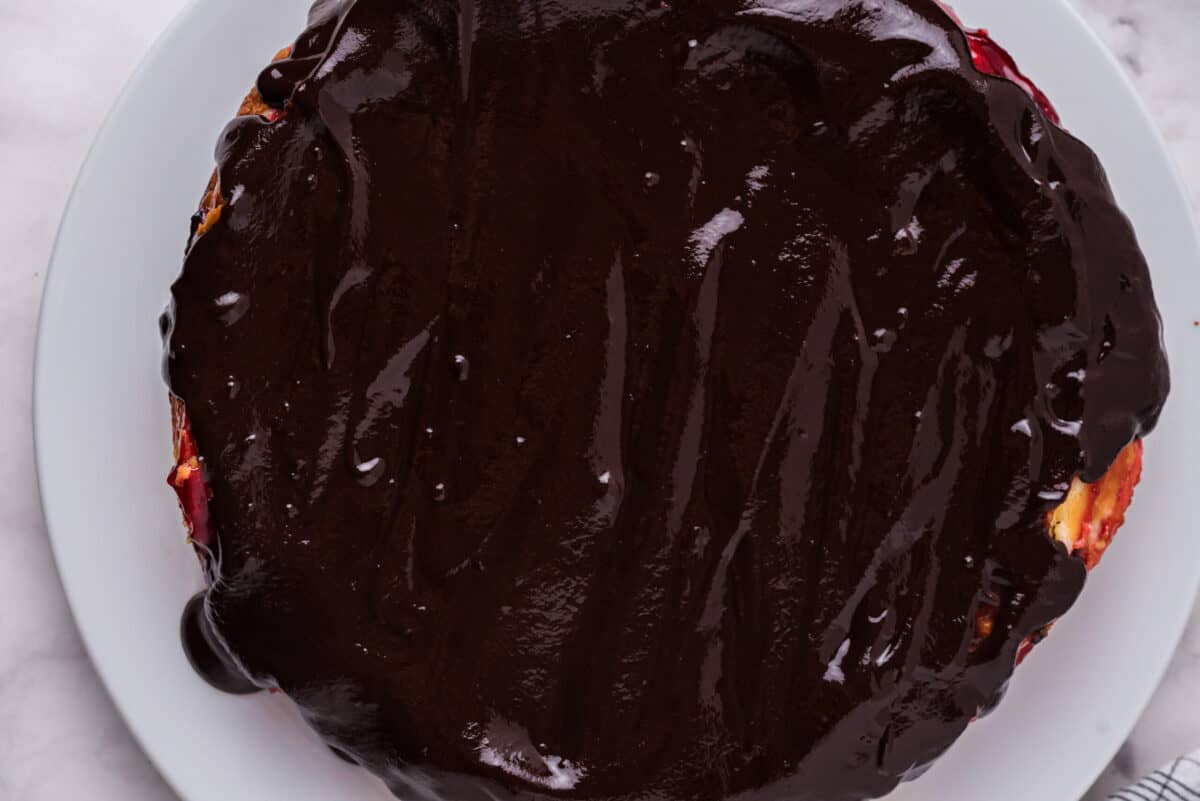
- When the cheesecake is cool, prepare the ganache. Make a batch of milk chocolate ganache. Use a fork to stir and smoosh the chocolate chips into the cream. Microwave again for 30 seconds and repeat. If there are still solid chips in the mixture, you can microwave it a third time, but I've never had to microwave more than twice.
- Place the cheesecake on a serving platter, and pour the ganache over its top, encouraging it to pour down over the sides. It makes a very nice presentation with the chocolate all around it on the platter.
- Refrigerate the chocolate-covered cheesecake for a minimum of 3 hours or overnight. If you need it sooner (like I did), you can chill it more quickly in the freezer for an hour or two to set the ganache and chill the cheesecake, but that is risky. It's better to make a day early and chill in the fridge.

Do I need a springform pan for this cheesecake?
Yes, you need a springform pan if you're going to make a cheesecake. The sides of a springform pan expand and can be removed so that you can slide a slice of the cake out easily. I honestly don't know what you could use if you don't have a springform pan. If you don't use one, you're going to have a huge mess on your hands when you try to cut the cheesecake.
Is a water bath necessary for this cheesecake?
Some recipes will tell you that a water bath is essential for baking a cheesecake. They claim that a cheesecake baked without a water bath will be dry, overly dense, or cracked. I have not found this to be the case with any cheesecake I've ever baked.
I personally think that water baths are risky because, if you don't get the springform pan wrapped tightly enough, the water will leak in and ruin your crust. I had that happen several times in my early cheesecake baking days.
After giving up on the springform-pan-in-the-water water bath, I used to put a pan of water on the rack below the cheesecake, allowing the steam to fill the oven. However, one time I forgot to do it, and guess what! The cheesecake was awesome. So now, I never use one because I have found that it is just not necessary. Why do the extra work if you don't need to?
Why did my cheesecake crack?
The most common reason for a cracked cheesecake is over beating the filling, resulting in an excess air in the batter. Extra air is the enemy of a cheesecake because it makes the filling puff up in the oven, and then it cracks as it cools and sinks.
You should never use a whisk to mix cheesecake filling. Don't use the whisk attachment on your mixer, either. If you're using a stand mixer, use the paddle attachment. If you're using a hand mixer, the beaters are good. And of course, if you're doing it by hand, go for a spatula instead of a whisk.
Even if you use a paddle attachment or the beaters, you could still add too much air if you beat and beat and beat the filling. So, never mix more than is absolutely necessary.
If you aren't sure if you've beaten it long enough, turn off the mixer and use a spatula to turn the filling over a few times and look for pockets of unmixed ingredients. If it's evenly mixed, don't beat any more.
One good thing about this cheesecake is that you're going to cover it with marshmallows, so even if it does crack, no one will know.
More tips for the best Chocolate Cherry Cheesecake
Use quality ingredients - Try to stick with the name brand ingredients, because the quality of your ingredients will make a huge difference in your finished cheesecake.
Keep the oven door closed - Don't peek at your cheesecake while it's baking. The cold air can shock the cheesecake and make it crack.
Likewise, when the cook time is done, and you've jiggled it to make sure the edges are set, put it back into the hot oven with the door cracked an inch or two, and let it cool in there for an hour. This also helps to prevent cracking.
Don't over bake - Don't over bake your cheesecake. Turn the heat off and crack the door open as soon as the outer edge is set. The center should be jiggly.
Try these other delicious cheesecake recipes while you're here:
- Chocolate Peppermint Cheesecake
- Chocolate Orange Cheesecake
- S'mores Cheesecake
- Pecan Crust Cheesecake (Naturally Gluten-Free)
- Candy Cane Swirl Cheesecake
- Peanut Butter Cheesecake Brownies
- No Churn Cheesecake Ice Cream
Recipe
Homemade Chocolate Cherry Cheesecake Recipe
Ingredients
- 1 package Oreo cookies or something similar. I bought the generic ones.
- 3 tablespoons butter melted
- 4 package cream cheese softened (Get the real stuff! This is not the time for low fat cream cheese.)
- 3 eggs
- 1 cup heavy whipping cream divided
- ¾ cup white sugar
- 1 teaspoon almond extract
- 1 can cherry pie filling
- 1 cup chocolate chips semisweet
Instructions
- Preheat oven to 325ºF.
- Chop the cookies in your blender. The blender makes quick work of this otherwise tedious and awful job. You want to end up with 2 cups of cookie crumbs. It took ¾ of the package of cookies for me, but could take more or less for you, depending on how fine you want the crumbs to be.
- Add the melted butter to the cookie crumbs and pulse it a bit more to blend everything together.
- Press the cookie crumbs into the bottom and sides of a springform pan. Aim to go about halfway up the sides and make it thin and uniform across the bottom of the pan.
- If you haven't already softened the cream cheese, put it in a medium bowl and microwave it for 30 seconds at a time, until it is soft enough to work with. (I used my stand mixer to mix the cream cheese and associated ingredients. I recommend that option, but if you don't have one, you could use a whisk or spatula. Prepare to have a sore arm.)
- Beat the cream cheese in your mixer until it is smooth. Just the cream cheese for now; don't add anything to it.
- Add the eggs, one at a time, and beat just until they are fully incorporated. Don't over beat the mixture. Beating too much will add air to your cheesecake, and that will make it rise too much in the oven and crack as it cools. Not the end of the world, but it looks nicer if it doesn't crack. And also, mine almost always cracks, so don't feel bad if it does.
- Add ½ cup of the heavy cream along with the sugar and almond extract and beat until the mixture is smooth and evenly blended.
- Carefully pour a little more than half of the cream cheese mixture on top of the crust in the springform pan. Tap the pan on your counter a bit to work out air bubbles.
- Very carefully pour the can of cherry pie filling over the cream cheese mixture and spread it to the edges of the springform pan.
- Pour the rest of the cream cheese mixture over the cherry pie filling and smooth it out, again to the edges of the pan. Tap the pan on the counter again to work out any air bubbles.
- Place the springform pan in the middle of the oven, and put a cookie sheet or casserole dish underneath to catch the drips. THERE WILL BE DRIPS. Bake your cheesecake for 1 hour and 15 minutes. Mine took 1 hour and 25 minutes, but you should start checking it after an hour or so.
- When the outer half of the cheesecake is golden brown, the cheesecake is done. The center will still be soft and jiggle, but it will firm up while cooling. Turn the oven off and prop the oven door open a couple of inches. Let the cheesecake sit in the partially open oven for an hour to cool. Cooling it gently like this helps to prevent cracking.
- After an hour or so, remove the cheesecake from the oven and set it on a wire cooling rack. At this point, I run a knife around the edge of the cheesecake to free it from the springform pan, and I remove the pan sides. If you're in a hurry, you can move the cheesecake to the freezer at this point, but it's better to let it cool in the fridge overnight.
- When the cheesecake is cool, prepare the ganache. Microwave ½ cup heavy cream with 1 cup of chocolate chips for 30 seconds. Use a fork to stir and smoosh the chocolate chips into the cream. Microwave again for 30 seconds and repeat. If there are still solid chips in the mixture, you can microwave it a third time, but I've never had to microwave more than twice.
- Place the cheesecake on a serving platter, and pour the ganache over its top, encouraging it to pour down over the sides. It makes a very nice presentation with the chocolate all around it on the platter. You can also add whole cherries while the ganache is hot and runny.
- Refrigerate the chocolate-covered cheesecake for a minimum of 3 hours or overnight. If you need it sooner (like I did), you can chill it more quickly in the freezer for an hour or two to set the ganache and chill the cheesecake, but t is risky. It's better to make a day early and chill in the fridge.

Cindy says
Oh, my goodness. My blood sugar levels rose just reading this post! Maybe someday I'll try it, when I have lots and lots of people to share it with so I don't eat it all myself. :0)
Feels Like Home Blog┞¢ says
There's a reason that I made it for a church function. 🙂 I'm going to make it again for our Christmas dinner at church. It's much too dangerous to make and have sitting around.
Rusty says
Great looking cheesecakes! Have you ever tried using homemade vanilla extract or even vanilla bean paste? I run http://makingvanilla.com and I absolutely love making cheesecakes with my own pure vanilla extract. The best thing about it is that it's actually cheaper than store-bought!
Thanks for the recipe!
Kathleen Backhus says
It looks delish but you didn't say what size cream cheese . there are two sizes.please hurry with comments I want to make this for 60 people on wednesday. Also I want to use a 9x13 springform pan can you tell me the ing. amounts for this size pan? Thank you SOOOO very much for your quick response. and God bless you for helping so many of us be a blessing to soo many others.
Tara Ziegmont says
8 ounces
Kathleen Backhus says
thanks for the reply. Now for the second question I asked if this recipe was enough for a 9x13 spring form pan or do I need to double it or what ?(please hurry!!
Tara Ziegmont says
I've never seen a 9x13 springform pan. This recipe fills an 8 or 9-inch round sprinform pan. I wouldn't try to double it because it may not cook right. I'd make 2 in smaller round pans.
Heather says
I have been going to make this recipe ever since I found it in the Pillsbury Christmas 2007 recipe book. Your version is a little different, and uses Oreos for the crust instead of chocolate wafer cookies which are impossible to find! I wondered if Oreos would work and I guess they do! Thanks!
Sheri says
I made this cheesecake a few months ago and can’t stop thinking about it-it was SO yummy! Making it again today. I didn’t have a can of the traditional cherry pie filling so I used a can of organic pitted cherries drained. I liked using these cherries instead of the pie filling. Easy to follow recipe and once again-SO yummy!
Tara Gerner says
Great idea! Thank you for sharing your tip.