

Earlier in July, I posted a terrific article (if I do say so myself) on the science behind slime and all the cool lessons and activities you could do to teach real science concepts like viscosity and non-Newtonian fluids. Buried in that post was this printable, and I was afraid it might get lost in the sliminess.
So, below is the section from that post explaining what the scientific method is and how it can guide any experiment you do or answer (almost) any question you and your kids have about a sciencey subject.
I love the scientific method, and when I was a high school science teacher, I used a paper airplane lab to teach the steps.
The Scientific Method Steps
The scientific method is the backbone of all science. It's the general set of steps that all scientists and researchers follow in order to learn new stuff about the world, although it is fluid and flexible and sometimes done in a different order. But essentially, here's what happens:
- Observe a situation.
- Identify a problem or question. What do you want to learn or answer?
- Research the problem or question, possible causes and factors that could affect it. What do you already know or can you learn from others' work?
- Write a hypothesis or educated guess based on the information you have. What do you predict will happen?
- Create an experiment to test the hypothesis. Use this opportunity to talk about variables and trials (explained below).
- Observe and analyze the results. What happened?
- Draw conclusions. What did you learn? Was your hypothesis proved or disproved?
- Report the results of your experiment.
Then you start over, tweaking your hypothesis given the new information that you have. You might repeat this process four or five times or even more depending on your experiment and variables.
The steps of the scientific method are typically done in order, but after you get to the end, you may come back to step 4 and create a new hypothesis without additional research. Or you may come back to step 5 and create a new experiment to retest your existing hypothesis/prediction. The steps are a guideline but there is room to jump around a bit and continue your scientific investigation.
Free scientific method worksheet
I created this free scientific method printable resource that you can grab and fill out with your kids. It's appropriate for all grade levels, although probably best for elementary students as older kids might find the font a bit juvenile. (We all know how cool they are.)
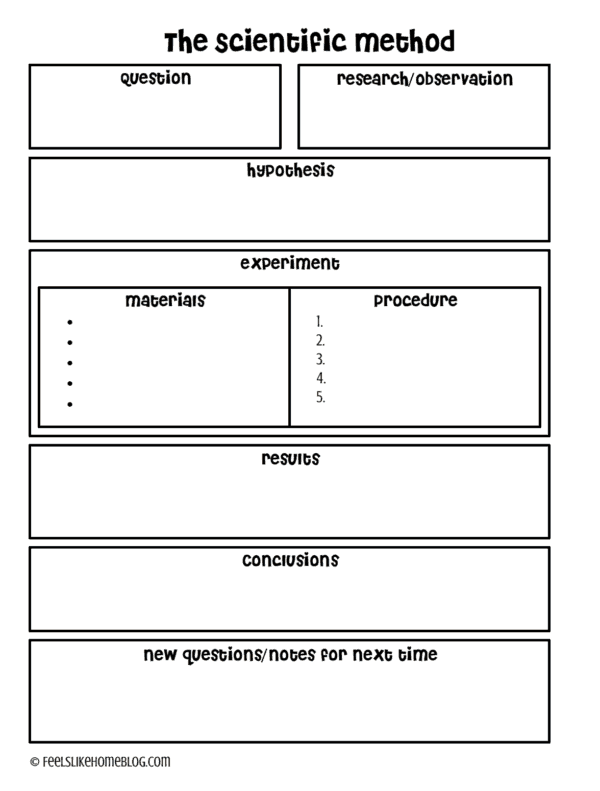
Hint: a great way to write the question in the beginning is to follow this format:
What effect will ___________ have on___________?
Variables
Variables are things that change during an experiment. Part of designing an effective experiment is identifying and manipulating the variables. Independent variables are variables that you can control, such as the amount of glue or the amount of water. Dependent variables are variables that change as the independent variables change, such as the stickiness of the slime you create. Finally, controlled variables (or "controls") are the variables that never change, such as the combination of ingredients used (you would change the amounts of the ingredients, but each batch of slime would use the same list of ingredients.).
In a well-designed and simple experiment, you would only have one independent variable. You might want to test the effect of water on the slime, so you try several different recipes using different amounts of water, but you don't vary the amount of glue or borax at all. Or perhaps you want to test the effect of borax on the slime, so you do several different recipes, each with a different amount of borax, while keeping the amount of glue and the amount of water constant.
You may have heard the term "control group" before. That's the trial where you do everything normally with no changes to the independent variable. It's like the status quo, the regular, normal state of things. Having a control group allows you to see the results of your change.
Trials
A trial is one run of an experiment. In some experiments, only one trial can be performed, but to get the best results, you often will do at least three trials with identical situations. For example, in the paper airplane lab below, you would get results if you flew each airplane one time. However, if you threw each airplane three times and took the average of the three results, you would have a much more reliable picture of the airplane's true behavior.
In the slime example, it doesn't make much sense to make each recipe three times. That would be a waste of your materials as, presumably, if you use the same recipe each time, the results will be the same.


Sara says
Thank you so much for the free printable. I'm printing this blog post as well for my own reference while teaching the scientific method to my second-grader.
P. Officer says
Thanks for the template
Lisa Gonzalez says
This was just what I needed for my Intermediate level Science class. Thank you!
KIm says
How do I download?
Tara Gerner says
https://feelslikehomeblog.com/wp-content/uploads/2017/07/The-Scientific-Method-report-form.pdf