Couldn't Be Easier Cherry Pie Recipe
This easy cherry pie recipe takes about three minutes to assemble and then 45 minutes to bake. There is no easier and more delicious cherry pie out there. You're going to love it!
Ingredients
- 2 unbaked pie crust I always buy these in the dairy case pre-made. I am normally a make-it-from-scratch kind of girl, but on Thanksgiving, there's so much to do already, without making homemade pastry dough. I have gotten the store brand and the Pillsbury, and both come out very nicely.
- 2 cans cherry pie filling I have used both the regular and the lower sugar. These days I use either 2 cans of regular or one of each. (Two cans of lower sugar with Splenda makes the pie come out tasting odd.), with Splenda
- 1 teaspoons almond extract
- milk
- sugar
Instructions
- Preheat oven to 425.
- Place one pie crust in a deep dish pie plate. Allow your little helper to use her fingers to press it into the bottom, sides, and especially the corners of the plate. (Yes, pie plates are round and don't have corners. I mean the place where the sides connect to the bottom. That's kind of a corner.)
- Open the cans of pie filling and scrape it into the pie plate. Add the almond extract and mix it with the cherries and juice. Smooth it all out with a spatula.
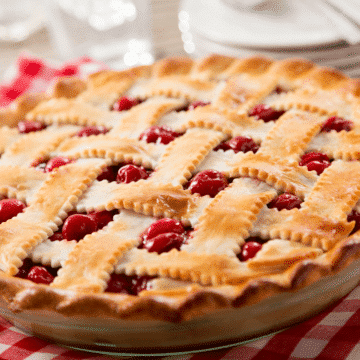
- Lay the remaining pie crust on a large cutting board (or directly on the counter). Help your helper to make four cutouts (these will allow the steam to leak out of the pie; without them, the top crust will have big air bubbles trapped under it). If you don't have a cookie cutter, you could cut a couple of Xs or even a couple of slits with a sharp knife after you've put the top crust on the pie.Alternately, if you're feeling fancy and have a few extra minutes, you could cut the pie crust into strips and make a lattice on top of the pie. You just lay a few strips on direction, and lift up the strips to weave in a few strips going the other direction. Here's a YouTube video explaining the lattice crust process.
- Carefully lay the second pie crust on top of the pie filling, and press the edges together. You may need to use a bit of water or egg to get them to stick together nicely. Cut the top crust so that it's even with the bottom crust, and finish the edge however you want.
- Brush the top crust with milk and sprinkle with sugar. This is just to make it pretty and not at all necessary.
- Bake until the crust is golden brown, about 40-45 minutes. After the first 15 minutes, cover the outer edge of the pie with aluminum foil or a pie shield to make sure it doesn't get too brown. (See link in notes for a pie shield.)
- Cool at least an hour before serving. The filling will set up as the pie cools.
Notes
If the crust gets too brown on the edges, use a ring of aluminum foil so that the center continues to brown while the edge is protected. Better yet, invest in a couple of pie shields before the holidays so that you’ll be prepared for that and don’t end up trying to make an aluminum foil ring while your pie crust is turning black.
Nutrition
Calories: 732kcal | Carbohydrates: 124g | Protein: 6g | Fat: 22g | Saturated Fat: 7g | Polyunsaturated Fat: 3g | Monounsaturated Fat: 10g | Sodium: 401mg | Potassium: 395mg | Fiber: 4g | Sugar: 0.1g | Vitamin A: 608IU | Vitamin C: 11mg | Calcium: 49mg | Iron: 3mg
Tried this recipe? Pin it for later!Follow @FeelsLikeHome or tag #FeelsLikeHomeBlog!