• Skip to primary navigation
  • Skip to main content
  • Skip to primary sidebar

Feels Like Home™ logo

white magnifying glass on a red circle
  • Shop
    • Christianity Downloads
    • Family Downloads
    • Food & Cooking Downloads
    • Hobbies & Crafts Downloads
    • Learning Downloads
  • All Recipes
    • By Course
      • Appetizers
      • Breakfast
      • Condiments & Spices
      • Desserts
      • Drinks
      • Lunches & Dinners
      • Side Dishes
      • Snacks
    • By Method
      • 30 Minute Meals
      • Oven
      • Stove Top
      • Air Fryer
      • Instant Pot
      • Slow Cooker
      • Copycat Recipes
      • Grill
      • Microwave
      • No Bake
    • By Meat
      • Beef
      • Pork
      • Chicken
      • Turkey
      • Seafood
      • Meatless
    • By Cuisine
      • Asian
      • Italian
      • Mexican
      • Eating after Bariatric Surgery
      • Gluten-Free
      • Vegetarian
      • Copycat Recipes
    • Comfort Food
    • Recipes for Foodie Kids
    • Quick & Easy Weeknight Meals
  • Dinners
    • Beef
    • Pork
    • Chicken
    • Turkey
    • Seafood
    • Meatless
    • Pizza
    • Stir Fry
    • Sandwiches
    • Pasta
    • Salads
    • Soup & Chili
    • Casseroles
    • 30 Minute Meals
    • One Pot
    • Crockpot
    • Instant Pot
    • Grilling
    • Side Dishes
  • Desserts
    • Ice Cream
    • Cakes
    • Cheesecake
    • Pies
    • Cookies
    • Candy
    • No Bake Desserts
  • Holidays
    • Super Bowl
    • Valentine's Day
    • St. Patrick's Day
    • Easter
    • Cinco de Mayo
    • Mother's Day
    • Memorial Day
    • 4th of July
    • Labor Day
    • Halloween
    • Thanksgiving
    • Christmas
    • New Year's
    • Birthdays
  • Family
    • Parenting
    • Holidays & Celebrations
      • Birthdays
      • Valentine's Day
      • St. Patrick's Day
      • Easter
      • Mother's Day
      • Father's Day
      • Summer Picnics
      • Thanksgiving
      • Christmas
      • New Year's Eve
    • Kids activities
      • Kids Crafts
      • Christmas Crafts for Toddlers & Preschoolers
      • Christmas Crafts for Kids
      • Christmas Crafts for Tweens & Teens
  • Subscribe
menu icon
go to homepage
subscribe
search icon
Homepage link
  • SHOP
  • RECIPES
  • FAMILY
  • FAITH
  • HEALTH
    • Facebook
    • Pinterest
    • Twitter
  • ×
    See More:   Adult crafts Crafts & Hobbies Learning Preschoolers STEM

    Last Modified: May 26, 2022 by Tara Gerner 37 Comments

    How to Make a Geoboard

    22Facebook402PinterestXFlipboard
    424
    SHARES

    how to make a geoboardPin

    A few weeks ago, I discovered Pink and Green Mama's homemade geoboard project. I'd never heard of a geoboard before, let alone considered making one.

    A little girl using her geoboardPin

    After a little Googling, I thought a geoboard would be right up our alley. Geoboards allow kids to work with geometry concepts while playing. Essentially, the geoboard is a grid with pegs in it. Since I've started looking, I've seen them made from cheap plastic (think plastic plates), heavy plastic, wood, cork board, and even peg board.

    It took some time (waiting for glue to dry, waiting for paint to dry, finding time to measure the grid, etc.), but it was totally worth it. Grace loves her board, and we've played with it a couple of times a day every day since I finished it.

    We picked up the supplies we needed at the local hardware store, and we got started. The materials cost around $30. We could've gotten everything a lot cheaper if we'd driven a few miles to the big box store, but... we supported the local people.

    Materials for Making a Geoboard

    • 12" x 12" (or thereabouts) piece of wood
    • Sandpaper
    • Spray pain
    • Lots of push pins
    • Sparkly Mod Podge (not pictured)
    • Rubber band ball (not pictured)

    Geoboard materialsPin

    I wanted our geoboard to be one square foot, but our little hardware store didn't have any wood in that size. We ended up buying an 8-foot long plank (are they called planks?) of pine.  Fortunately, they did cut it for us, so we had a 1-foot long piece and a 7-foot long piece. I'm sure we'll think of something to do with the rest of the wood.

    How to Make a Geoboard

    1. The first step was to sand the wood so that there were no rough edges or splinters.
      A man sanding a boardPin
      Despite the expression on my dear husband's face (he wasn't ecstatic to be helping me with this project), sanding wood is quite easy. It just took a few minutes.
    2. Next, paint the wood.
      Grace wanted her geoboard to be purple. This presented a challenge as the little hardware store only sells gallons and spray paint in purple. I was not going to buy a $30 gallon of paint for this project. Spray paint was our only other option.
      Spray painting the geoboardPin
      I've never spray painted anything in my life, but it was easy enough to figure out. I do think I may have had the paint on too thick; it got a little drippy and sticky on the bottom.
      If it looks like I'm spray painting in the snow, it's because I am. The snow drift next to our driveway was almost as tall as me, so I had to carve out a little ledge and find something to put under the wood so that it wouldn't be sitting directly on the snow.
      Grace spray painting her geoboardPin
      I even let Grace believe that she helped to paint her board. As you might imagine, she loved that.
    3. I painted both sides of the board. I'm not sure what happened, but the board cracked while it was drying.
      Maybe because I sprayed too much paint on it?
      Because I had it sitting in the snow?
      I haven't a clue. I picked the least cracked side to be the top. I let the whole thing dry over night.
    4. The paint stayed tacky in some places (probably because I put on so much too much), so I decided to use some Modge Podge to seal it. I just so happened to have some sparkly Modge Podge, so it was a no-brainer.
      Sparkles make every project gaudier better, right?
      Painting sparkly Mod Podge on the geoboardPin
      I aimed for a thin, even coat of Modge Podge (except where the board had cracked; I really slathered it on there in hopes that it would sink down into the crack and glue it together).
      This was another instance in which Grace could contribute in a meaningful way, however, and she decided to use the Modge Podge to make a beautiful painting of Max & Ruby.
      In other words, the Modge Podge became a lot thicker and more glittery in some spots.
      I really, really wanted to even out the Modge Podge after Grace left the table, but I abstained. Partly because it had already started to dry, but also party because we'll someday look back on her board and smile about how she was painting it.
    5. The next step is more waiting. It took our Modge Podge a long time to dry.
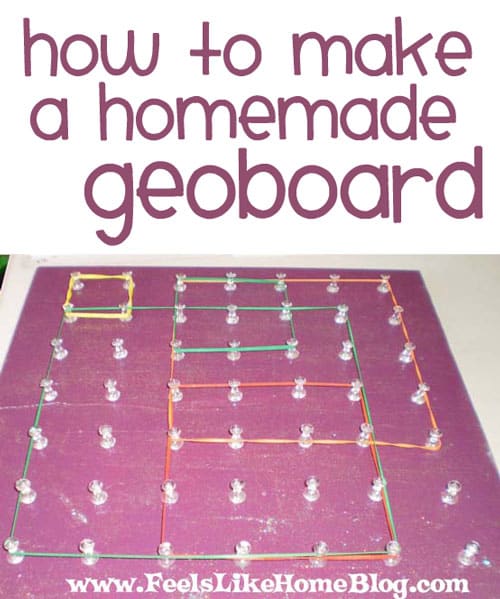
    6. Never actually having seen a geoboard before, I wasn't sure how big the grid should be.
      I was going to make the pins 2 inches apart with 1 inch on either side. That made sense, and I marked the spots with a silver Sharpie.
      Then I realized that the board was only 11 inches in one direction, so 2 inches apart wouldn't work. I had to go back and re-mark all of my pins at 1.5 inches. I used 2 rulers to make sure the grid was correct, and I made tiny Xs where the pins should go.
      Drill holes in a grid patternPin
    7. The last step was to push the push pins into the board. This part was a lot easier than I expected it to be.
      There was one vein across the exact center of the board where the pins just wouldn't go in. For that part, I used a craft punch  (you know, the metal kind) to push the pins in without breaking their little heads off.A close up of the board with push pins stuck in the holesPin
    8. The last step is to play!

    Playing with Your Homemade Geoboard

    We had a really good time playing with our geoboard. Here are a few of the things we did:

    A close up of the geoboard with rubber bands on itPin

    We counted the pins inside of rubber bands. Grace liked making the bands stretch longer and longer.

    Geoboard with rubber bandsPin

    We grouped our rubber bands by color.

    A close up of shapes on the homemade geoboardPin

    We made squares that were bigger and bigger and bigger.

    A close up of shapes on the homemade geoboardPin

    We made all different shapes.

    Triangles on the homemade geoboardPin

    We looked at the same and different.

    The letter G on the geoboardPin

    We made a G for Gracie. She never gets tired of that.

    We also made R, A, C, and E, but I didn't take a picture of those.

    The words MOM and DAD on the geoboardPin

    Some words are small enough to make on the board, so we did a little of that, too. Grace is starting to recognize a few words, so it's really fun for me to write things she knows.

    I don't know how I managed to not take a picture of our maze, but we also made a rubber band maze with our board. Grace's Littlest Pet Shop animals ran around the maze, and we tilted and turned the board around to make a marble go through it, too.

    I'm also thinking about making some cards with shapes that Grace can try to recreate. I think she'd like that, if she's got the fine motor skills to do it at this point.

    More Geoboard Resources

    • Giant homemade geoboard
    • Geoboard on Wikipedia
    • Geoboard activities
    • Geoboard activities for upper elementary
    • Using geoboards (has a variety of activities for different ages)

    [wp_eStore_ssf id=1 template="2" button_text="Get it now!"]

    22Facebook402PinterestXFlipboard
    424
    SHARES

    More Adult crafts

    • a close up of chocolate orange sugar scrub in a small jar
      Homemade DIY Chocolate Orange Sugar Scrub Recipe for Hands & Lips
    • A close up of cookie cutters
      10 Crafts to Make with Cookie Cutters
    • A homemade terrarium
      How to Make an Herb Terrarium for Under $15
    • DIY no sew gnome ornament with felt and faux fur
      No Sew DIY Gnome Christmas Ornaments

    Reader Interactions

    Comments

      Leave a Reply Cancel reply

      Your email address will not be published. Required fields are marked *

      Recipe Rating


    1. Monica says

      February 22, 2010 at 3:09 pm

      That is a cool looking board with so many options of play!

      Reply
    2. melissamhoward says

      February 22, 2010 at 10:56 am

      Ooooooooooooooooooooooooooh - I think I need to make one for my youngest, this would be right up her alley.

      Reply
    3. Kaysi (Keeping It Simple) says

      February 22, 2010 at 10:58 am

      That is such a great idea! I love it and so want to try it!

      Reply
    4. Laura says

      February 22, 2010 at 4:40 pm

      I love the idea of a geoboard!! I have never heard of such and I really appreciate you sharing your work!!

      Reply
    5. Allison says

      February 22, 2010 at 4:20 pm

      Grace looks like a sweetheart. The Geo board looks like a great learning tool she can use for years.

      I hope you'll swing by AtticMag this week to tour my home.
      Allison

      Reply
    6. Sandy says

      February 22, 2010 at 4:48 pm

      Thank you for such detailed instructions.. had to add this to my daughters FB.. she homeschools... Following from Monday giveaway...

      Reply
    7. FeelsLikeHomeBlog says

      February 22, 2010 at 5:33 pm

      Perfect! 🙂 Aside from the time it took for paint and Modge Podge to dry, this was really a quick project.

      Reply
    8. Satakieli says

      February 23, 2010 at 3:22 am

      This is a great DIY! I had one of those as a kid (although i didn't know what it was called until just now, lol) and I remember loving it and playing with it pretty much constantly!

      Mine wasn't anywhere as nice as this one though, just a plastic one!

      Reply
    9. amandascookin says

      February 23, 2010 at 6:42 am

      Oh how fun! I haven't seen one of those since I was a kid, never thought of making one myself 🙂

      Reply
    10. modpodgerocks says

      February 23, 2010 at 7:08 am

      So fun! I love it!

      Reply
    11. Jules says

      February 23, 2010 at 9:19 am

      Great idea. And sparkles are prettier especially if your little. Thanks for sharing with Made it Monday! Jules

      Reply
    12. Kelly Brumley says

      February 23, 2010 at 9:52 am

      This is awesome! I am so making this for my son and when I do I will link back here for sure! Thanks!

      Reply
    13. Kristi says

      February 23, 2010 at 1:17 pm

      what a great project! I am so doing this for my oldest daughter, thanks for the how to!

      Reply
    14. FeelsLikeHomeBlog says

      February 23, 2010 at 3:35 pm

      I don't remember ever seeing them before, but I sure like it! I might like it even more than Grace does. 🙂

      Reply
    15. FeelsLikeHomeBlog says

      February 23, 2010 at 3:37 pm

      My pleasure 🙂

      Reply
    16. FeelsLikeHomeBlog says

      February 23, 2010 at 3:38 pm

      My pleasure 🙂

      Reply
    17. kim~todays creative blog says

      February 23, 2010 at 3:42 pm

      great idea - do the push pins pop out ever with the pressure of the rubber bands?

      Reply
    18. FeelsLikeHomeBlog says

      February 23, 2010 at 4:43 pm

      They haven't. I made sure every single one was pushed in til its bottom was flat against the wood. If they ever do become loose, I'll put some glue into the hole.

      Reply
    19. Crystal says

      February 23, 2010 at 6:38 pm

      This is such a fantastic idea! I've been wanting one but I never thought to make one. This will be so fun for my girls.

      Reply
    20. FeelsLikeHomeBlog says

      February 23, 2010 at 7:04 pm

      It will! And they can help you make it. They'll love it, too. 🙂

      Reply
    21. Cheryl says

      February 23, 2010 at 7:32 pm

      What creative fun! SOOOO Makes My Monday, too! Thank you for playing along!

      Reply
    22. millermix says

      February 24, 2010 at 4:50 am

      Ooh, I love this. Two questions - where do you store the rubber bands when you aren't using them?

      Reply
    23. jennirobinson says

      February 24, 2010 at 7:12 am

      Thanks for posting this idea! Can't wait to make one for our girls. It will be a great help with homeschooling activities, especially keeping one occupied while helping the other.

      Reply
    24. FeelsLikeHomeBlog says

      February 24, 2010 at 5:03 pm

      There you go. 🙂 My sister tells me that Home Depot and Lowe's sometimes sell scraps of wood for under $1. I wish I'd thought of that!

      Reply
    25. FeelsLikeHomeBlog says

      February 24, 2010 at 5:21 pm

      I put them back on the rubber band ball or I wrap them loosely around pins on the board. Right now, we've got a big heart on the board. We never took it off. 🙂

      Reply
    26. Tiffany H says

      February 24, 2010 at 11:12 pm

      We made something similar to this last year with nails though...yours turned out lots prettier! 🙂
      Thanks for sharing

      Reply
    27. Fawnda says

      February 25, 2010 at 3:17 pm

      The math teacher in me LOVES this idea! Great job! I love the color! very fun!

      Reply
    28. Lori says

      February 26, 2010 at 8:46 am

      Very neat. I use to let my daughter think she was painting when she was younger.
      She always felt so proud..

      Thanks for joining Get your Craft on Thurs. Please join me next week for another great party.
      If you haven't entered my giveaway you still have time. http://lifeaslori.blogspot.com/2010/02/advertis...
      Lori

      Reply
    29. jennifer says

      February 26, 2010 at 1:57 pm

      My kids would love that. Super fun.

      Reply
    30. jenjen says

      February 26, 2010 at 11:00 pm

      Great instructions!!! I remember loving those when I was growing up. So cool! Thanks for linking up!

      XOOX
      Jen

      Reply
    Newer Comments »

    Primary Sidebar

    Hi, I'm Tara.

    Harrisburg PA mom blogger Tara Ziegmont
    I'm passionate about helping people to care for themselves and their families by offering a combination of easy & delicious recipes, family fun ideas, and Christian inspiration. If you're tired of feeling so weary and uninspired, you're in good company.

    If you don’t like cooking or don’t think you can cook, you're in the right place. Feels Like Home is all about simple recipes, and I promise you, ANYONE can make them! No one will ever question your cooking ability again.

    I'm so glad you're here!

    Read more about me...

    Facebook icon Twitter icon Pinterest icon Instagram icon LinkedIn icon envelope icon

    Recent posts:

    a white bowl full of canned chicken salad and topped with two pecan halves

    Canned Chicken Salad Recipe

    Scallops and pasta with asparagus in a white wine garlic butter sauce on a white plate

    Scallops and Pasta in White Wine Garlic Butter Sauce

    one warm turkey bacon wrap held in a napkin

    How to Make the Best Warm Turkey Bacon Wrap

    Hawaiian burger topped with grilled pineapple and caramelized onions on a sweet Hawaiian roll and cooked on the stove

    Hawaiian Burgers on the Stove

    AS SEEN ON

    a list of the websites where Tara Ziegmont has been featured

    Popular Recipes

    BBQ Chicken Enchiladas
    BBQ CHICKEN ENCHILADAS


    chicken and potatoes cooked in the crockpot
    CROCKPOT CHICKEN & POTATOES


    Pampered Chef Apple Crisp Recipe made with a Cake Mix
    CAKE MIX APPLE CRISP


    chocolate covered donuts
    BAKED OR FRIED CHOCOLATE COVERED DONUTS


    praline pecan pumpkin pie
    PRALINE PECAN PUMPKIN PIE


    heart shaped hand pies with cherry filling
    HEART-SHAPED CHERRY HAND PIES

    Footer

    ↑ back to top

    About

    • Privacy Policy
    • Disclaimer
    • Terms of Use
    • Accessibility
    • No AI

    As seen on

    a list of the websites where Tara Ziegmont has been featured

    Contact Tara


    As an Amazon Associate, I earn from qualifying purchases at no cost to you. Read my full disclosure policy.

    All content provided on Feels Like Home Blog is for informational purposes only. The owner of this site makes no representations as to the accuracy or completeness of any information on this site or found by following any link on this site.

    Copyright © 2007-2025 Feels Like Home Blog  | No content on this site, including text and photos, may be reused in any fashion without written permission.

    We use cookies on our website to give you the most relevant experience by remembering your preferences and repeat visits. By clicking “Accept”, you consent to the use of ALL the cookies.
    Do not sell my personal information.
    SettingsAccept
    Privacy & Cookies Policy

    Privacy Overview

    This website uses cookies to improve your experience while you navigate through the website. Out of these, the cookies that are categorized as necessary are stored on your browser as they are essential for the working of basic functionalities of the website. We also use third-party cookies that help us analyze and understand how you use this website. These cookies will be stored in your browser only with your consent. You also have the option to opt-out of these cookies. But opting out of some of these cookies may affect your browsing experience.
    Necessary
    Always Enabled
    Necessary cookies are absolutely essential for the website to function properly. This category only includes cookies that ensures basic functionalities and security features of the website. These cookies do not store any personal information.
    Non-necessary
    Any cookies that may not be particularly necessary for the website to function and is used specifically to collect user personal data via analytics, ads, other embedded contents are termed as non-necessary cookies. It is mandatory to procure user consent prior to running these cookies on your website.
    SAVE & ACCEPT