
A few weeks ago, I discovered Pink and Green Mama's homemade geoboard project. I'd never heard of a geoboard before, let alone considered making one.

After a little Googling, I thought a geoboard would be right up our alley. Geoboards allow kids to work with geometry concepts while playing. Essentially, the geoboard is a grid with pegs in it. Since I've started looking, I've seen them made from cheap plastic (think plastic plates), heavy plastic, wood, cork board, and even peg board.
It took some time (waiting for glue to dry, waiting for paint to dry, finding time to measure the grid, etc.), but it was totally worth it. Grace loves her board, and we've played with it a couple of times a day every day since I finished it.
We picked up the supplies we needed at the local hardware store, and we got started. The materials cost around $30. We could've gotten everything a lot cheaper if we'd driven a few miles to the big box store, but... we supported the local people.
Materials for Making a Geoboard
- 12" x 12" (or thereabouts) piece of wood
- Sandpaper
- Spray pain
- Lots of push pins
- Sparkly Mod Podge (not pictured)
- Rubber band ball (not pictured)

I wanted our geoboard to be one square foot, but our little hardware store didn't have any wood in that size. We ended up buying an 8-foot long plank (are they called planks?) of pine. Fortunately, they did cut it for us, so we had a 1-foot long piece and a 7-foot long piece. I'm sure we'll think of something to do with the rest of the wood.
How to Make a Geoboard
- The first step was to sand the wood so that there were no rough edges or splinters.

Despite the expression on my dear husband's face (he wasn't ecstatic to be helping me with this project), sanding wood is quite easy. It just took a few minutes. - Next, paint the wood.
Grace wanted her geoboard to be purple. This presented a challenge as the little hardware store only sells gallons and spray paint in purple. I was not going to buy a $30 gallon of paint for this project. Spray paint was our only other option.

I've never spray painted anything in my life, but it was easy enough to figure out. I do think I may have had the paint on too thick; it got a little drippy and sticky on the bottom.
If it looks like I'm spray painting in the snow, it's because I am. The snow drift next to our driveway was almost as tall as me, so I had to carve out a little ledge and find something to put under the wood so that it wouldn't be sitting directly on the snow.

I even let Grace believe that she helped to paint her board. As you might imagine, she loved that. - I painted both sides of the board. I'm not sure what happened, but the board cracked while it was drying.
Maybe because I sprayed too much paint on it?
Because I had it sitting in the snow?
I haven't a clue. I picked the least cracked side to be the top. I let the whole thing dry over night. - The paint stayed tacky in some places (probably because I put on so much too much), so I decided to use some Modge Podge to seal it. I just so happened to have some sparkly Modge Podge, so it was a no-brainer.
Sparkles make every project gaudier better, right?

I aimed for a thin, even coat of Modge Podge (except where the board had cracked; I really slathered it on there in hopes that it would sink down into the crack and glue it together).
This was another instance in which Grace could contribute in a meaningful way, however, and she decided to use the Modge Podge to make a beautiful painting of Max & Ruby.
In other words, the Modge Podge became a lot thicker and more glittery in some spots.
I really, really wanted to even out the Modge Podge after Grace left the table, but I abstained. Partly because it had already started to dry, but also party because we'll someday look back on her board and smile about how she was painting it. - The next step is more waiting. It took our Modge Podge a long time to dry.
- Never actually having seen a geoboard before, I wasn't sure how big the grid should be.
I was going to make the pins 2 inches apart with 1 inch on either side. That made sense, and I marked the spots with a silver Sharpie.
Then I realized that the board was only 11 inches in one direction, so 2 inches apart wouldn't work. I had to go back and re-mark all of my pins at 1.5 inches. I used 2 rulers to make sure the grid was correct, and I made tiny Xs where the pins should go.

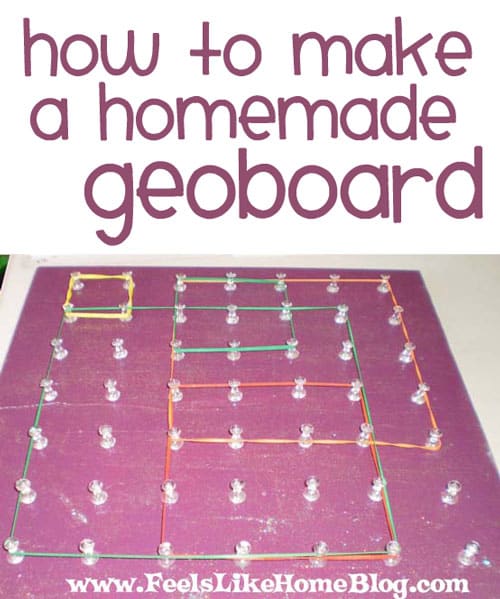
- The last step was to push the push pins into the board. This part was a lot easier than I expected it to be.
There was one vein across the exact center of the board where the pins just wouldn't go in. For that part, I used a craft punch (you know, the metal kind) to push the pins in without breaking their little heads off.
- The last step is to play!


Playing with Your Homemade Geoboard
We had a really good time playing with our geoboard. Here are a few of the things we did:

We counted the pins inside of rubber bands. Grace liked making the bands stretch longer and longer.

We grouped our rubber bands by color.

We made squares that were bigger and bigger and bigger.

We made all different shapes.

We looked at the same and different.

We made a G for Gracie. She never gets tired of that.
We also made R, A, C, and E, but I didn't take a picture of those.

Some words are small enough to make on the board, so we did a little of that, too. Grace is starting to recognize a few words, so it's really fun for me to write things she knows.
I don't know how I managed to not take a picture of our maze, but we also made a rubber band maze with our board. Grace's Littlest Pet Shop animals ran around the maze, and we tilted and turned the board around to make a marble go through it, too.
I'm also thinking about making some cards with shapes that Grace can try to recreate. I think she'd like that, if she's got the fine motor skills to do it at this point.
More Geoboard Resources
- Giant homemade geoboard
- Geoboard on Wikipedia
- Geoboard activities
- Geoboard activities for upper elementary
- Using geoboards (has a variety of activities for different ages)
[wp_eStore_ssf id=1 template="2" button_text="Get it now!"]


Lenetta @ Nettacow says
Nice work, and I love the colors! :>) I linked to this on my weekly roundup, post is under my name. Thanks for sharing!
Lenetta @ Nettacow says
Nice work, and I love the colors! :>) I linked to this on my weekly roundup, post is under my name. Thanks for sharing!
Bobbi Gregory says
I love this. I think my kiddos would too. Thanks for the step by step pictures..I love tutorials like that:)
fasteners Wholesaele says
Hi,
It is really very useful article for making a Geoboard.
Thanks
Rockermom says
I made one of these for my son when he was two. He loved it!!!
http://thelintonacademy.blogspot.com/2009/07/geoboard-for-my-tot.html
shivam bansal says
thats a better way of making a geo board